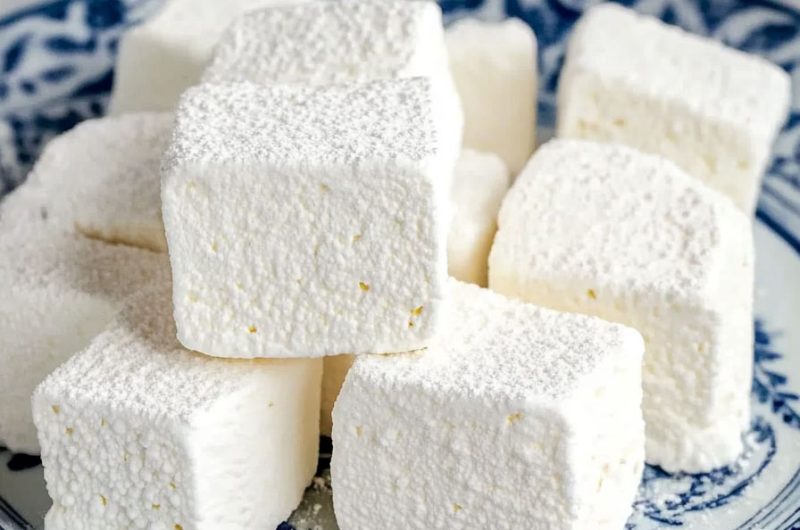
Vanilla Marshmallows
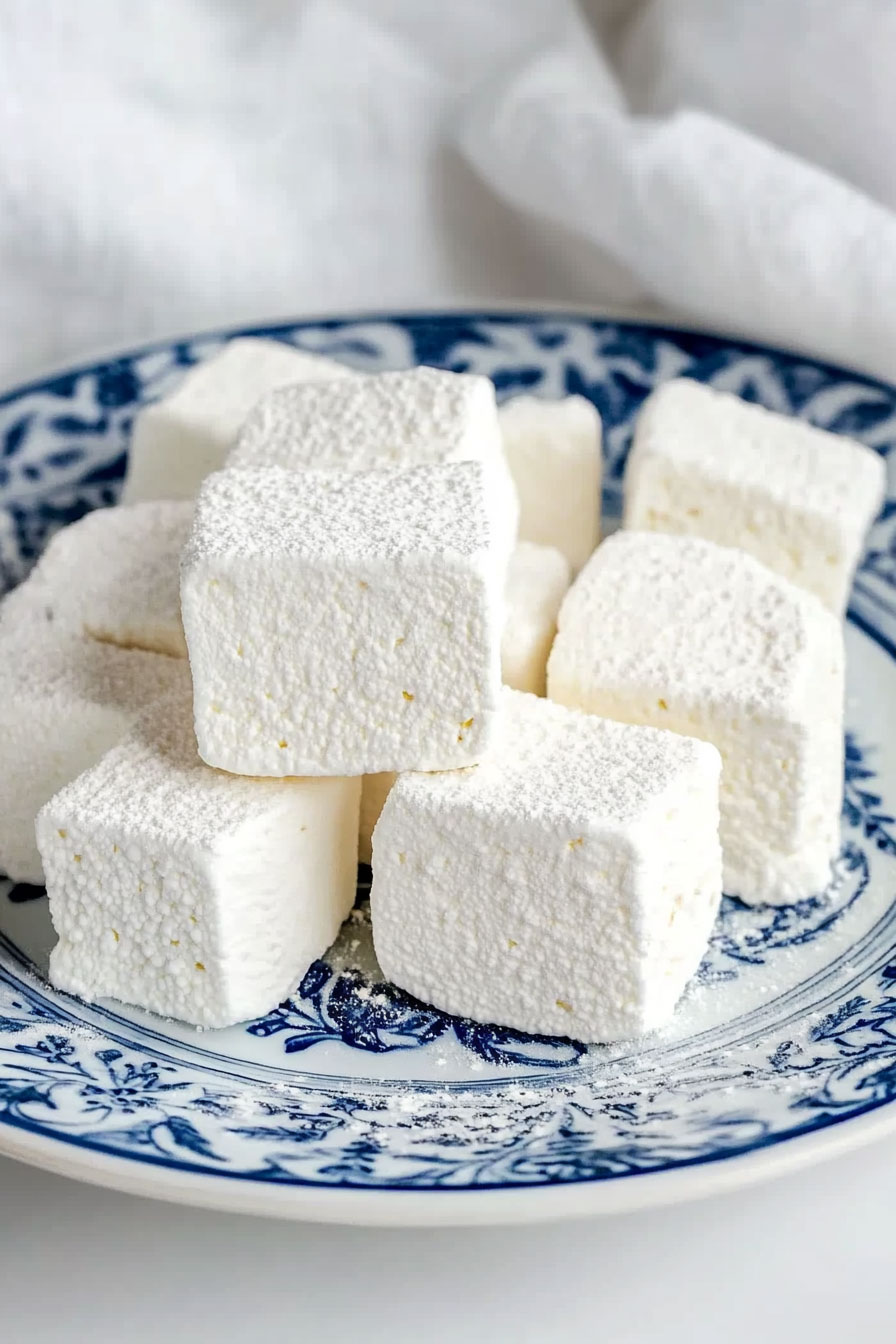
Vanilla Marshmallows are one of those treats that feel extra magical when made at home. They turn out soft, fluffy, and so much better than the store-bought kind. Honestly, I was surprised the first time I tasted how fresh and sweet they were.
I love this recipe because it feels fun and simple at the same time. The vanilla flavor is light and cozy, and the texture stays pillowy soft. Umm, they’re perfect for hot chocolate, snacks, or sweet homemade gifts too.
If you want a treat that feels homemade, fluffy, and extra special, these Vanilla Marshmallows are such a great choice. I’ll show you how I make them step by step, so you can enjoy every soft and sweet bite at home too.
Why You’ll Love This Recipe
- Melt-in-Your-Mouth Texture: These marshmallows are light, fluffy, and infinitely better than anything from the store.
- Customizable: Add your favorite flavors or colors to make them truly unique.
- Perfect for Gifting: Package them up beautifully for birthdays, holidays, or just because.
- Beginner-Friendly: With a little patience and the right tools, anyone can make these marshmallows.
- Budget-Friendly: Homemade marshmallows cost less than premium store-bought ones.
Required Kitchen Tools
To make marshmallows at home, you’ll need a few essential tools:
- Stand Mixer or Hand Mixer: A stand mixer is ideal for whipping the marshmallow mixture, but a hand mixer works too.
- Candy Thermometer: Precision is key, and a candy thermometer ensures you heat the syrup to the perfect temperature.
- 9×9-inch Pan: For thick marshmallows, or use a larger pan for thinner ones.
- Parchment Paper or Silicone Mat: Prevents sticking and makes removal a breeze.
- Offset Spatula: Useful for spreading the mixture evenly.
Ingredients for Homemade Vanilla Marshmallows
Here’s what you’ll need to create these fluffy delights:
For the Bloom:
- 5 teaspoons unflavored gelatin (approximately 2 standard 1/4-ounce packets)
- 1/2 cup cold water
For the Syrup:
- 1/2 cup light corn syrup, divided
- 3/4 cup granulated sugar
- 1/4 cup water
- 1/8 teaspoon salt
For the Mallowing:
- 2 teaspoons pure vanilla extract
- 1/2 cup classic coating (recipe below)
For the Classic Coating (Large Batch Recipe):
- 1 1/2 cups powdered sugar
- 1 cup cornstarch
Tip: Make extra classic coating to store for future batches. It prevents sticking and adds a light sweetness.
Step-by-Step Instructions
1. Prepare the Bloom
- In the bowl of a stand mixer, sprinkle the gelatin evenly over 1/2 cup of cold water. Allow it to sit for 5-10 minutes until fully bloomed (it will appear thick and jelly-like). Attach the whisk attachment to your mixer and set the bowl aside.
2. Cook the Syrup
- In a medium saucepan, combine 1/4 cup of the corn syrup, granulated sugar, 1/4 cup water, and salt. Stir over medium heat until the sugar dissolves.
- Attach a candy thermometer to the side of the pan. Increase the heat to medium-high and let the mixture boil without stirring until it reaches 240°F (soft-ball stage). Remove the pan from heat.
3. Whip the Marshmallow Mixture
- Turn the stand mixer on low and slowly pour the hot syrup into the bloomed gelatin. Be cautious to pour along the side of the bowl to prevent splattering.
- Once all the syrup is added, increase the speed to high and whip for 8-10 minutes. The mixture should triple in volume, become thick, and appear glossy.
- Add the vanilla extract during the last minute of whipping.
4. Prepare the Pan and Spread the Mixture
- While the marshmallow mixture is whipping, grease a 9×9-inch pan with nonstick spray and dust generously with the classic coating.
- Once the mixture is ready, use a greased spatula or offset spatula to spread it evenly into the prepared pan. Dust the top with more classic coating.
- Let the marshmallows sit uncovered at room temperature for at least 6 hours or overnight to set.
5. Cut and Coat the Marshmallows
- Once set, turn the marshmallow slab onto a clean surface dusted with classic coating.
- Use a sharp knife or pizza cutter, coated with classic coating, to cut the marshmallows into desired shapes. Toss each piece in the classic coating to prevent sticking.
Variations for Vanilla Marshmallows
- Flavored Marshmallows: Add peppermint extract, almond extract, or even cocoa powder for different flavors.
- Colored Marshmallows: Mix in food coloring during the whipping stage for fun, vibrant colors.
- Shaped Marshmallows: Use cookie cutters to create stars, hearts, or other fun shapes.
- Gourmet Add-Ons: Drizzle with melted chocolate or roll in crushed nuts for a fancy touch.
How to Serve Vanilla Marshmallows
These versatile marshmallows can be enjoyed in countless ways:
- Hot Chocolate: Add a couple of marshmallows for a melty, sweet topping.
- S’mores: Layer between graham crackers and chocolate for a classic treat.
- Gifting: Wrap them in cellophane bags with a ribbon for a thoughtful homemade gift.
- Dessert Topping: Dice them and sprinkle over cakes, cupcakes, or ice cream.
- Snack Attack: Enjoy them as-is for a sweet, pillowy snack.
Storing Homemade Marshmallows
- Room Temperature: Store marshmallows in an airtight container for up to 2 weeks. Dust layers with classic coating to prevent sticking.
- Freezing Marshmallows: Freeze marshmallows in a freezer-safe bag for up to 3 months. Let them thaw at room temperature before using.
Nutrition Information (per serving)
| Serving Size | 1 Marshmallow (approx. 1×1-inch square) |
|---|---|
| Calories | 25 |
| Fat | 0g |
| Carbohydrates | 6g |
| Sugar | 4g |
| Protein | 0.5g |
Vanilla Marshmallows
Course: Uncategorized36
marshmallows10
minutes15
minutes25
kcal6
hoursIngredients
For the Bloom: 5 tsp unflavored gelatin, 1/2 cup cold water
For the Syrup: 1/2 cup light corn syrup, 3/4 cup sugar, 1/4 cup water, 1/8 tsp salt
For the Mallowing: 2 tsp vanilla extract, 1/2 cup classic coating
For the Classic Coating: 1 1/2 cups powdered sugar, 1 cup cornstarch
Directions
- Bloom gelatin in cold water.
- Cook syrup to 240°F and whip into gelatin.
- Spread whipped mixture into a prepared pan.
- Let set for 6+ hours.
- Cut, coat, and enjoy!
Conclusion
Vanilla Marshmallows are one of those homemade treats that feel simple but so special. The soft fluffy texture and sweet vanilla flavor taste much better than store-bought ones. Honestly, once I made them at home for the first time, I didn’t want to go back. I hope these Vanilla Marshmallows bring a little fun and sweetness to your kitchen too. They’re perfect for hot chocolate, gifting, or enjoying as a soft little snack anytime. Once you try them fresh and fluffy, you’ll probably want to make another batch again soon.
FAQs About Vanilla Marshmallows
Can I make these without a candy thermometer?
While a thermometer is ideal for precision, you can use the soft-ball stage test by dropping a bit of syrup into cold water—it should form a soft, pliable ball.
Can I use agar-agar instead of gelatin?
Yes, agar-agar works for a vegetarian option, but the texture will differ slightly.
Can I reduce the sugar?
Marshmallows rely on sugar for structure, so reducing it may affect the outcome.
Enjoy these homemade vanilla marshmallows as a delightful treat for any occasion!