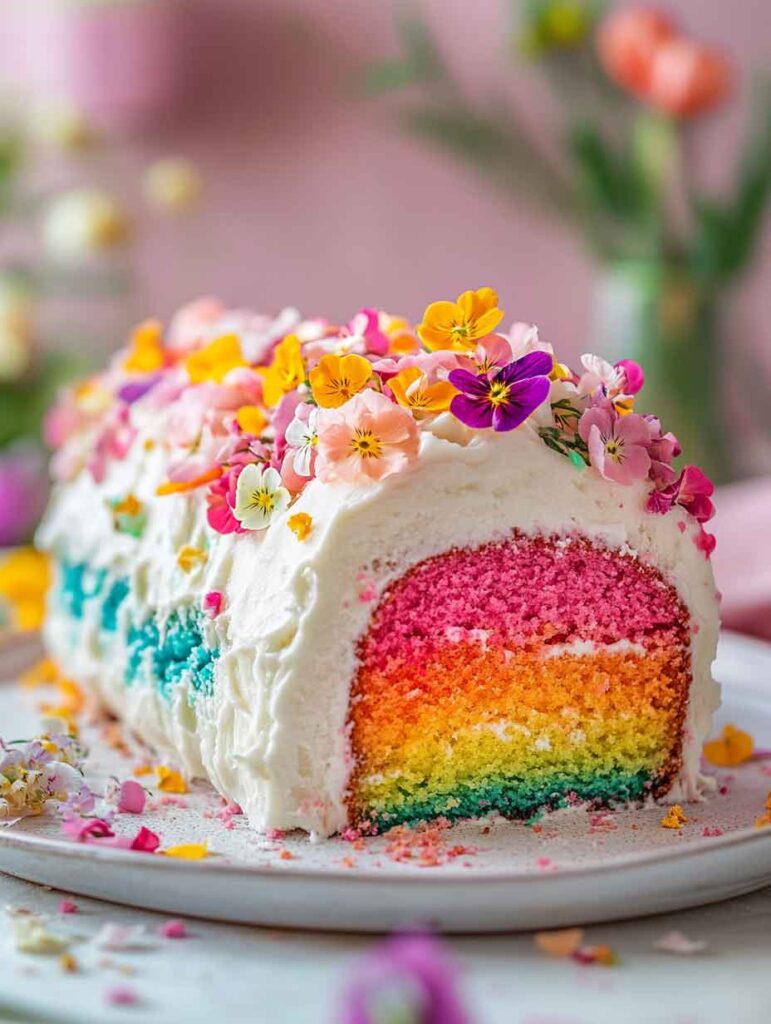
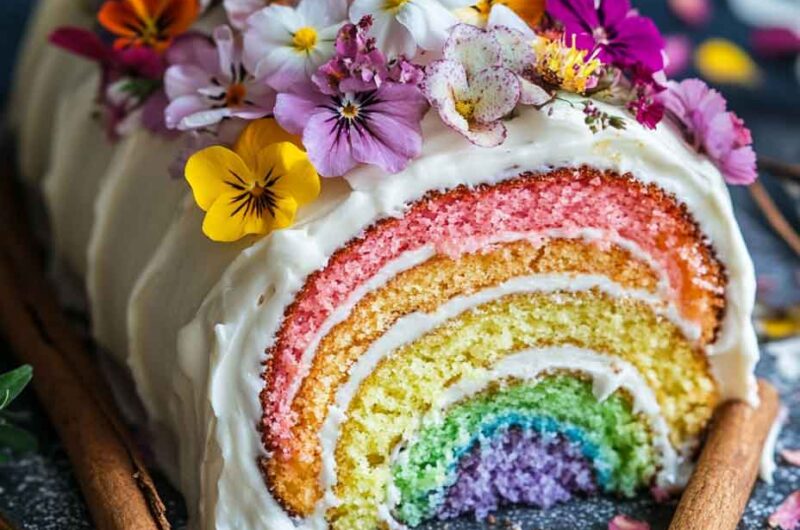
Watercolor Cake Roll: A Stunning Treat for Amateurs
A Stunning Treat for Amateurs is the perfect dessert to impress with minimal effort. The soft, fluffy cake paired with vibrant, watercolor-like swirls makes this treat look like a masterpiece! And the best part? It’s surprisingly easy to make, even for beginners.
I was amazed at how simple it was to create such a beautiful dessert. The swirls of color make it look like something you’d find at a fancy bakery, but it’s all homemade! Trust me, if I can do it, so can you.
Whether you’re making it for a special occasion or just for fun, this cake roll is guaranteed to be a hit. So, grab your ingredients, and let’s get started on creating this stunning, delicious treat together!

Why You’ll Love This Recipe
- Beginner-Friendly: You don’t need to be a professional baker or an artist to create a stunning watercolor effect.
- Soft and Fluffy Texture: The sponge cake is light, airy, and perfectly balanced with the creamy filling.
- Customizable Colors: Choose any combination of colors to match your event or personal style.
- Perfect for Any Occasion: Impress guests at birthdays, baby showers, or tea parties with this eye-catching dessert.
- A Fun and Creative Project: Get creative with edible “painting” and make a unique cake every time.
Required Kitchen Tools
To create this masterpiece, you’ll need:
- Mixing bowls
- Electric mixer or hand whisk
- Sifter
- Jelly roll pan (or baking sheet with raised edges)
- Parchment paper
- Offset spatula
- Clean kitchen towel
- Small paintbrush or food-safe brush
- Piping bag (optional, for filling)
Ingredients
For the Cake Batter:
- 4 large eggs (room temperature)
- ¾ cup (150g) granulated sugar
- 1 teaspoon vanilla extract
- ⅓ cup (80ml) milk (room temperature)
- 1 cup (120g) cake flour (sifted)
- 1 teaspoon baking powder
- A pinch of salt
For the Whipped Cream Filling:
- 1 cup (240ml) heavy whipping cream
- ¼ cup (30g) powdered sugar
- 1 teaspoon vanilla extract
For the Watercolor Effect:
- Gel food coloring (choose 2-3 colors of your choice)
- 1 teaspoon of water (per color, for thinning)
- Small paintbrush or food-safe brush
Step-by-Step Instructions
Step 1: Prepare the Cake Batter
- Preheat the oven to 350°F (175°C). Line a jelly roll pan with parchment paper, leaving extra overhang for easy removal.
- In a large mixing bowl, whisk the eggs and sugar together until the mixture becomes pale and fluffy (about 3-4 minutes). The volume should nearly double.
- Add vanilla extract and milk, mixing gently to combine.
- Sift the flour, baking powder, and salt together, then fold them into the wet ingredients using a spatula. Be careful not to deflate the batter—use light folding motions.
Step 2: Bake the Cake
- Pour the batter into the prepared pan, spreading it evenly with an offset spatula.
- Bake for 10-12 minutes, or until the top is lightly golden and the cake springs back when touched. Avoid overbaking, as this can make the cake difficult to roll.
Step 3: Roll the Cake While Warm
- Once baked, immediately remove the cake from the pan using the parchment paper overhang.
- Place a clean kitchen towel on the counter and lightly dust it with powdered sugar.
- Carefully flip the cake onto the towel, then peel off the parchment paper.
- While the cake is still warm, roll it up gently with the towel (starting from the short end). This step helps the cake keep its rolled shape and prevents cracking later.
- Let the rolled cake cool completely at room temperature.
Step 4: Prepare the Whipped Cream Filling
Once the cake has cooled completely, it’s time to make the filling!
- In a large mixing bowl, add heavy whipping cream, powdered sugar, and vanilla extract.
- Using a hand mixer or stand mixer, beat on medium-high speed until soft peaks form. This should take 2-3 minutes.
- Be careful not to overwhip—if the cream turns grainy, it’s been overbeaten. If this happens, add a small amount of fresh cream and mix gently to smooth it out.
- Store in the refrigerator until ready to use.
Step 5: Fill and Re-Roll the CakeNow comes the fun part—assembling the cake roll!
- Unroll the cooled cake carefully to avoid cracks. If any small cracks appear, don’t worry—the watercolor design will help disguise them.
- Spread the whipped cream filling evenly over the cake using an offset spatula. Leave about ½ inch of space around the edges to prevent overflow when rolling.
- Gently roll the cake back up, this time without the towel, using the parchment paper to help guide the roll.
- Wrap the cake roll tightly in plastic wrap and refrigerate for at least 1 hour to help it set and hold its shape.
Step 6: Create the Watercolor Effect
Choosing Your Colors
Pick 2-3 gel food colors that complement each other. Pastel shades work beautifully for a soft watercolor effect, while vibrant hues create a more dramatic look.
Mixing the Colors
- In small bowls, dilute each gel food color with a few drops of water to create a paintable liquid.
- Test your colors on a piece of parchment paper before applying them to the cake.
Painting the Cake
- Remove the cake roll from the refrigerator and place it on a serving platter.
- Dip a clean paintbrush or food-safe brush into one of the colors and lightly dab or brush it onto the cake’s surface.
- Repeat with the other colors, blending them slightly where they overlap for a soft watercolor effect.
- For a more natural look, use a damp paper towel to gently blot areas where the colors look too intense.
Step 7: Serving and Presentation
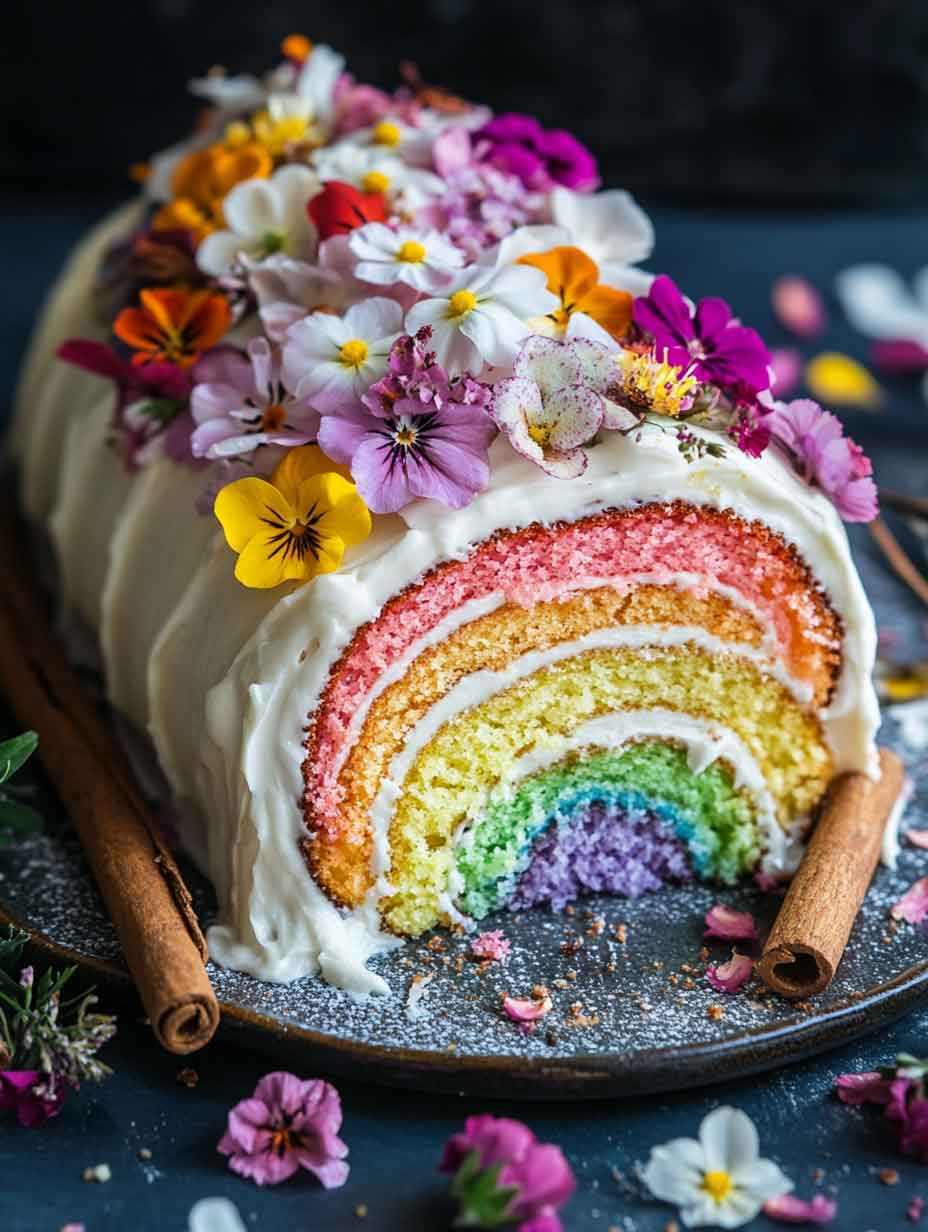
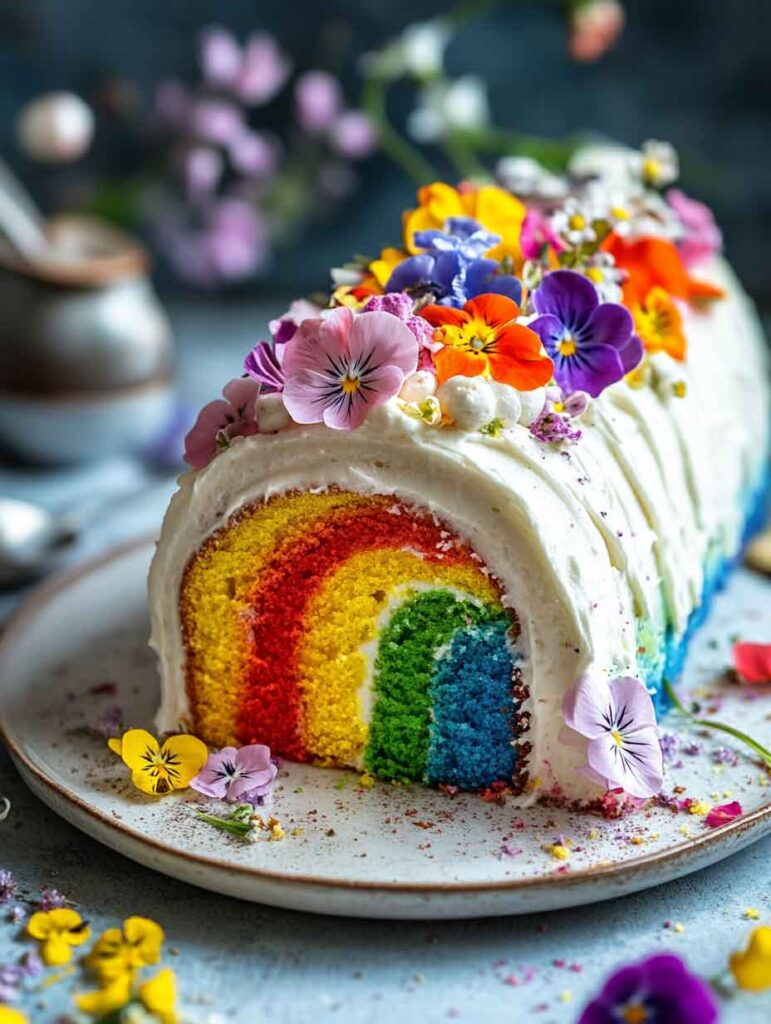
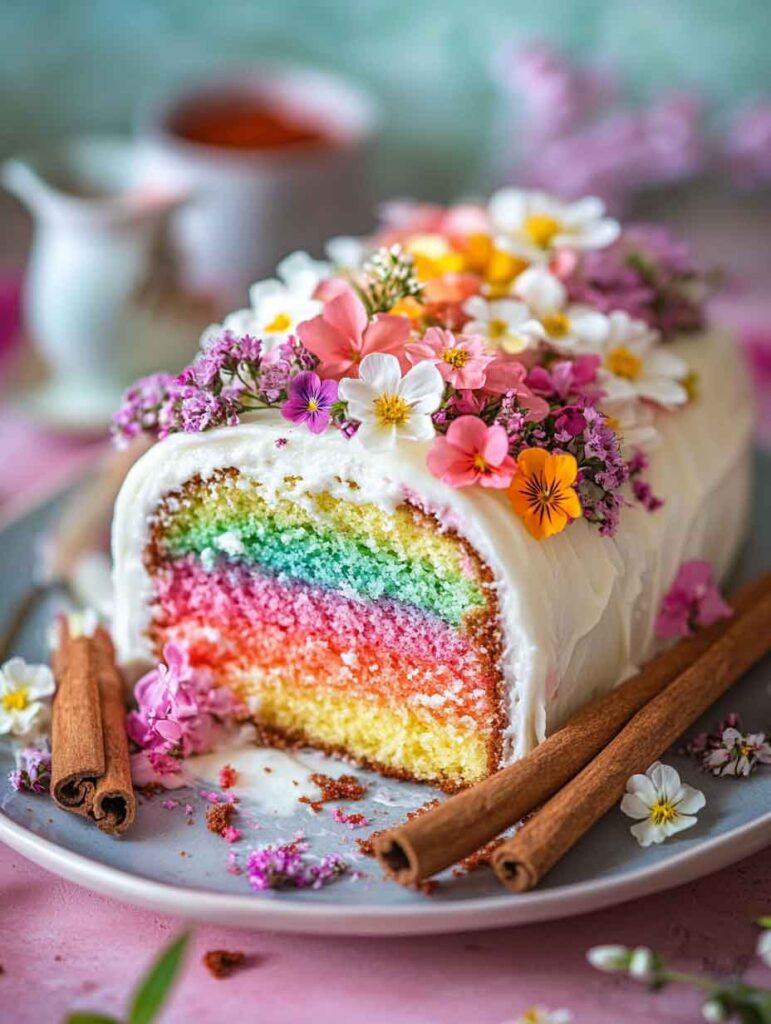
Once your watercolor cake roll is beautifully decorated, it’s time to slice and serve!
- Use a sharp serrated knife for clean slices. Wipe the blade with a damp cloth between cuts to keep the slices neat.
- Serve chilled or slightly at room temperature for the best texture.
- Garnish options: Dust with powdered sugar, top with edible flowers, or drizzle with white chocolate for extra flair.
Serving Ideas:
- With Fresh Fruit: Pair with strawberries, raspberries, or blueberries for a refreshing touch.
- With a Side of Ice Cream: A scoop of vanilla or berry-flavored ice cream complements the soft cake.
- For Special Occasions: This cake makes a stunning centerpiece for birthdays, bridal showers, or afternoon tea.
Storage and Make-Ahead Tips
How to Store the Cake Roll
- Refrigerator: Store the cake roll in an airtight container for up to 3 days. This prevents it from drying out while keeping the filling fresh.
- Freezer: Wrap the cake roll tightly in plastic wrap, then in aluminum foil. Freeze for up to 1 month. Thaw overnight in the fridge before serving.
Make-Ahead Tips
- The cake can be baked and rolled (without filling) a day in advance. Keep it wrapped in plastic wrap until ready to fill.
- The whipped cream filling can be made ahead and stored in the fridge for up to 24 hours.
- The fully decorated cake roll can be refrigerated overnight for easy serving the next day.
Variations for Your Watercolor Cake Roll
Want to customize this recipe? Try these fun variations!
Flavor Twists
- Lemon Raspberry: Add 1 teaspoon of lemon zest to the cake batter and spread raspberry jam under the whipped cream.
- Chocolate Marble: Replace ¼ cup of flour with cocoa powder for a chocolate swirl effect.
- Strawberry Shortcake: Mix finely chopped strawberries into the whipped cream for a fruity filling.
Creative Decorating Ideas
- Gold Accents: Use edible gold dust to add a glamorous touch to the watercolor design.
- Ombre Effect: Blend colors from light to dark for a gradient watercolor look.
- Sprinkles & Glitter: Add edible glitter or pearl sprinkles for a fun party cake.
Tips and Tricks for Success
✔ Use Room Temperature Ingredients: Cold eggs won’t whip properly, and cold milk can deflate the batter.
✔ Don’t Overbake the Cake: A dry cake will crack when rolled. Remove it from the oven as soon as it’s lightly golden.
✔ Roll the Cake While Warm: This prevents cracking and helps it hold its shape.
✔ Chill Before Slicing: A well-chilled cake holds its shape better and slices cleanly.
✔ Be Gentle with the Paintbrush: Light strokes create a soft watercolor effect without damaging the cake surface.
Recipe Card: Watercolor Cake Roll
Watercolor Cake Roll – A Stunning Treat for Amateurs
Yield: 8-10 servings
Prep Time: 30 minutes
Bake Time: 10-12 minutes
Chill Time: 1 hour
Total Time: ~2 hours
Watercolor Cake Roll: A Stunning Treat for Amateurs
Course: Uncategorized8-10
servings30
minutes10
minutes220
kcal1
hoursIngredients
- For the Cake Batter:
4 large eggs (room temperature)
¾ cup (150g) granulated sugar
1 teaspoon vanilla extract
⅓ cup (80ml) milk (room temperature)
1 cup (120g) cake flour (sifted)
1 teaspoon baking powder
A pinch of salt
- For the Whipped Cream Filling:
1 cup (240ml) heavy whipping cream
¼ cup (30g) powdered sugar
1 teaspoon vanilla extract
- For the Watercolor Effect:
Gel food coloring (choose 2-3 colors of your choice)
1 teaspoon of water (per color, for thinning)
Small paintbrush or food-safe brush
Directions
- Prepare the Cake Batter
- Preheat oven to 350°F (175°C). Line a jelly roll pan with parchment paper.
- In a large bowl, whisk eggs and sugar together until fluffy and pale (about 3-4 minutes).
- Add vanilla extract and milk, mixing gently.
- Sift together flour, baking powder, and salt, then fold them into the wet ingredients. Be careful not to deflate the batter.
- Bake the Cake
- Pour batter into the prepared pan and spread evenly.
- Bake for 10-12 minutes, or until the cake is lightly golden and springs back when touched.
- Roll the Cake While Warm
- Remove cake from the oven and flip onto a clean kitchen towel dusted with powdered sugar.
- Peel off the parchment paper and roll the cake (with the towel) from the short side. Let it cool completely.
- Make the Whipped Cream Filling
- In a bowl, beat heavy cream, powdered sugar, and vanilla extract until soft peaks form.
- Fill and Roll the Cake
- Unroll the cooled cake and spread the whipped cream evenly.
- Gently roll it back up, wrap in plastic wrap, and chill for 1 hour.
- Create the Watercolor Effect
- Thin gel food coloring with a few drops of water.
- Using a small paintbrush, lightly dab or brush colors onto the cake. Blend for a soft watercolor effect.
- Serve and Enjoy
- Slice with a serrated knife, wiping between cuts for clean slices.
- Serve chilled and enjoy!
Watercolor Cake Roll FAQs
1. How do I prevent my cake from cracking?
- Roll the cake while it’s still warm using a towel to shape it.
- Avoid overbaking, as a dry cake is more likely to crack.
2. Can I use regular all-purpose flour instead of cake flour?
Yes! Replace 1 cup of cake flour with 1 cup all-purpose flour minus 2 tablespoons, plus 2 tablespoons cornstarch for a lighter texture.
3. Can I use buttercream instead of whipped cream?
Yes! Buttercream will make the roll sturdier and more decadent. Just make sure it’s spread in a thin layer to prevent difficulty rolling.
4. How long does the cake roll last?
- Refrigerator: 3 days in an airtight container.
- Freezer: Up to 1 month (wrapped in plastic + foil). Thaw overnight before serving.
5. Can I use natural food coloring for the watercolor effect?
Yes! Natural colors like beet juice (pink), matcha (green), and turmeric (yellow) work well, but the colors will be softer.
Nutrition Information (Per Serving, Approximate Values)
| Nutrient | Amount |
|---|---|
| Calories | 220 kcal |
| Carbohydrates | 30g |
| Protein | 4g |
| Fat | 10g |
| Saturated Fat | 6g |
| Cholesterol | 90mg |
| Sodium | 60mg |
| Fiber | 0.5g |
| Sugar | 20g |
Note: Nutritional values may vary based on ingredient brands and portion sizes.
Conclusion
The Watercolor Cake Roll is more than just a dessert—it’s a work of art! Its light, fluffy sponge cake, dreamy whipped cream filling, and stunning hand-painted watercolor effect make it the ultimate showstopper for any occasion. Best of all, you don’t need to be an expert baker or artist to create this masterpiece—just a few simple techniques and a touch of creativity!
This cake is perfect for birthdays, baby showers, weddings, or anytime you want to impress your guests. Plus, you can customize the colors and flavors to match any theme!