Ugly Sweater Cake
You know those holiday sweaters that are so silly but also so fun? Yeah, that’s exactly what this cake feels like. It’s bright, it’s playful, and it makes everyone smile right away.
I love how it’s not just cake—it’s kind of a joke on the table too. The colors pop, the frosting looks wild, and it turns dessert into a party starter.
And the best part? It’s actually easy to make, even if it looks fancy. Once you try it, you’ll see how much fun it is to bake and share.
Would you like me to also make a nutrition box for Ugly Sweater Cake, the way you asked earlier for Danish Butter Cookies and Black Forest Cheesecake?
Why You’ll Love This Ugly Sweater Cake Recipe
- Holiday Cheer in Every Bite: The bright, playful design will get everyone in the holiday spirit.
- Easy to Make: It’s surprisingly simple with the help of a box cake mix and store-bought frosting, plus some fun toppings to create the sweater look.
- Great for All Ages: Kids will love helping decorate, and adults will appreciate the nostalgic vibes.
- Make-Ahead Friendly: Bake the cake in advance and decorate just before serving.
- Perfect for Holiday Gatherings: This cake is sure to be a conversation starter at your holiday party, with its charming and quirky design.
Required Kitchen Tools
Before you begin, make sure you have the following tools on hand to make the process smooth and easy:
- Cake Pans (9-inch or 8-inch): You’ll need two round cake pans to create the layers of the Ugly Sweater Cake.
- Mixing Bowls: For mixing the cake ingredients and frosting.
- Hand or Stand Mixer: To blend the cake batter and frosting smoothly.
- Spatula: For spreading frosting evenly.
- Piping Bags & Decorating Tips: These are key for creating the sweater pattern on the cake.
- Cooling Rack: To cool the cake layers before frosting them.
- Knife or Cake Leveler: To level the cake layers if necessary for a smooth, even look.
Ingredients
For this holiday cake, we’ll use a mix of boxed and homemade ingredients to create a delicious and visually stunning cake that everyone will love. Here’s what you’ll need (exact measurements are in the recipe card below):
- Betty Crocker™ Super Moist™ White Cake Mix: This cake mix provides a light and fluffy base. All you need to add is water, vegetable oil, and eggs—easy peasy!
- Green Gel Food Coloring: To give the cake that vibrant, holiday look.
- Red Gel Food Coloring: For a contrasting pop of color to make the “sweater” stand out.
- Betty Crocker™ Rich & Creamy Vanilla Frosting: A creamy, smooth frosting that’s perfect for spreading and decorating.
- Soft Peppermint Candies: For adding some cute, festive details to the cake.
- Betty Crocker™ Black Cookie Icing: Use this for creating the outlines and details on the sweater design.
- M&M’s® Candy-Coated Milk Chocolate Candies: These add fun color and texture to the sweater design. We’ll use green, yellow, blue, red, orange, and brown.
- Miniature Candy Canes: These add a touch of peppermint flavor and are perfect for creating cute “sweater” details.
- Red Spice-Flavored Gumdrops: Cut these in half to use as buttons or other decorative elements on the sweater.
- Betty Crocker™ Candy Shoppe Eyeballs: These can be used to create a fun, quirky pattern on the sweater.
- Red Cinnamon Candy: Perfect for adding some fun texture to the cake.
- Reese’s Peanut Butter Cup: This mini treat will help create a fun design element on the cake.
- Hershey’s Kisses Brand Milk Chocolate: Perfect for adding a chocolatey element to the sweater design.
- Mini Pretzel Twist: Broken in half, these add texture and a bit of crunch to the cake design.
Step-by-Step Instructions for Making the Ugly Sweater Cake
Now that we have all our ingredients and tools ready, let’s walk through the process of making this fun and festive Ugly Sweater Cake!
1. Bake the Cake
Preheat and Prepare:
Start by preheating your oven to 350°F (175°C). Grease and flour your cake pans so the cake layers won’t stick.
Mix the Cake Batter:
In a large bowl, follow the instructions on the cake mix box. Combine the cake mix, water, vegetable oil, and eggs. Use a hand or stand mixer to blend the ingredients until smooth.
Add the Food Coloring:
Divide the cake batter into two equal portions. In one bowl, add the green gel food coloring and mix it well until the batter is bright green. In the other bowl, add the red gel food coloring and mix it until the batter turns a vibrant red.
Bake the Cakes:
Pour each batter into one of the prepared cake pans. Place the pans in the preheated oven and bake for 25-30 minutes, or until a toothpick inserted into the center of the cakes comes out clean.
Cool the Cakes:
Once the cakes are done, remove them from the oven and allow them to cool in the pans for 10 minutes. Then, remove the cakes from the pans and transfer them to a wire rack to cool completely before frosting.
2. Prepare the Frosting
While the cakes are cooling, you can prepare the frosting. Open two tubs of Betty Crocker™ Rich & Creamy Vanilla Frosting. Set aside a small amount for any details you’ll want to add with piping bags. You can tint the frosting green or red if desired, but it’s not necessary unless you want to match the sweater design more closely.
3. Assemble the Ugly Sweater Cake
Level the Cake Layers:
Once the cakes have cooled, use a cake leveler or knife to carefully trim the tops of the cakes to make them flat and even. This will give you a smooth surface for frosting.
Stack the Layers:
Place the green cake layer on the bottom and spread a thin layer of frosting on top. Place the red cake layer on top of the green layer.
Frost the Cake:
Cover the entire cake with a smooth layer of frosting. You can use a spatula to spread the frosting evenly over the top and sides of the cake. Be sure to make the frosting layer as smooth as possible.
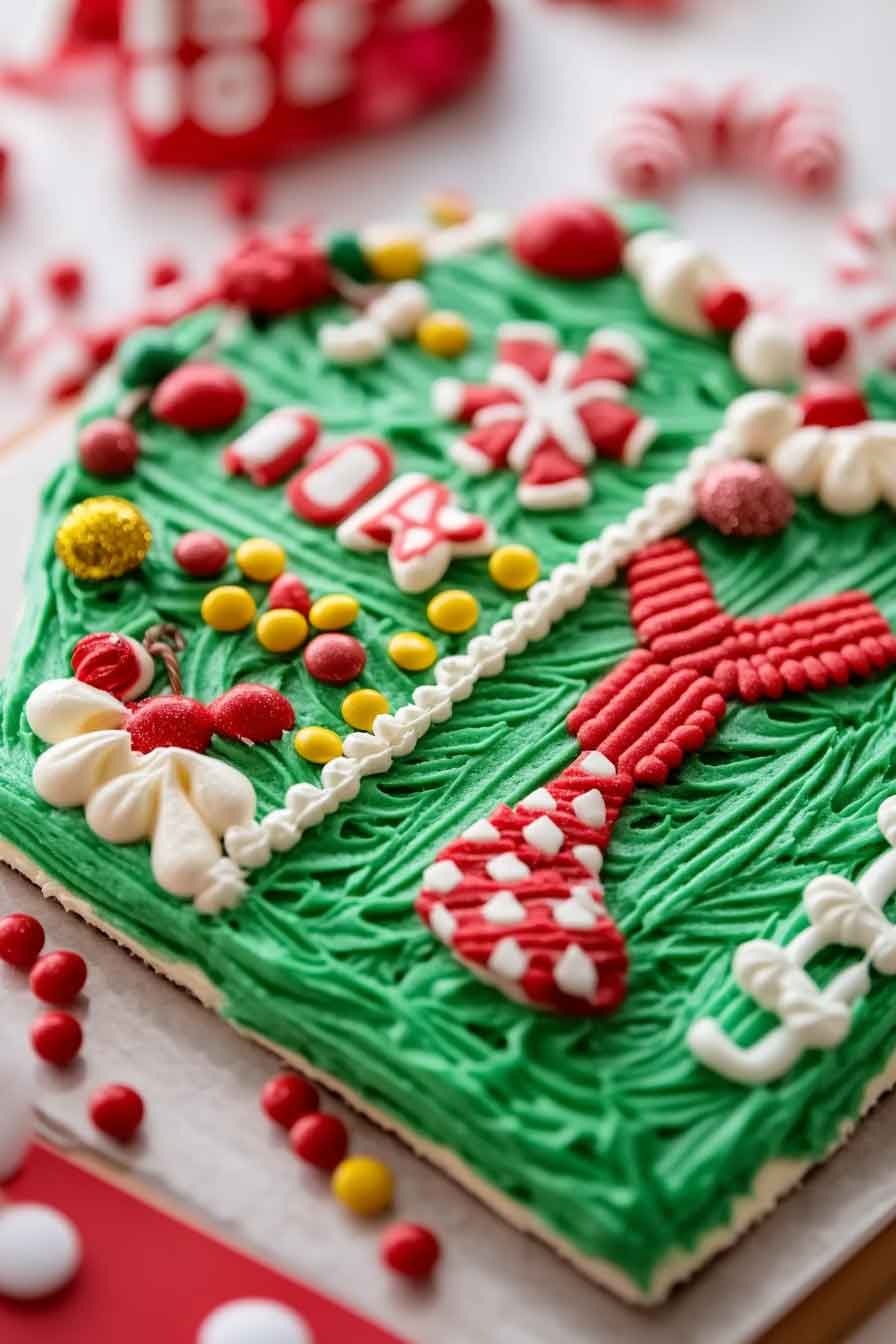
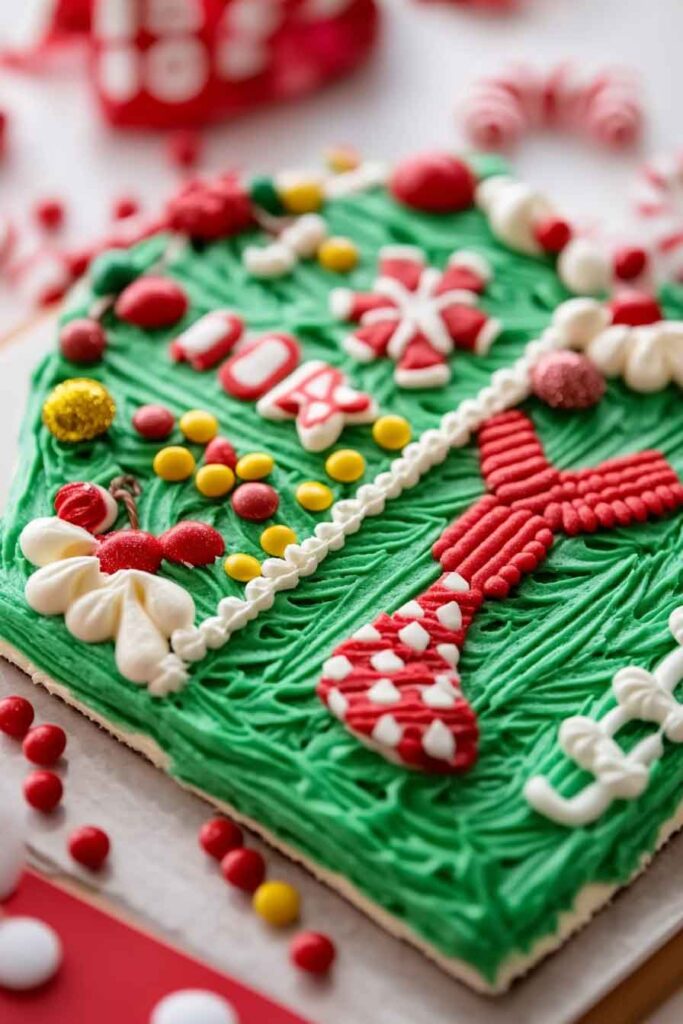
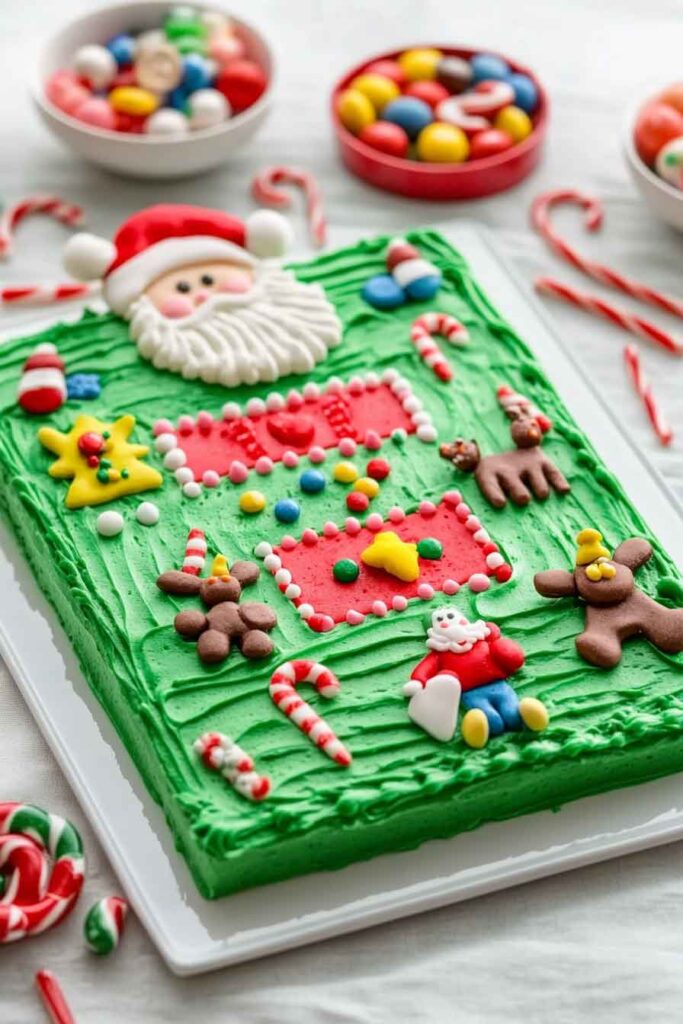
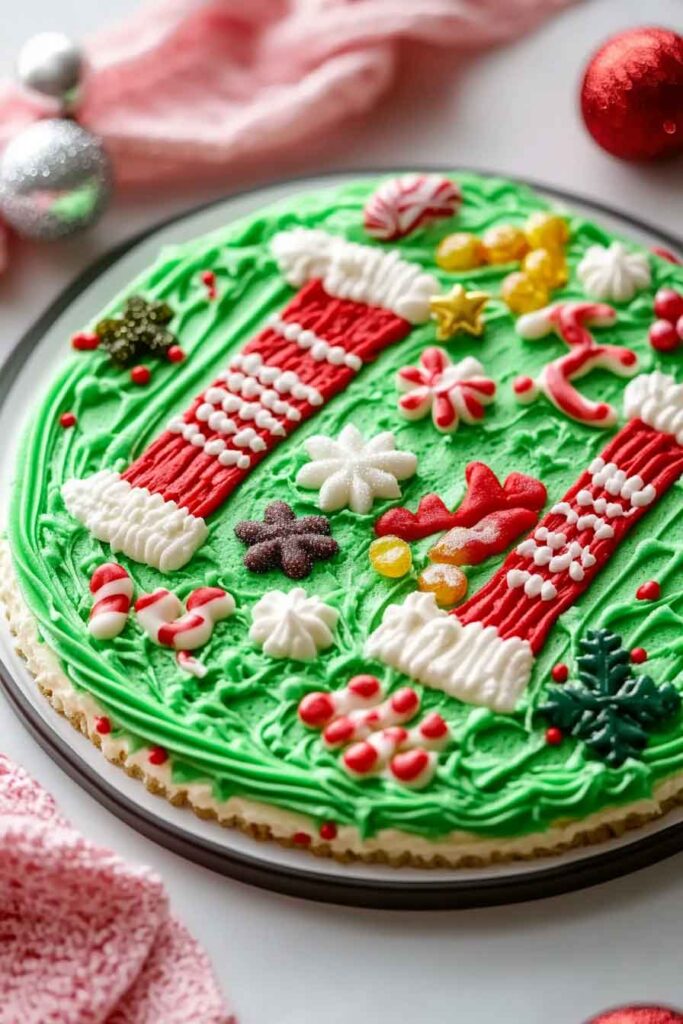
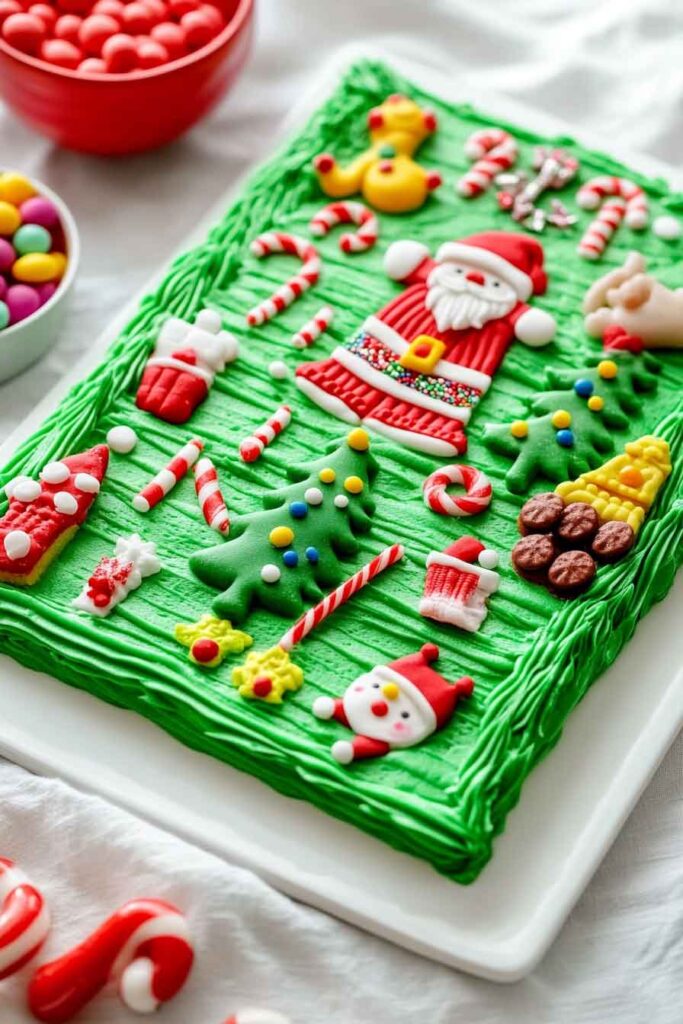
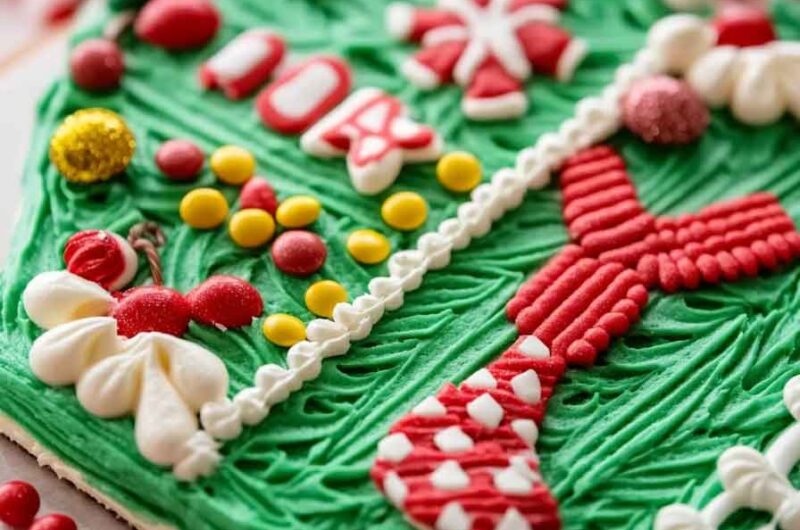
4. Decorate the Ugly Sweater Cake
This is the fun part! Let’s make the cake look like an “ugly sweater” with festive decorations.
Pipe the Sweater Design:
Using a piping bag fitted with a small round tip, pipe out lines and shapes on the cake to create the look of a holiday sweater. You can use black cookie icing to outline sweater patterns like stripes, zigzags, and other fun designs. Let your imagination run wild!
Add Fun Decorations:
Now it’s time to get creative with the cake decorations! Use the following elements to make the sweater even more festive:
- Peppermint Candies: Place these around the cake to add a pop of color.
- M&M’s® Candies: Arrange these in patterns like buttons, ornaments, or even snowflakes.
- Candy Canes: Use the candy canes to make the sleeves of the sweater or add them as cute embellishments around the cake.
- Red Spice-Flavored Gumdrops: Place these on the sweater as little buttons or as part of the design.
- Candy Shoppe Eyeballs: Stick these on for a quirky, fun touch.
- Red Cinnamon Candy: Place these strategically for extra color and texture.
- Reese’s Peanut Butter Cups and Hershey’s Kisses: These can be used to create “pockets” or other design elements on the sweater.
- Mini Pretzel Twists: These can be broken in half and placed along the edges for a fun, crunchy touch.
Serving and Decoration Ideas
Once your Ugly Sweater Cake is decorated, it’s time to serve it! Here are some fun ideas for serving this festive cake:
- Holiday Parties: Cut the cake into slices and serve it with a scoop of vanilla or peppermint ice cream for extra holiday flair.
- Family Gatherings: Let the kids decorate their own “ugly sweater” cake slice by adding more candies or toppings on their piece.
- Gift It: Wrap up a slice of the cake as a fun, sweet holiday gift. Decorate with a little holiday ribbon and a festive note.
Storing the Ugly Sweater Cake
- Leftover Cake: Store leftover cake in an airtight container in the refrigerator for up to 3 days. Allow it to come to room temperature before serving, or enjoy it chilled.
- Decorations: Most of the decorations will hold up well, but any candy-based decorations may soften after a few days.
Ugly Sweater Cake Nutrition (per serving)
| Nutrient | Amount |
|---|---|
| Calories | 460 |
| Total Fat | 21 g |
| Saturated Fat | 12 g |
| Trans Fat | 0.5 g |
| Cholesterol | 85 mg |
| Sodium | 310 mg |
| Total Carbohydrates | 64 g |
| Dietary Fiber | 1 g |
| Sugars | 47 g |
| Protein | 4 g |
| Calcium | 6% DV |
| Iron | 10% DV |
Ugly Sweater Cake FAQs
Can I make this cake in advance?
Yes! You can bake the cake layers and prepare the frosting in advance. Just store the cake layers in an airtight container at room temperature, and store the frosting in the fridge until you’re ready to assemble and decorate.
Can I make this cake without the food coloring?
Absolutely! If you prefer a more traditional white cake, you can skip the food coloring and just use the plain white cake mix for a simple, elegant look.
How do I make this cake gluten-free?
If you want a gluten-free version, simply substitute the Betty Crocker™ Super Moist™ White Cake Mix with a gluten-free cake mix. The rest of the recipe will stay the same!
Ugly Sweater Cake
Course: Uncategorized12-16
servings30
minutes25
minutes460
kcalIngredients
1 box Betty Crocker™ Super Moist™ White Cake Mix
2 teaspoons Betty Crocker™ green gel food color
1 teaspoon Betty Crocker™ red gel food color
2 1/2 cups Betty Crocker™ Rich & Creamy Vanilla Frosting
4 soft peppermint candies
Betty Crocker™ black cookie icing
14 green, 5 yellow, 2 blue, 2 red, 2 orange, 2 brown M&M’s® candies
2 miniature candy canes
6 red spice-flavored gumdrops (cut in half)
4 Betty Crocker™ Candy Shoppe eyeballs
1 red cinnamon candy
1 Reese’s Peanut Butter Cup
1 Hershey’s Kisses Brand milk chocolate
1 mini pretzel twist (broken in half)
Directions
- Prepare the cake batter
Preheat your oven to 350°F (175°C). Grease and line two 9-inch round cake pans. Prepare your favorite vanilla or chocolate cake batter (boxed mix or homemade). - Bake the cakes
Divide the batter evenly between the pans and bake for 25–30 minutes, or until a toothpick inserted in the center comes out clean. Let the cakes cool completely on a wire rack. - Bake the cakes
Divide the batter evenly between the pans and bake for 25–30 minutes, or until a toothpick inserted in the center comes out clean. Let the cakes cool completely on a wire rack. - Assemble the cake
Place one cake layer on a serving plate. Spread a layer of frosting on top, then place the second cake layer over it. Cover the entire cake with a smooth coat of white frostin - Decorate the sweater design
Fill piping bags with the colored frostings. Using different tips, pipe holiday patterns like zig-zags, snowflakes, trees, or reindeer across the top to mimic a festive sweater look. Use sprinkles or candy pieces for extra detail. - Serve and enjoy
Chill the cake for 20–30 minutes to help set the design. Slice and serve your Ugly Sweater Cake as the highlight of your holiday table.
Conclusion
This Ugly Sweater Cake is the perfect combination of fun, flavor, and festivity. It’s sure to be the highlight of your holiday celebrations. From the vibrant colors to the quirky sweater designs, this cake will bring a smile to everyone’s face and add a touch of sweetness to your holiday table. Whether you’re making it for a holiday party, family gathering, or just for fun, this Ugly Sweater Cake will become a holiday tradition you can look forward to every year. Happy baking and happy holidays!