Orange Creamsicle Ice Cream Cake – The Ultimate Refreshing Treat

Oh, wow, have you ever tasted something that screams summer? I tried an Orange Creamsicle Ice Cream Cake, and it’s like a party in my mouth! It’s so cool and yummy.
I made this cake for my friends, and they loved it. The orange flavor pops, and the ice cream is super creamy. It’s like eating a dreamsicle but as a big, fun cake!
You gotta try making this yourself! It’s easy, and everyone will think you’re a baking star. I felt so proud serving it at my picnic.
Let’s grab some orange gelatin and ice cream to start. Check out this simple recipe I used. Come on, it’ll be a blast!
Why You’ll Love This Recipe
- Nostalgic Flavor: The combination of orange and vanilla flavors brings back memories of childhood, reminding you of the beloved orange creamsicle popsicles.
- No-Bake: A great option for those hot summer days when you don’t want to turn on the oven. This cake requires no baking, making it a fuss-free dessert.
- Layers of Delight: A moist cake layer topped with creamy, tangy orange ice cream layers creates a dessert that’s as beautiful as it is delicious.
- Perfect for Any Occasion: Whether it’s a family gathering, birthday, or casual get-together, this ice cream cake is perfect for any event.
- Make-Ahead: You can prepare this cake in advance and store it in the freezer, making it an easy option for entertaining without any last-minute stress.
Required Kitchen Tools
Before you dive into creating this mouthwatering dessert, make sure you have the following tools on hand:
- 9-inch round cake pan: For creating the base layer of cake.
- Mixing bowls: For combining ingredients for both the cake and ice cream layers.
- Electric mixer or hand whisk: For mixing the batter and incorporating the whipped topping.
- Measuring cups and spoons: To ensure the correct quantities of ingredients.
- Rubber spatula: For folding and spreading mixtures evenly.
- Plastic wrap or parchment paper: To cover the cake layers and prevent freezer burn.
- Freezer-safe storage container: To keep your ice cream cake in top condition while freezing.
Ingredients
Here’s what you’ll need to make this indulgent dessert. Be sure to check the recipe card below for exact measurements:
Cake Layer:
- All-purpose flour: This forms the structure of the cake.
- Sugar: Adds sweetness and helps with the texture of the cake.
- Baking powder: To give the cake a light and airy texture.
- Salted butter (room temperature, I use Challenge Butter): For richness and moisture.
- Egg whites: These add lightness and create a fluffy texture in the cake.
- Vanilla extract: A classic flavor that complements the orange.
- Sour cream: Adds moisture and tenderness to the cake.
- Milk: Balances the consistency of the batter.
- Hot water: To help loosen the batter and make it smoother.
- Orange Jello powder: This gives the cake its bright citrus flavor, adding an extra orange kick.
Ice Cream Layers:
- Cream cheese (softened): Gives the ice cream layers a smooth, creamy texture.
- Sugar: Sweetens the ice cream mixture.
- Milk: Helps in creating the right consistency for the ice cream.
- Cool Whip: Adds lightness and fluffiness to the ice cream layers.
- Orange Jello powder (less 3 tbsp): Intensifies the orange flavor in the ice cream.
- Hot water: Helps dissolve the Jello powder and creates a smoother mixture.
- Vanilla extract: Enhances the overall flavor of the ice cream.
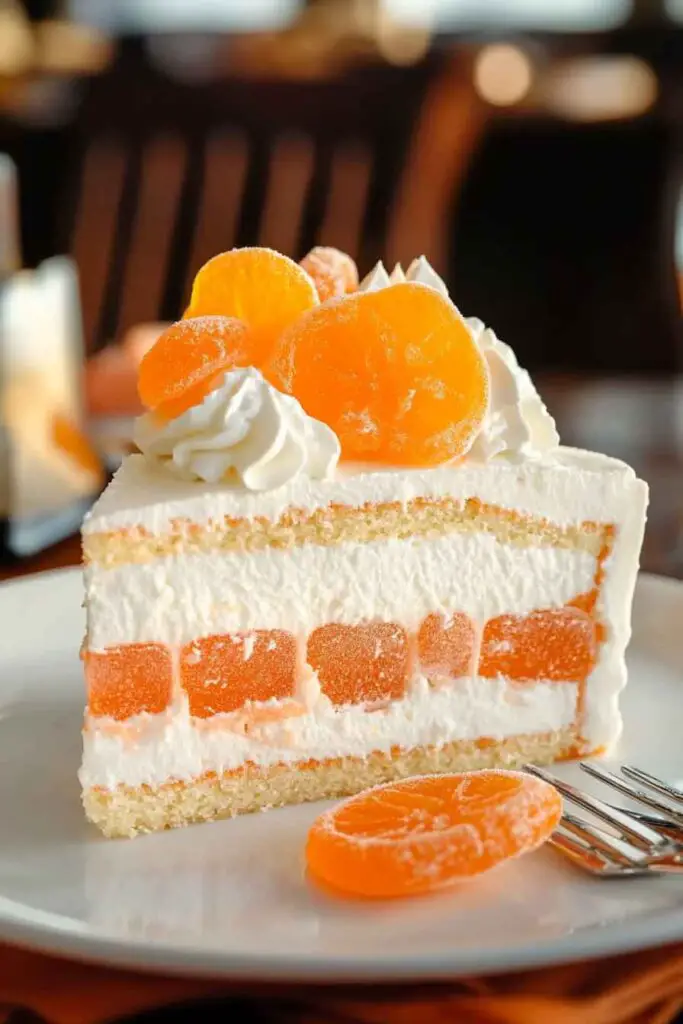
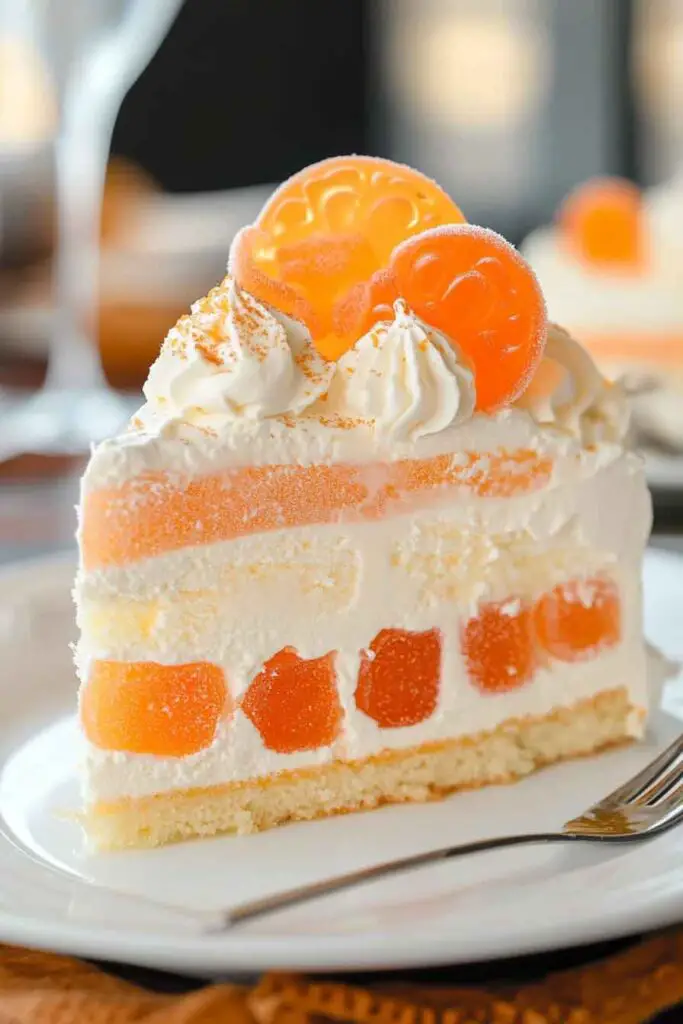
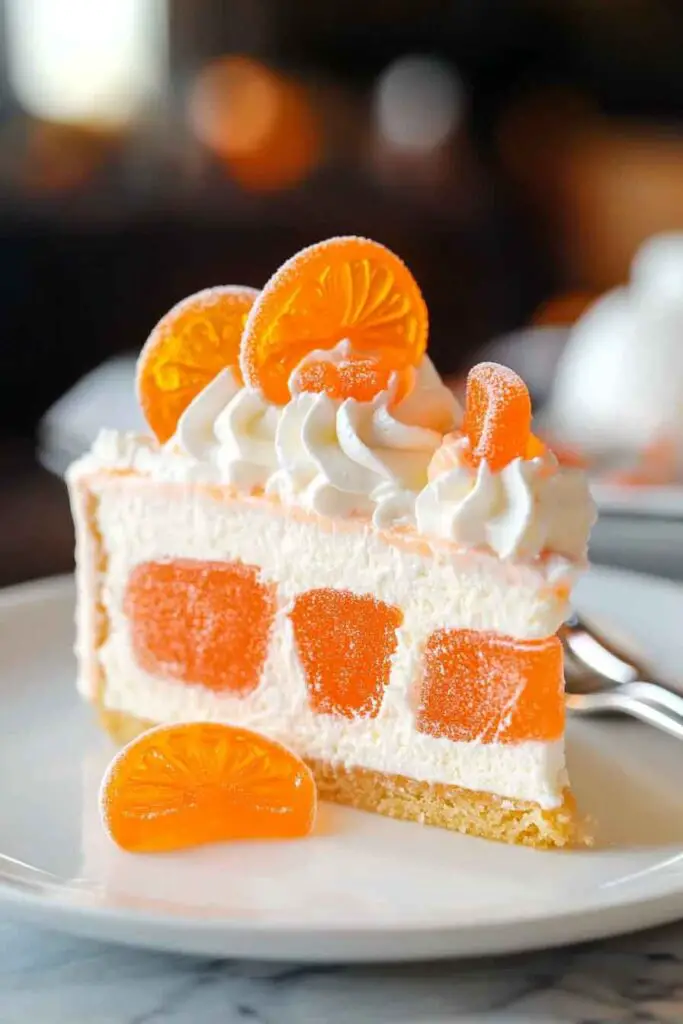
- Orange candy slices: These add a fun decorative touch and a tangy flavor to the cake.
- Orange gel icing color: This adds a vibrant orange color to the ice cream layers for that classic creamsicle look.
Step-by-Step Instructions
1. Prepare the Cake Layer
We begin by making the cake layer, which will serve as the base of our delicious Orange Creamsicle Ice Cream Cake.
1. Preheat the Oven
Start by preheating your oven to 350°F (175°C). Grease a 9-inch round cake pan with butter or non-stick spray and lightly dust it with flour to ensure that the cake will come out easily once baked.
2. Mix the Dry Ingredients
In a large mixing bowl, combine the all-purpose flour, sugar, and baking powder. Stir these dry ingredients until well blended.
3. Prepare the Wet Ingredients
In a separate bowl, whisk together the egg whites, vanilla extract, sour cream, and milk. Add in the hot water and stir until the mixture is smooth and well combined.
4. Combine Wet and Dry Ingredients
Slowly add the wet mixture into the dry ingredients and mix until just combined. Be careful not to overmix, as this can result in a dense cake.
5. Add Orange Jello Powder
Now, stir in the orange Jello powder. This is where the magic happens – the Jello not only gives the cake its bright, tangy flavor but also adds moisture. You’ll notice a vibrant orange color start to emerge as the powder dissolves into the batter.
6. Bake the Cake
Pour the batter into your prepared cake pan and spread it evenly. Bake for about 25-30 minutes, or until a toothpick inserted into the center comes out clean. Let the cake cool completely in the pan.
2. Make the Ice Cream Layers
While the cake is cooling, you can get started on the ice cream layers that will top the cake.
1. Prepare the Orange Jello Mixture
In a small bowl, combine 3 tablespoons of hot water with the orange Jello powder (remember, you’ll only use part of the packet). Stir until the Jello is completely dissolved.
2. Mix Cream Cheese and Sugar
In a large bowl, beat the softened cream cheese and sugar together using an electric mixer. Mix until it’s smooth and creamy with no lumps.
3. Add the Milk and Orange Jello
Add the milk to the cream cheese mixture and continue mixing. Once combined, pour in the dissolved orange Jello mixture and vanilla extract. Mix everything thoroughly.
4. Fold in Cool Whip
Gently fold in the Cool Whip until everything is well blended. This will give the ice cream layers their light, fluffy texture.
5. Color the Ice Cream Layers (Optional)
If you want to amp up the color, you can add a few drops of orange gel icing color to the mixture for a vibrant look. Mix until evenly colored.
3. Assemble the Orange Creamsicle Ice Cream Cake
1. Layer the Cake and Ice Cream
Once the cake has cooled, carefully remove it from the pan and place it on a serving platter. Spread a generous layer of the orange creamsicle ice cream mixture over the cake, making sure it covers the entire surface. You may need to smooth it out with a spatula.
2. Freeze the Cake
Cover the cake with plastic wrap or parchment paper and place it in the freezer. Let it freeze for at least 4 hours, or overnight for best results. This will allow the ice cream layers to firm up and create a beautiful contrast with the soft cake.
3. Add the Final Touches
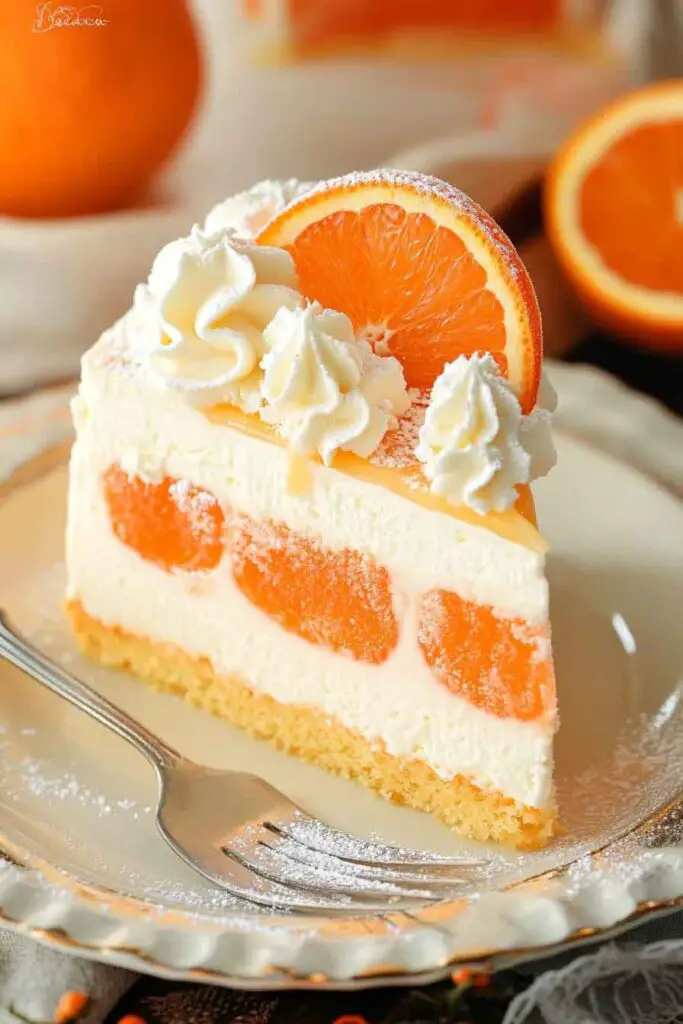
Once the ice cream cake is frozen and ready to serve, top it off with orange candy slices for a playful and colorful touch. You can also add a drizzle of orange icing or more Cool Whip for extra decoration if desired.
Variations for Orange Creamsicle Ice Cream Cake
One of the best things about this cake is how easy it is to make it your own! Here are a few ways you can customize this recipe to suit your taste preferences or to switch things up for different occasions:
1. Swap the Orange Flavor
If you’re not a fan of orange or you want to experiment with other citrus fruits, you can easily swap the orange flavor with something else! Here are a few ideas:
- Lemon: Substitute the orange Jello with lemon Jello to create a lemon creamsicle cake. You can also use lemon zest to amplify the flavor.
- Lime: For a tangy twist, try using lime Jello powder. You’ll get that same creamy texture but with a zesty lime kick.
- Mixed Citrus: Combine orange, lemon, and lime Jello powders for a more complex citrus flavor. It’ll give your cake an exciting flavor profile.
2. Add Fruit Layers
To elevate the flavor and texture of your ice cream cake, consider adding fresh fruit layers in between the cake and the ice cream layers. Some great options are:
- Fresh Orange Slices: Layer fresh orange slices between the cake and ice cream. They’ll add a burst of citrus flavor and some texture contrast.
- Berries: Raspberries, strawberries, or blueberries are all great options to incorporate. They add both color and a touch of tartness.
- Tropical Fruits: Pineapple, mango, or even kiwi can work beautifully with the creamy orange ice cream, giving the cake a tropical flair.
3. Make It an Ice Cream Sandwich Cake
If you want to go all in on the ice cream element, try turning this recipe into an ice cream sandwich cake. Instead of a traditional cake layer, alternate layers of ice cream with layers of graham crackers or cookies. This gives the cake a fun, handheld twist!
4. Add a Crunchy Layer
If you love a little texture contrast in your desserts, consider adding a crunchy layer to your cake. You can do this in one of two ways:
- Crushed Graham Crackers: After spreading the ice cream layer, sprinkle crushed graham crackers on top to give your cake a slightly crumbly, buttery layer.
- Crushed Nuts: Chopped walnuts, pistachios, or almonds work great as a crunchy layer or topping. They also add a little extra flavor!
5. Use Different Whipped Toppings
While Cool Whip is a great option for the ice cream layers, feel free to switch things up with other whipped toppings:
- Homemade Whipped Cream: If you prefer a more natural topping, you can whip up fresh heavy cream and sweeten it to your taste.
- Whipped Marshmallow Creme: For a unique twist, try mixing in marshmallow creme with the Cool Whip. It adds a slight sweetness and marshmallow flavor to your cake.
How to Serve Orange Creamsicle Ice Cream Cake
Once your cake is prepared and frozen, it’s time to serve it. Here are a few tips to make your presentation and serving just as amazing as the flavor:
1. Serve in Slices
To get neat, clean slices, make sure the cake has had time to freeze properly. If the cake is too soft, the slices may fall apart, so it’s important to give it several hours (or overnight) to fully firm up. Use a sharp knife to cut through the ice cream cake. You can also dip the knife in warm water before slicing for cleaner cuts.
2. Top with Garnishes
To make your Orange Creamsicle Ice Cream Cake even more visually appealing, garnish it with:
- Orange Zest: Sprinkle freshly grated orange zest on top for an extra burst of citrusy aroma and flavor.
- Mint Leaves: Add a few fresh mint leaves around the cake to provide a refreshing contrast to the sweet orange flavor.
- Candied Oranges: Candied orange slices or even orange-flavored sprinkles can add a pop of color and a fun texture.
3. Serve with Extra Orange Sauce or Topping
If you want to take the flavor to the next level, serve slices of the ice cream cake with a drizzle of homemade orange sauce or topping. You can easily make this by combining orange juice with sugar and boiling it down into a syrup. Drizzle it over the cake before serving for an extra layer of citrus goodness.
4. Pair with a Beverage
For an extra special touch, pair your Orange Creamsicle Ice Cream Cake with complementary beverages, such as:
- Orange Soda: Keep the citrus theme going with a cold glass of orange soda, perfect for summer.
- Iced Tea: A refreshing, slightly tangy iced tea would pair beautifully with the cake, balancing the sweetness.
- Sparkling Water: For a lighter option, serve the cake with a fizzy citrus-flavored sparkling water. This is especially nice if you’re serving the cake on a hot day!
Storing Orange Creamsicle Ice Cream Cake
This cake can easily be made ahead of time, making it perfect for events where you want to prepare things in advance and simply serve them later. Proper storage ensures that your cake stays fresh and doesn’t become freezer-burned or lose its texture.
1. Freezing the Cake
After you’ve assembled your ice cream cake and added the final touches, wrap it tightly in plastic wrap or foil. If you want extra protection from freezer burn, place it in an airtight container or a freezer-safe cake box. This ensures the cake stays fresh for an extended period.
2. How Long Can I Store It?
You can store the Orange Creamsicle Ice Cream Cake in the freezer for up to 1-2 weeks. After this, the ice cream may begin to lose some of its smooth texture, and the flavors may start to dull. So, it’s best to enjoy it within that time frame for optimal taste.
3. Thawing and Serving
If you have frozen the cake for a while and it’s become too hard to slice, let it thaw in the refrigerator for about 20-30 minutes before serving. This softens the ice cream just enough to make it easier to cut through while still maintaining that perfect frozen texture.
4. Storing Leftovers
If you have leftover cake (though I doubt it!), wrap it tightly and return it to the freezer. You can store the leftovers for another few days. Just keep in mind that the more the cake is thawed and refrozen, the more it may lose some of its original texture and flavor.
Orange Creamsicle Ice Cream Cake FAQs
1. Can I use store-bought cake instead of making it from scratch?
Yes, absolutely! If you’re looking to save time, you can use a store-bought cake mix. Simply prepare the cake according to the package instructions, and then follow the steps for layering the ice cream on top. Just make sure to let the cake cool completely before adding the ice cream layers so that they don’t melt.
2. Can I make this cake with dairy-free or gluten-free ingredients?
Yes, you can modify the recipe to make it gluten-free or dairy-free. Here are a few substitutions to consider:
- Gluten-Free Cake: Use a gluten-free cake mix or substitute the all-purpose flour with a gluten-free flour blend. You’ll also want to double-check the other ingredients to ensure they are gluten-free, such as the Jello powder.
- Dairy-Free: Swap the butter for dairy-free margarine, and use a dairy-free ice cream or whipped topping. Coconut milk or almond milk can replace regular milk in the cake and ice cream layers.
3. What if I don’t have Cool Whip?
No problem! If you don’t have Cool Whip or prefer not to use it, you can easily substitute with homemade whipped cream. Simply whip heavy cream with a little powdered sugar until stiff peaks form. This will give the same fluffy texture to the ice cream layers as Cool Whip.
4. How do I make the cake more “orange-flavored”?
For a stronger orange flavor, increase the amount of orange Jello powder in both the cake and ice cream layers. You can also add freshly grated orange zest to the cake batter and ice cream mixture to really enhance the citrusy flavor.
5. Can I use a different flavor of Jello for the ice cream layers?
Definitely! While orange Jello is the star of this recipe, you can experiment with other flavors like lemon, lime, or even strawberry for a different twist. Just make sure to adjust the color and flavoring accordingly to match the Jello you use.
6. Can I use a different topping for the cake?
If you don’t want to use orange gel icing or orange candy slices, you can top the cake with any garnish you prefer. Crushed graham crackers, chocolate shavings, or even whipped cream would make great alternatives. Feel free to get creative with the finishing touches!
7. How do I prevent the ice cream from melting while assembling the cake?
To keep your ice cream layers from melting during assembly, work quickly and ensure that the cake is completely cooled before adding the ice cream. You can also partially freeze the cake and ice cream layers in between steps to help them firm up and maintain their shape.
| Nutrient | Amount per Serving |
|---|---|
| Calories | 280 kcal |
| Total Fat | 12 g |
| Saturated Fat | 6 g |
| Trans Fat | 0 g |
| Cholesterol | 35 mg |
| Sodium | 220 mg |
| Total Carbohydrates | 40 g |
| Dietary Fiber | 0 g |
| Sugars | 30 g |
| Protein | 4 g |
| Vitamin A | 6% DV |
| Vitamin C | 4% DV |
| Calcium | 8% DV |
| Iron | 4% DV |
Orange Creamsicle Ice Cream Cake – The Ultimate Refreshing Treat
Course: Uncategorized10-12
servings30
minutes280
kcal4-6
hoursIngredients
- Cake Layer:
1 ½ cups all-purpose flour
1 cup granulated sugar
1 ½ tsp baking powder
½ cup salted butter (room temperature)
4 large egg whites
1 tsp vanilla extract
1/2 cup sour cream
½ cup milk
¼ cup hot water
1 package orange Jello powder (3 oz size)
- Ice Cream Layers:
8 oz cream cheese (softened)
1 cup sugar
1 cup milk
2 packages Cool Whip (8 oz each)
1 package orange Jello powder (3 oz size, use 3 tbsp)
½ cup hot water
1 tsp vanilla extract
1 package orange candy slices (optional)
Orange gel icing color (optional)
Directions
- Prepare the Cake Layer:
- Preheat the oven to 350°F (175°C). Grease and flour a 9-inch round cake pan or line with parchment paper.
- In a large bowl, whisk together the flour, sugar, and baking powder.
- In a separate bowl, cream together the butter, egg whites, and vanilla extract until smooth.
- Add the sour cream, milk, and hot water to the butter mixture and mix until fully combined.
- Gradually add the dry ingredients to the wet mixture and mix until smooth.
- Stir in the orange Jello powder until well blended.
- Pour the batter into the prepared cake pan and bake for 25-30 minutes, or until a toothpick inserted into the center comes out clean.
- Allow the cake to cool completely in the pan before removing it.
- Prepare the Ice Cream Layers:
- In a medium-sized bowl, dissolve 3 tablespoons of the orange Jello powder in hot water. Let it cool for a few minutes.
- In a separate large bowl, beat the cream cheese and sugar together until smooth.
- Add the milk, vanilla extract, and the dissolved orange Jello mixture. Mix until fully combined.
- Fold in the first package of Cool Whip, ensuring it’s fully incorporated. Then, fold in the second package of Cool Whip to give the mixture a light and fluffy texture.
- Assemble the Cake:
- Once the cake has completely cooled, carefully cut it in half horizontally to create two layers.
- Place the first layer of cake on a serving platter and spread a generous layer of the orange ice cream mixture on top.
- Place the second layer of cake on top and repeat with the remaining ice cream mixture.
- Freeze the assembled cake for at least 4 hours, or overnight, until firm.
- Decorate and Serve:
- Before serving, you can decorate the cake with orange candy slices, orange gel icing, or any other garnish of your choice.
- Let the cake sit at room temperature for about 10 minutes before slicing to make it easier to cut.
Final Thoughts
And there you have it—your complete guide to making a delicious, refreshing Orange Creamsicle Ice Cream Cake! Whether you’re making it for a special occasion or just as a treat for yourself and loved ones, this cake is sure to be a hit. It combines the best of cake and ice cream into one perfect dessert, with a tangy citrus flavor that evokes summer nostalgia with every bite. Don’t forget to get creative with the variations, toppings, and flavor twists to make it truly your own!