Olive Oil Chocolate Chip Cookies Recipe

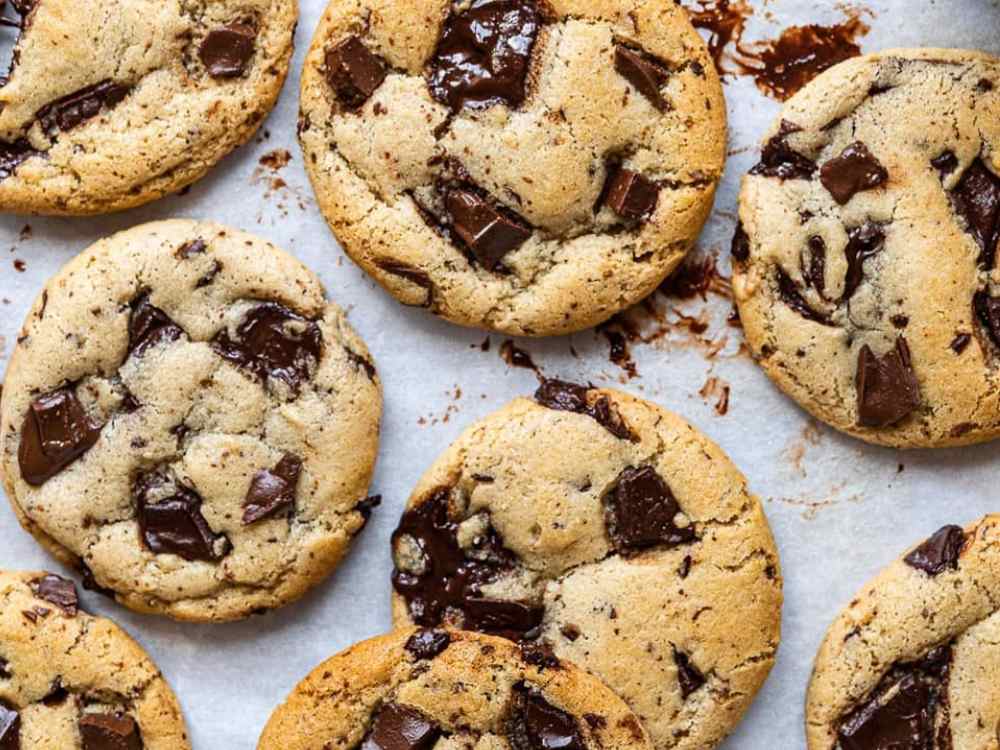
Chocolate chip cookies are a classic dessert, loved by many for their chewy centers and crispy edges. What if we told you that you could make them without butter? That’s right! These Olive Oil Chocolate Chip Cookies swap out the butter for olive oil, delivering a unique and delicious flavor while maintaining the cookie’s beloved texture. Perfect for dairy-free bakers, these cookies will impress your taste buds without compromising on flavor.
Why Use Olive Oil?
You might be wondering, why use olive oil in cookies? Olive oil has long been known for its health benefits, including heart-healthy fats and antioxidants. But when it comes to baking, olive oil adds moisture and a subtle richness that pairs beautifully with dark chocolate. Plus, using olive oil in place of butter makes these cookies dairy-free, making them a great option for those with dietary restrictions.
Key Benefits of Olive Oil in Baking:
- Healthier Fat: Olive oil contains monounsaturated fats, which are healthier than the saturated fats found in butter.
- Moisture and Flavor: It helps create soft, chewy cookies with a slightly fruity taste.
- Dairy-Free Option: Ideal for people who are lactose intolerant or prefer plant-based baking.

Ingredients You’ll Need
The ingredients for these cookies are simple, and you likely already have most of them in your pantry. The key is to use good-quality olive oil, as it will affect the overall flavor of the cookies.
| Ingredient | Amount | Notes |
|---|---|---|
| Brown Sugar | 130g (⅔ cup) | Light or dark, depending on your taste preference. |
| Fine Granulated Sugar | 50g (¼ cup) | For sweetness and balance. |
| Olive Oil | 100g (½ cup) | Use an olive oil with a taste you enjoy. |
| Egg | 1 large | Adds structure and richness to the dough. |
| Pure Vanilla Extract | 1 teaspoon | Vanilla enhances the flavor of the cookies. |
| Fine Sea Salt | ½ teaspoon | Salt balances sweetness and deepens flavor. |
| Baking Soda | 1 teaspoon | A leavening agent that helps the cookies rise. |
| All-Purpose Flour | 180g (1⅓ cups) | Provides the structure for the cookie. |
| Dark Chocolate Chips | 150g | Use dairy-free chocolate for a completely dairy-free recipe. |
Step-by-Step Instructions
This recipe is straightforward and beginner-friendly, requiring just one bowl and a few simple steps. Let’s dive in:
Step 1: Whisk the Sugars and Egg
In a medium-sized bowl, whisk together the brown sugar, granulated sugar, and the egg. The mixture will start dark and thick but will become light and fluffy as you whisk, which helps create the cookie’s chewy texture.
Step 2: Add the Olive Oil
Slowly drizzle in the olive oil while whisking continuously. It’s crucial to pour the oil gradually, allowing it to emulsify with the sugar and egg mixture. This step is what gives the cookies a soft, tender crumb.
Step 3: Incorporate the Dry Ingredients
Using a spatula, stir in the baking soda, salt, and flour. Be gentle with this step, ensuring that you don’t over-mix the dough, which can lead to tough cookies. Once the dry ingredients are partially combined, add the chocolate chips and stir until just mixed.
Step 4: Rest the Dough
One of the biggest secrets to achieving the perfect texture is letting the dough rest. Cover the dough with plastic wrap and leave it on the counter for about 1 hour. This rest period allows the flour to fully hydrate, ensuring a more even bake and a more flavorful cookie.
Step 5: Scoop and Bake
Preheat your oven to 350°F (175°C) and line two baking sheets with parchment paper. Scoop the dough onto the baking sheets, leaving about 2 inches between each ball to allow the cookies to spread. Bake for 10-12 minutes, or until the edges are golden and the centers are set.
Step 6: Cool and Enjoy
Let the cookies cool on the pan for 5 minutes before transferring them to a wire rack. Once completely cool, they can be stored in an airtight container.
The Science Behind the Perfect Cookie
Why Rest the Dough?
Resting the dough isn’t just about convenience; it’s science. Allowing the dough to rest lets the flour fully absorb the liquid ingredients, leading to a cookie with better structure and more developed flavors. This step also gives the olive oil time to evenly distribute throughout the dough, resulting in a richer, more cohesive cookie.
Olive Oil vs. Butter: Texture and Flavor Comparison
- Butter provides a creamier texture and a slightly nutty flavor when browned. However, butter can sometimes lead to greasier cookies.
- Olive Oil, on the other hand, offers a lighter texture and a subtle fruity flavor that pairs beautifully with chocolate. The absence of butter also means these cookies won’t be overly rich or greasy.
Variations and Customizations
One of the joys of baking is making a recipe your own. Here are a few ways you can customize your olive oil chocolate chip cookies:
1. Add Nuts
For a bit of crunch, try adding chopped walnuts or pecans to the dough. About ½ cup of nuts should do the trick.
2. Use Different Chocolate
If dark chocolate isn’t your thing, feel free to swap it out for milk or white chocolate chips. You can also chop up your favorite chocolate bar for larger chunks.
3. Gluten-Free Option
For a gluten-free version, swap out the all-purpose flour for a gluten-free flour blend. Oat flour also works well, but you may need to adjust the liquid content slightly.
FAQs: Your Olive Oil Chocolate Chip Cookie Questions Answered
Q1: Can I make the dough ahead of time?
Yes! You can make the dough and freeze it for later. Simply scoop the dough onto a baking sheet and freeze for about 10 minutes. Once the dough balls are firm, transfer them to a freezer-safe bag. When ready to bake, allow them to come to room temperature and bake as directed.
Q2: Should I use chocolate chunks or chips?
Both work well, but they create different textures. Chocolate chunks will melt more fully, creating gooey puddles of chocolate, while chocolate chips tend to hold their shape, providing bites of chocolate throughout the cookie.
Q3: Can I use flavored olive oil?
Yes! If you want to get creative, try using flavored olive oil, like a citrus-infused or vanilla olive oil, for an extra layer of flavor in your cookies.
Expert Tips for Baking Success
- Choose Your Olive Oil Wisely: Since you’ll taste the olive oil in these cookies, it’s essential to use one with a flavor you enjoy. Extra virgin olive oil has a bolder taste, while light olive oil is more subtle.
- Don’t Over-Mix: When you add the flour, mix just until the ingredients are combined. Over-mixing can lead to tough, dense cookies.
- Watch Your Bake Time: The baking time can vary depending on the size of your cookies. For chewier cookies, bake for 10 minutes. If you prefer crispier edges, let them go for 12-13 minutes.
Why These Olive Oil Chocolate Chip Cookies Stand Out
Unlike traditional chocolate chip cookies, which rely heavily on butter for flavor and texture, these olive oil cookies offer a lighter, dairy-free alternative without sacrificing taste. The combination of dark chocolate and olive oil creates a more sophisticated flavor profile, while still satisfying that classic cookie craving.
Not only do these cookies taste amazing, but they’re also healthier than the average chocolate chip cookie, thanks to the olive oil. Whether you’re looking for a dairy-free treat, a healthier alternative, or simply a delicious cookie, this recipe has you covered.
Conclusion: A Must-Try Recipe for Cookie Lovers
Whether you’re a seasoned baker or new to the kitchen, these Olive Oil Chocolate Chip Cookies are sure to become a favorite. With their crispy edges, chewy centers, and rich chocolate flavor, they offer everything you love about classic chocolate chip cookies, but with a healthy twist. Plus, they’re easy to make and perfect for anyone avoiding dairy. Give them a try—you won’t be disappointed!


