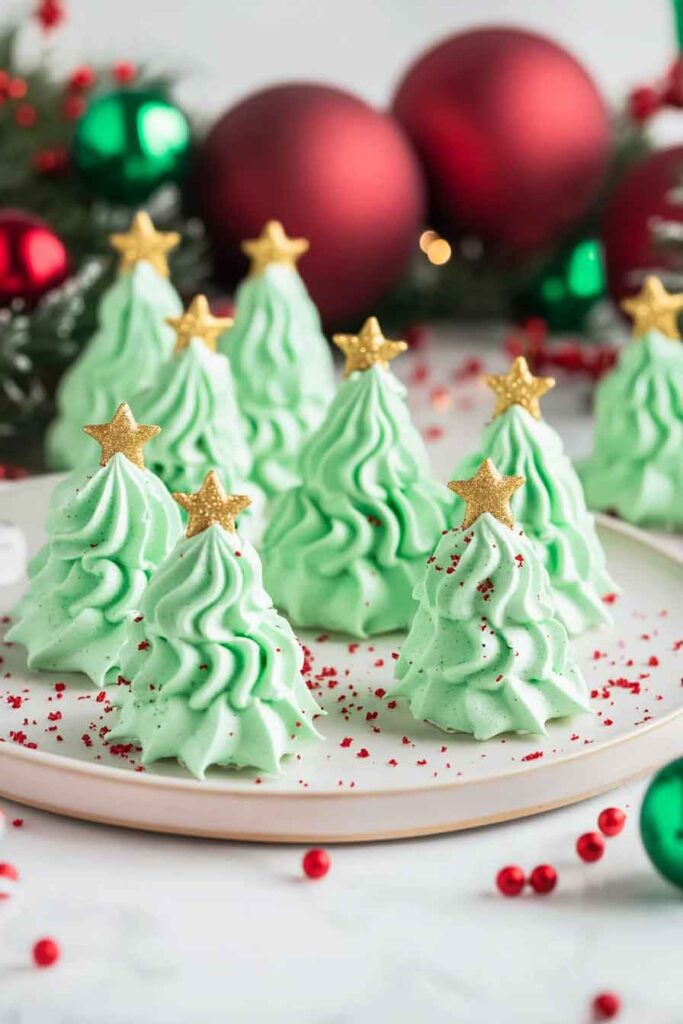
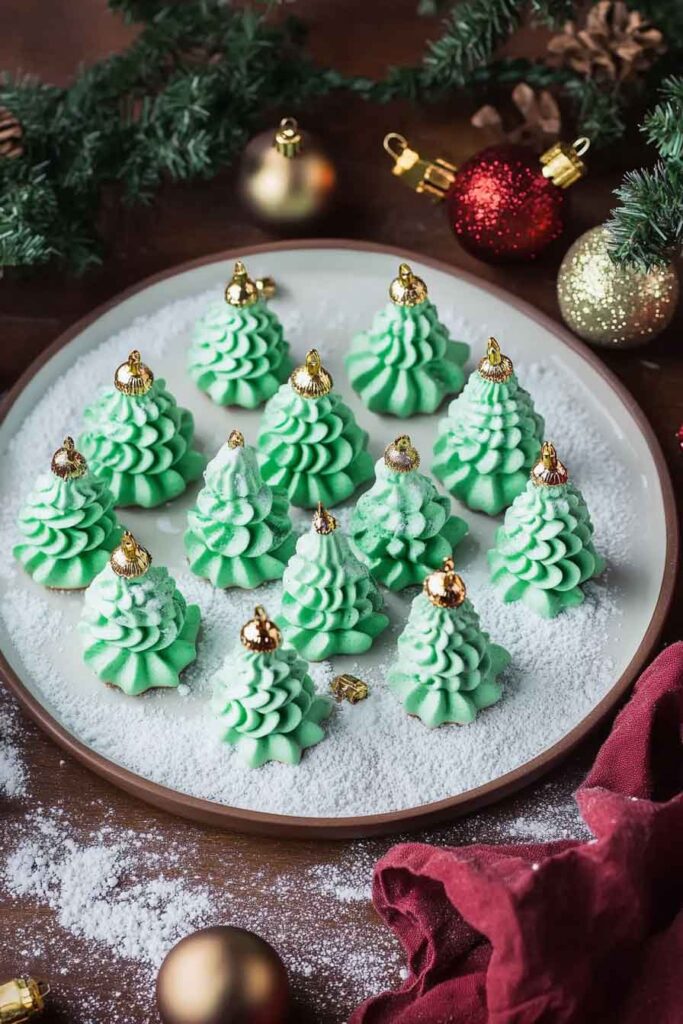
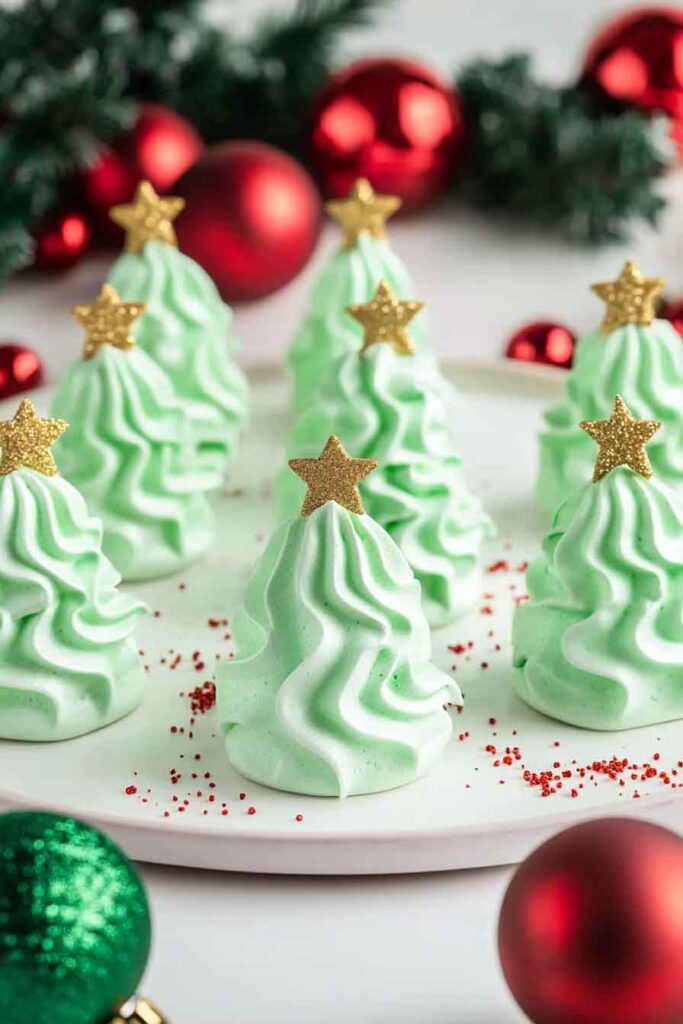
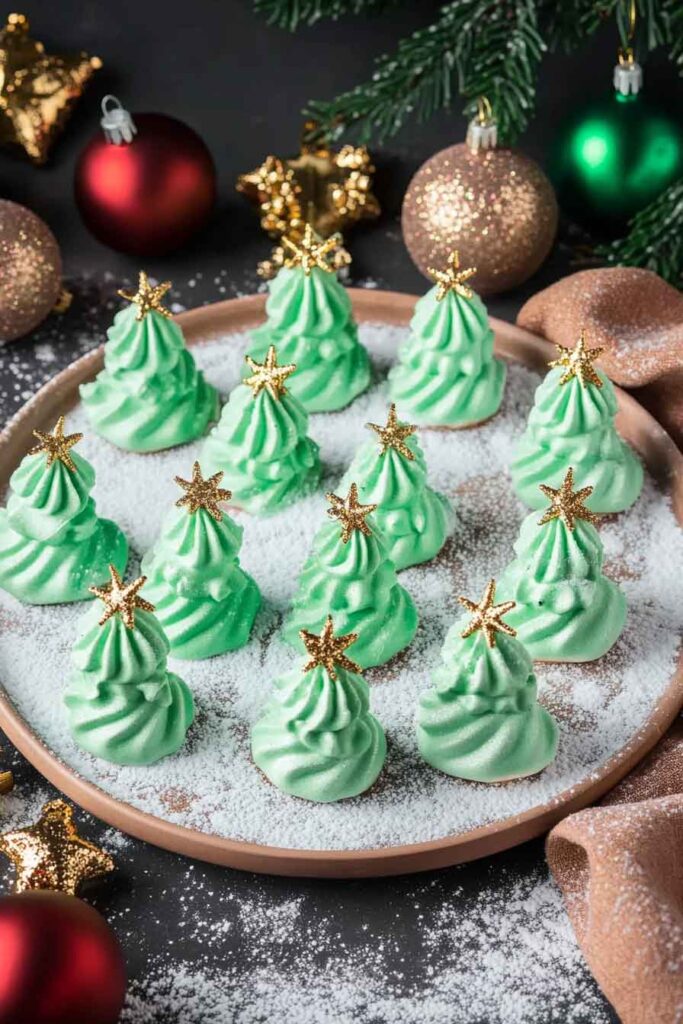
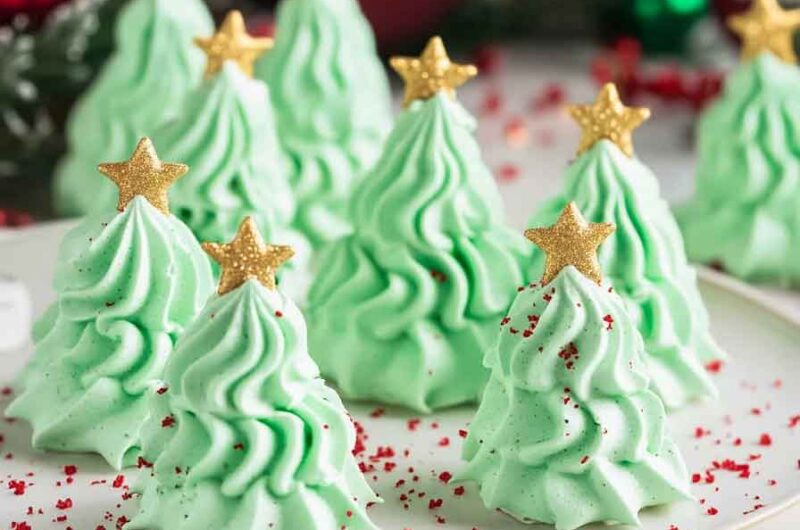
Meringue Christmas Trees

The first time I made these Meringue Christmas Trees, my whole kitchen felt like a little winter wonderland. They looked so cute and festive sitting on the counter. It’s the kind of treat that makes you smile just by looking at it.
I love how light and crisp they are, with just the right amount of sweetness. They melt in your mouth like snowflakes. And the best part? You only need a few simple ingredients to make them.
They’re perfect for parties, gifts, or just a fun baking day at home. I always add a little sparkle on top to make them extra magical. Everyone thinks they came from a fancy bakery.
So, let’s make these little trees together. They’re simple, sweet, and so much fun to decorate. Once you bake them, it’ll start to feel like Christmas in your kitchen.
Why You’ll Love This Recipe
- Reader Favorite: As one reader put it, “These meringue trees are the perfect holiday treat – crunchy, sweet, and so fun to make!”
- Light and Airy: The delicate texture of meringue is like biting into a cloud – it’s sweet without being overly heavy.
- Festive and Fun: Shaping these meringues into Christmas trees and decorating them with sprinkles is a creative and enjoyable holiday activity.
- Perfect for Gifting: Pack these cute meringue trees into gift boxes or tins for a thoughtful and edible gift for family and friends.
- Customizable: You can adjust the color of the meringue or the sprinkles to fit any holiday theme or even a specific color scheme.
Required Kitchen Tools
Here are the tools you’ll need to create these adorable meringue trees:
- Electric Mixer: For whipping the egg whites to the perfect stiff peaks.
- Baking Sheet: For baking the meringues.
- Parchment Paper: To prevent the meringues from sticking to the baking sheet.
- Piping Bag with Star Tip: To pipe the meringue mixture into tree shapes.
- Large Bowl: For whipping the egg whites.
- Spatula: For gently folding in ingredients and scraping down the sides of the bowl.
Ingredients
This recipe calls for just a few ingredients that you probably already have in your pantry. Here’s what you’ll need (exact measurements are in the recipe card below):
- Egg Whites: Make sure your egg whites are at room temperature for the best whipping results.
- Granulated Sugar: Superfine sugar works best, but regular granulated sugar will do.
- Pinch of Salt: To balance the sweetness and help stabilize the meringue.
- Cream of Tartar: This helps the meringue hold its shape and stabilize.
- Vanilla Extract or Peppermint Extract: Vanilla is classic, but peppermint adds a festive twist that screams Christmas.
- Green Food Coloring: A few drops of green food coloring will turn these meringues into gorgeous mini Christmas trees. Adjust the color based on how vibrant you want them to be.
- Tiny Sprinkles: For decoration! Use any small festive sprinkles you love – think red and green, gold stars, or silver edible glitter.
- Powdered Sugar: To dust over the trees for a snowy, finished look.
Variations for Meringue Christmas Trees
These meringue Christmas trees are incredibly customizable! Here are some variations and ideas for making this recipe your own:
- Flavoring the Meringues: While vanilla is traditional, you can experiment with other extracts, like almond or hazelnut, for a unique twist on these meringue trees.
- Change the Color: If you’re making these for a New Year’s party or other events, you could use blue food coloring for a winter wonderland theme, or even mix colors to create a rainbow effect!
- Add a Twist of Chocolate: You could drizzle melted chocolate on top of the meringue trees or even pipe chocolate stars for extra sweetness.
- Top with Edible Gold: For a luxurious touch, dust the tops with edible gold dust or edible glitter for a sparkle effect.
- Make Mini Trees: Instead of piping larger trees, try making mini ones for bite-sized fun.
Step-by-Step Instructions
Making these Meringue Christmas Trees is easier than you think. With just a few simple steps, you’ll have the cutest (and tastiest) holiday treat to share.
1. Preheat the Oven and Prepare the Baking Sheet
Before you begin, make sure to preheat your oven to 225°F (107°C). This low temperature helps the meringues dry out properly without overbaking. Line a baking sheet with parchment paper to prevent the meringues from sticking during baking.
2. Prepare the Egg Whites
To begin making your meringue, separate the egg whites from the yolks. Be sure to discard the yolks or save them for another recipe (like custard or scrambled eggs). It’s important that there is no yolk in the egg whites, as the fat in the yolk can prevent the meringues from whipping up properly.
Place the egg whites in a clean, dry mixing bowl. Add a pinch of salt to help stabilize the egg whites as you whip them. Using an electric mixer, beat the egg whites on medium speed until they begin to froth, about 1 minute.
3. Add the Cream of Tartar
Once the egg whites have started to froth, add 1/2 tsp of cream of tartar. This is the key to getting those stiff, glossy peaks in your meringue. Continue to whip on medium speed until soft peaks form.
4. Gradually Add Sugar
Next, slowly add 1 cup of granulated sugar, about a tablespoon at a time, while continuing to beat the egg whites. This gradual addition helps the sugar dissolve properly into the egg whites, creating a smooth, stable meringue.
Once all the sugar is added, increase the mixer speed to high and continue whipping until stiff peaks form. This should take about 5-7 minutes, and the meringue should look shiny and smooth.
5. Add Vanilla or Peppermint Extract
Once you’ve reached stiff peaks, add your 1 tsp of vanilla extract (or 1/4 tsp peppermint extract for a festive twist). Mix gently to combine. Now is the time to add the green food coloring (about 20 drops or more depending on the intensity of the color you want).
Continue to mix just until the color is fully incorporated.
6. Pipe the Meringues
Now, for the fun part! Transfer your meringue mixture into a piping bag fitted with a star tip. I recommend using a large star tip (like a 1M) for a nice tree shape.
To pipe the trees, start at the bottom of the parchment paper and pipe a wide, circular base. Then, pipe upward, gradually decreasing the size of each layer as you go, creating a tree shape. Don’t worry if they’re not perfect – each tree has its own unique charm!
If you want to add a little “snow” effect, sprinkle a few edible glitter or small sugar sprinkles on top before baking.
7. Bake the Meringues
Place your baking sheet in the preheated oven and bake the meringue trees for 1.5 to 2 hours. Meringues are done when they are dry and crisp to the touch. Avoid opening the oven door during the baking process, as this can cause the meringues to collapse.
Once they are done baking, turn off the oven and let the meringues cool inside with the door slightly ajar. This helps them firm up without cracking.
8. Serve and Decorate
Once your meringue Christmas trees have cooled completely, gently lift them off the parchment paper. If you’d like, dust the meringues with powdered sugar for a snowy effect, or you can even add some extra sprinkles for a touch of whimsy.
These meringue trees are perfect for serving at a holiday party, or they can be packaged up as a thoughtful homemade gift.
Serving and Decoration
Meringue Christmas Trees are a beautiful, light dessert that pairs well with other holiday treats. Here are some fun serving ideas:
- As an Edible Centerpiece: Create a beautiful display by arranging the meringue trees in the center of the table or on a festive platter. Add some fresh greenery and lights to make them pop.
- Gift Them: Pack meringue trees into small holiday tins or clear cellophane bags to give as gifts to family and friends. They make the perfect sweet surprise!
- Pair with Hot Chocolate or Eggnog: These light meringues make an excellent pairing with a rich, creamy beverage like hot chocolate or spiced eggnog.
Storing Meringue Christmas Trees
Meringues are best enjoyed fresh, but if you have leftovers, don’t worry! Here’s how to store them:
- Room Temperature Storage: Store meringue trees in an airtight container at room temperature for up to 3-4 days. Keep them in a cool, dry place to maintain their crispness.
- Freezing: Meringue trees can be frozen for up to 1 month. To freeze, place them in a single layer in an airtight container, separated by parchment paper. When ready to serve, thaw at room temperature for 30 minutes.
Nutrition
While meringue Christmas trees are light and airy, they are still a sweet treat. Here’s the approximate nutritional information per meringue (based on 12 servings):
| Nutrient | Amount per Serving |
|---|---|
| Calories | 50 |
| Total Fat | 0g |
| Carbohydrates | 12g |
| Sugar | 12g |
| Protein | 1g |
Conclusion
These Meringue Christmas Trees are the perfect addition to your holiday festivities. They’re light, airy, and fun to make, plus they look absolutely stunning on any dessert table. Whether you’re looking to impress guests with a delicate treat or create a fun family baking project, these meringue trees are sure to bring joy to everyone.
With simple ingredients and easy steps, you’ll be able to create these festive treats in no time. So get your mixing bowls ready, and start piping those adorable little trees! You won’t regret it.
Meringue Christmas Trees
Course: Uncategorized12-16
trees15
minutes1
minute50
kcalIngredients
4 egg whites, room temperature
1 cup granulated sugar (preferably superfine)
Pinch of salt
1/2 tsp cream of tartar
1 tsp vanilla extract or 1/4 tsp peppermint extract
20 drops green food coloring (more or less to preference)
Tiny sprinkles of your choice
Powdered sugar (for dusting)
Directions
- Preheat the oven to 225°F (107°C) and line a baking sheet with parchment paper.
- Whip egg whites and salt until frothy. Add cream of tartar and continue to whip until soft peaks form.
- Slowly add sugar, one tablespoon at a time, and whip until stiff peaks form. Add extract and food coloring.
- Pipe meringue into tree shapes on the baking sheet.
- Bake for 1.5 to 2 hours until dry and crisp.
- Cool completely before dusting with powdered sugar and serving.