The Best Homemade Mac and Cheese: A Comfort Food Classic
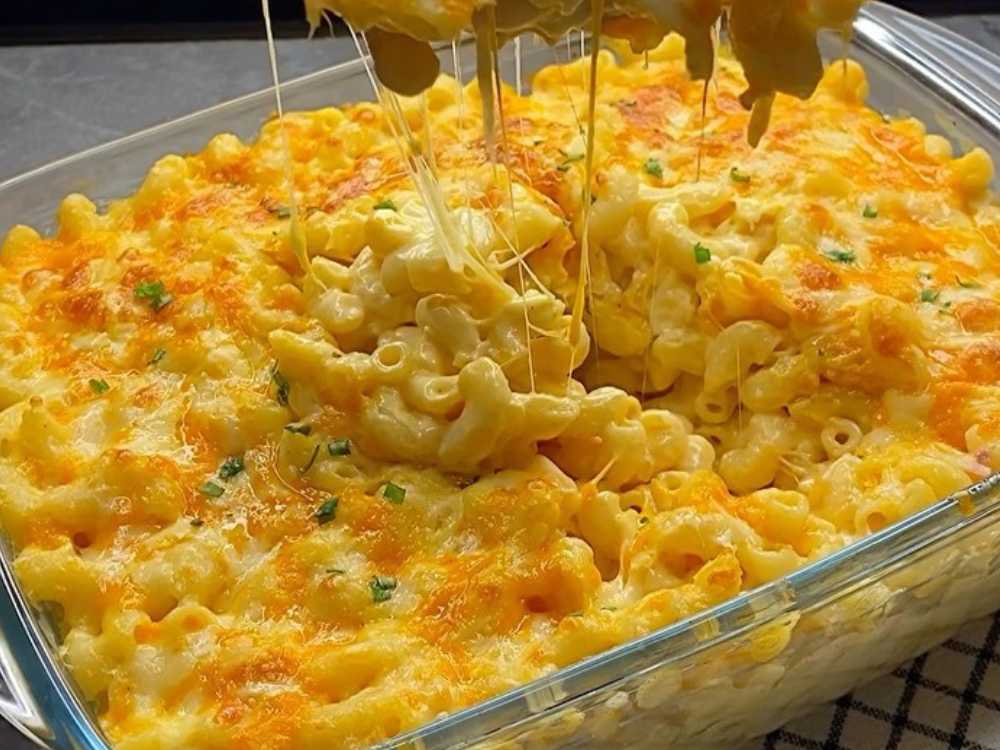
Craving comfort food that’s both creamy and satisfying? Look no further than our Homemade Mac and Cheese! Whether it’s a chilly evening or a celebration of life’s little victories, this classic dish has your back.
Our recipe combines velvety cheese, al dente pasta, and a dash of nostalgia. It’s like a warm hug for your taste buds—simple, cheesy, and utterly irresistible.
So, grab your apron, and let’s dive into the ooey-gooey magic of homemade mac and cheese. Your kitchen is about to become the coziest spot in town!
Why This Mac and Cheese is the Best
I know there are lots of mac and cheese recipes out there, but this one? It’s on a whole new level of deliciousness. We’re not just talking about a simple cheese sauce poured over pasta. Oh no, we’re layering it with extra cheese and baking it until it’s golden and bubbly on top. The result? A mac and cheese that’s creamy, cheesy, with just the right amount of crispy topping – trust me, it’s everything you’ve ever wanted in a dish.
Ingredients You’ll Need
Okay, let’s gather everything you’ll need. This is a pretty straightforward recipe, but using the right ingredients will make a world of difference. Here’s what you’ll need:
- Pasta (elbow macaroni or horns) – 450g (about 1 lb). Go for a shape that holds the sauce well.
- Processed cream cheese – 200g. This gives the sauce that super creamy texture.
- Cheddar cheese – 200g. The sharpness of cheddar really elevates the flavor.
- Red cheddar cheese – 200g. Not only does it add flavor, but the color makes the dish look so inviting.
- Butter – 70g. Butter is life, and it makes the sauce rich and smooth.
- Flour – 1.5 tbsp. We’ll use this to thicken the cheese sauce, so it’s not runny.
- Onion – ½ onion, finely chopped. Adds a little sweetness and depth.
- Garlic – 2-3 cloves, minced. Because garlic makes everything better.
- Cream (30% fat) – 500g. This makes the sauce luscious and rich.
- Paprika – to taste. Adds a little smoky flavor that pairs perfectly with cheese.
- Dried garlic – to taste. For that extra kick of garlic flavor.
Let’s Cook Some Mac and Cheese!
Cook the Pasta
First things first, let’s get that pasta going. Boil it in salted water but – and this is key – only cook it for 2 minutes less than the package directions. Why? Because we’re going to bake it later, and we don’t want mushy pasta. Once it’s ready, drain it, but don’t forget to save some pasta water – we’re going to use that in the sauce later.
Time for the Cheese Sauce
Now, let’s make the magic happen. In a large saucepan, melt the butter over medium heat. Once it’s melted, toss in the finely chopped onion and let it cook for about 2 minutes until it softens. This onion will add a subtle sweetness to the sauce. Then, add the minced garlic and cook for another minute until it’s fragrant (your kitchen should smell amazing by now!).
Next, sprinkle in the flour and stir it around for a couple of minutes. This is our thickening agent, making sure the cheese sauce isn’t too runny. After that, slowly add a ladle of the reserved pasta water (this stuff is like liquid gold for sauces), and stir constantly. It’ll start thickening up nicely.
The Cheesiest Part
Now comes my favorite part – adding the cheese! Pour in the cream and heat it gently, but don’t let it boil (we don’t want to scorch the cream). Start by stirring in the processed cream cheese, followed by the cheddar and red cheddar. Don’t just dump it all in at once – add it in batches, stirring constantly to ensure everything melts smoothly.
This sauce is going to be rich, velvety, and packed with cheesy goodness. Add a sprinkle of paprika and a dash of dried garlic for extra flavor. You’ll know it’s ready when the sauce is smooth and creamy, and you can’t resist sneaking a spoonful to taste.
Combine the Pasta and Sauce
Now that you’ve got this dreamy cheese sauce, it’s time to marry it with the pasta. Pour the cooked pasta into a large bowl, then add the cheese sauce and stir everything together until the pasta is fully coated. At this point, you could stop and dig in, but we’re not done yet – trust me, this next step is worth it!
Layer the Mac and Cheese
To take this dish to the next level, we’re going to layer it with extra cheese. Grab a baking dish or a casserole pan, and start by spreading ⅓ of the pasta mixture on the bottom. Then, sprinkle a generous handful of extra cheese over the top. Repeat this process – pasta, cheese, pasta, cheese – until everything is in the dish.
Bake to Perfection
Now, preheat your oven to 200°C (400°F). Pop the dish into the oven and bake for 5-7 minutes, just long enough to get that beautiful, golden-brown crust on top. The cheese will be all melted and bubbly, with a crispy layer that you won’t be able to resist breaking into.
Enjoy the Ultimate Comfort Food!
And there you have it – the most delicious mac and cheese you’ve ever made. The combination of the creamy, cheesy layers and the crispy baked top is pure heaven. It’s the kind of dish that’s perfect for a rainy day, a cozy night in, or just when you’re craving something ultra-comforting. I promise, once you try it, you’ll never go back to boxed mac and cheese again!
A Few Extra Tips:
- Undercooking the pasta: This is super important to avoid mushy mac and cheese. It’ll finish cooking while it bakes.
- The cheese combo: Mixing processed cream cheese with sharp cheddar gives you the best of both worlds – creaminess and flavor. Don’t skip the red cheddar either – it adds color and a slightly deeper taste.
- Baking just right: The goal is a crispy, golden crust with gooey cheese underneath. Keep a close eye on it in the oven, so it doesn’t burn.
Give It a Try!
If you’ve never made homemade mac and cheese before, now’s the time to give it a go! I guarantee you’ll fall in love with this cheesy, comforting dish. Drop a comment and let me know how it turns out or what tweaks you made to make it your own. Enjoy every bite!

