

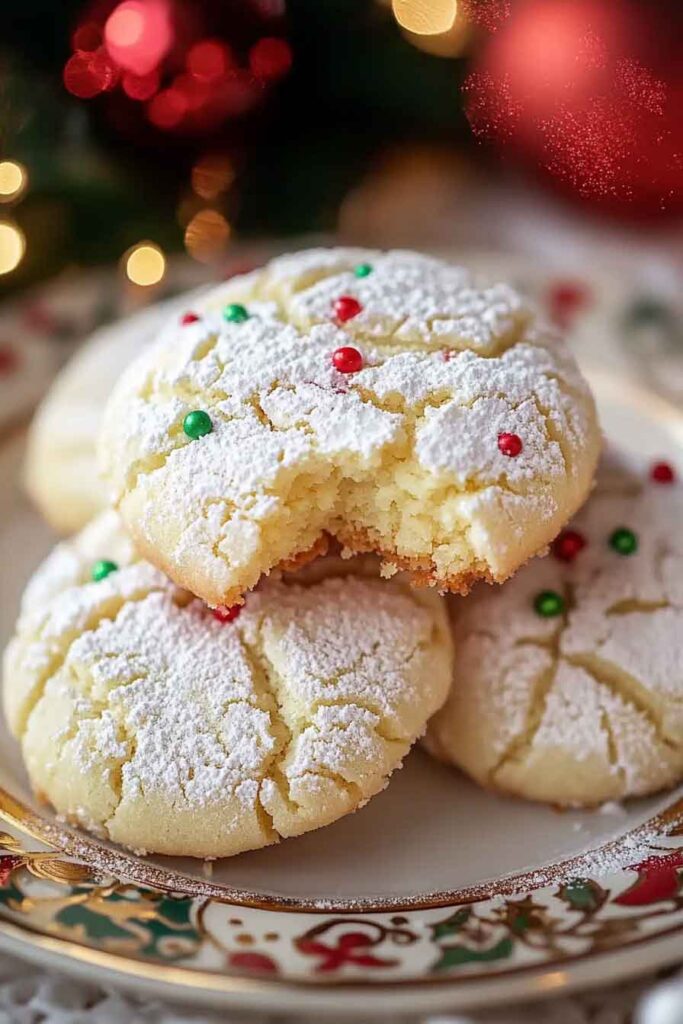
These cookies? Oh wow. They’re soft, sweet, and melt in your mouth. Total Christmas magic in every bite.
I made a batch last night—and yeah, they disappeared fast. Like, real fast. They’re gooey in the middle and lightly crispy outside.
If you want a fun, easy holiday treat, this is it. I make these every year, and now my whole family begs for them.


Why You’ll Love This Recipe
- Festive and Fun: Bright Christmas sprinkles make these cookies pop with color, and they’re sure to add a cheerful touch to any holiday gathering.
- Soft and Gooey: These cookies have the perfect balance of soft, chewy, and slightly gooey texture that will melt in your mouth.
- Simple to Make: No need to chill the dough, and you can make a batch in under an hour—making these cookies a convenient and quick holiday treat.
- Perfect for Cookie Swaps: Make a big batch of these and share with friends, neighbors, and coworkers. They’ll be the star of any cookie exchange.
- Everyone Will Love Them: Even people who aren’t typically into sweets will enjoy the mild sweetness and the melt-in-your-mouth texture.
Required Kitchen Tools
Before we get started, let’s make sure you have everything you need to bake these Christmas Ooey Gooey Butter Cookies. It’s a pretty straightforward process, so no fancy gadgets required—just a few essential tools for a successful baking session.
Tools Needed:
- Mixing Bowls: You’ll need a couple of mixing bowls to combine your wet and dry ingredients separately.
- Electric Mixer (Stand or Handheld): Since we’ll be beating cream cheese and butter together, a mixer will help make the process easier and give you that smooth, creamy consistency.
- Baking Sheets: Line them with parchment paper to prevent the cookies from sticking.
- Cookie Scoop or Tablespoon: A cookie scoop helps you portion out the dough evenly, but a tablespoon will also work just fine.
- Cooling Rack: Allow the cookies to cool properly on a wire rack so they don’t get soggy and maintain that perfect texture.
Ingredients
This recipe is simple, with most ingredients likely already in your pantry. It’s a few basic ingredients that come together to create a rich, buttery, and gooey cookie that tastes just like the holidays.
Here’s what you need:
- Salted Butter (Softened): The base of this cookie is butter, which gives it that irresistible richness and flavor. Using salted butter helps balance out the sweetness of the dough.
- Cream Cheese (Softened): The cream cheese is what makes these cookies gooey and tender. It adds a slightly tangy flavor that complements the sweetness of the butter and sugar.
- Granulated Sugar: A classic sweetener that helps make the dough soft and gives the cookies that slightly crisp edge when they bake.
- Large Egg (Room Temperature): The egg binds the dough and helps it rise slightly when baked.
- Vanilla Extract: A key flavor that brings out the best in the butter and sugar.
- Confectioners’ Sugar (Divided): Used to make the dough and for rolling the cookies. Powdered sugar ensures a soft, melt-in-your-mouth texture.
- Baking Powder: A leavening agent that ensures the cookies rise a little bit and have a tender crumb.
- Christmas Sprinkles: Because it’s the holiday season, you can’t go wrong with a festive sprinkle! These will add both a fun pop of color and a slight crunch to each bite.
Step-by-Step Instructions
1. Cream the Butter and Cream Cheese
Start by creaming together the softened butter and cream cheese using a hand or stand mixer. Mix them together for about 2-3 minutes on medium speed until the mixture is smooth, light, and fluffy. The butter and cream cheese need to be softened, so it blends evenly into the dough and achieves that perfectly gooey texture.
2. Add the Sugars and Beat Again
Next, add in the granulated sugar and beat the mixture for an additional 2-3 minutes until the sugar is fully incorporated, and the mixture becomes light and fluffy. This step is crucial to achieve that melt-in-your-mouth texture.
After that, add the egg and vanilla extract. Beat on low speed until everything is fully combined and the dough is smooth. The vanilla extract adds a rich flavor that’s perfect for the holiday season.
3. Mix in the Dry Ingredients
In a separate bowl, combine the dry ingredients—confectioners’ sugar, baking powder, and a pinch of salt. Slowly add this mixture into the wet mixture, mixing until just combined. You don’t want to overmix at this stage, as that could result in a denser cookie. The dough will be thick and slightly sticky.
4. Shape the Cookies
Using a cookie scoop or a tablespoon, scoop out about 1.5 tablespoons of dough for each cookie. Roll the dough into a ball and then roll it in a shallow bowl filled with extra powdered sugar until fully coated. This step will give the cookies their classic crackly, gooey look when they bake.
5. Bake the Cookies
Preheat your oven to 350°F (175°C) and line two baking sheets with parchment paper. Place the dough balls on the sheets, spacing them about 2 inches apart. The cookies will spread slightly as they bake, so give them some room.
Bake the cookies for 10-12 minutes, or until the edges are lightly golden and the centers are still soft and slightly gooey. The centers may seem a little underdone, but they will firm up as they cool, leaving you with that perfect ooey-gooey texture.
6. Cool and Enjoy
Once baked, let the cookies rest on the baking sheet for about 5 minutes. This allows them to set before transferring them to a cooling rack. After they’ve cooled completely, they are ready to enjoy!
How to Serve Christmas Ooey Gooey Butter Cookies
These cookies are delicious all on their own, but if you’re looking to elevate your cookie experience, here are a few fun serving ideas:
- With a Hot Drink: Pair these buttery cookies with a cup of hot cocoa, mulled cider, or a latte. The warm drink complements the gooey texture of the cookies perfectly.
- Gift Them: Place the cookies in a cute holiday tin or a box, and they make a fantastic homemade gift for friends, family, or coworkers.
- Holiday Parties: If you’re hosting a holiday gathering, these cookies will be the first thing to disappear off the plate. Their festive look and delightful taste make them a perfect addition to any holiday spread.
Variations for Christmas Ooey Gooey Butter Cookies
While this recipe is already perfect as-is, you can easily adapt it to your taste. Here are a few ideas for variations to customize your cookies for different holiday flavors:
- Swap the Sprinkles: If you’re feeling adventurous, try using colored sugar, crushed candy canes, or even mini chocolate chips instead of traditional sprinkles.
- Add Zest: Add some zest from an orange or lemon to bring a fresh, citrusy twist to the flavor.
- Go for a Chocolate Version: Incorporate cocoa powder into the dough for a chocolatey version of these ooey gooey cookies, or swirl in some melted chocolate chips for an extra indulgent treat.
- Mini Candy Versions: Add a small piece of your favorite candy, like a Hershey’s kiss, inside the dough before rolling it into a ball.
Storing Christmas Ooey Gooey Butter Cookies
These cookies are so delicious, they might not last long! But if you happen to have leftovers, here’s how to store them properly to maintain that soft and gooey texture:
- Room Temperature: Store the cookies in an airtight container at room temperature for up to 5 days. They’ll stay fresh and soft, perfect for snacking throughout the holiday season.
- Freezing: If you want to prepare ahead of time or save them for later, you can freeze the baked cookies. Place them in a freezer-safe container or bag, and they’ll last for up to 3 months. Let them thaw at room temperature or reheat gently in the microwave for that fresh, gooey experience.
Helpful Tips for Perfect Ooey Gooey Butter Cookies
These cookies are pretty foolproof, but there are a few extra tips to make them even better:
1. Use Softened Butter and Cream Cheese
For the best texture, both your butter and cream cheese should be softened to room temperature. This allows them to blend together easily and helps create that creamy, gooey dough. If you forget to set them out in advance, a quick trick is to microwave the butter and cream cheese for 10-15 seconds to soften them.
2. Don’t Overmix the Dough
Once you’ve added the dry ingredients to the wet ones, mix until just combined. Overmixing can cause the cookies to become dense rather than light and airy. The dough should be thick and sticky, but it should still come together easily.
3. Chill the Dough (Optional)
Although chilling isn’t required for this recipe, it can help if you find that your dough is too sticky to roll. Just pop it in the fridge for 15-20 minutes to firm it up a bit before rolling into balls. This can also help the cookies hold their shape a bit better during baking.
4. Check for Doneness by the Edges
Since these cookies are meant to be soft and gooey in the middle, the best way to check for doneness is to look at the edges. When they turn lightly golden and the center still looks soft, they’re ready to come out of the oven. Be careful not to overbake them or they’ll lose that perfect gooey texture.
5. Let Them Cool on the Baking Sheet
When you remove the cookies from the oven, let them cool on the baking sheet for about 5 minutes. This gives them time to firm up slightly before transferring to a wire rack. If you try to move them too quickly, they might break or lose their shape.
6. Use a Cookie Scoop for Even Size
A cookie scoop ensures that each cookie is the same size, meaning they’ll bake evenly. If you don’t have a cookie scoop, you can use a tablespoon, but the scoop really makes the process quicker and more consistent.
Fun Variations for Christmas Ooey Gooey Butter Cookies
While the original recipe is fantastic on its own, don’t hesitate to get creative with these variations! Here are some ideas to personalize your cookies:
1. Chocolate Swirl
For a rich chocolate version of these cookies, add 1/4 cup of cocoa powder to the dry ingredients. You can also swirl in some melted chocolate or mini chocolate chips into the dough for an extra decadent treat.
2. Candy Cane Crumbles
If you love the classic holiday flavor of peppermint, crush some candy canes and fold them into the dough. You can also use crushed candy canes as a topping when the cookies are fresh out of the oven, adding a crunchy, minty touch.
3. Orange Zest for a Citrusy Twist
For a pop of citrusy freshness, try adding the zest of one orange to the dough. The citrus flavor pairs wonderfully with the sweetness of the butter and adds a refreshing element that’s perfect for holiday baking.
4. Brown Sugar Option
For a deeper, richer flavor, you can swap out half of the granulated sugar with brown sugar. This will make the cookies a little more caramel-flavored, giving them an extra layer of sweetness and warmth.
5. Nutty Add-ins
If you’re a fan of nuts, try adding chopped pecans, walnuts, or even macadamia nuts to the dough. They will add a satisfying crunch and a bit of extra texture to the gooey cookies.
Frequently Asked Questions (FAQs)
1. Can I use unsalted butter instead of salted butter?
Yes, you can absolutely use unsalted butter if that’s what you have on hand. If you do use unsalted butter, just be sure to add a pinch of salt to the dough. Salt helps enhance the flavors and balance the sweetness.
2. Can I make the dough ahead of time?
Yes! You can make the dough ahead of time and store it in the fridge for up to 2-3 days. When you’re ready to bake, just roll the dough into balls and bake as directed. Alternatively, you can freeze the dough for up to 3 months. Just scoop the dough into balls, freeze them on a baking sheet, and then transfer them to a freezer bag. When you’re ready to bake, no need to thaw; just bake them for an extra minute or two.
3. How do I store the cookies to keep them fresh?
Store your cookies in an airtight container at room temperature for up to 5 days. You can also place a slice of bread in the container with the cookies. This trick helps to keep them moist and soft for a longer period of time. If you want to freeze the cookies, just make sure they’re fully cooled before placing them in a freezer-safe container. They can last for up to 3 months in the freezer.
4. Can I add more sprinkles or leave them out?
Of course! If you’re not a fan of sprinkles, feel free to skip them. You can also add extra sprinkles or use a variety of colors to make the cookies even more festive. Just keep in mind that the sprinkles will add a bit of crunch, so it’s a great way to give your cookies a little extra texture.
5. Why do my cookies spread too much?
If your cookies spread too much during baking, it could be due to the dough being too soft. Make sure your butter and cream cheese are softened but not too warm. Also, avoid overmixing the dough, as this can cause the cookies to spread more than desired. Chilling the dough for a bit before baking can help prevent excessive spreading.
How to Serve Christmas Ooey Gooey Butter Cookies
Now that you’ve made these delicious cookies, here are a few ways to serve them up and add a little extra holiday cheer:
- Holiday Cookie Platters: Serve these cookies alongside other holiday favorites, like gingerbread cookies, snickerdoodles, or sugar cookies. The gooey texture and buttery flavor will make them stand out as a crowd favorite.
- With Milk: You can never go wrong with a glass of cold milk to pair with these ooey-gooey cookies. The milk balances the richness of the butter and cream cheese, making it the perfect dip for your holiday treat.
- Decorated Cookie Plates: If you’re sending these as a gift, package them in a cute holiday tin or on a decorated plate. Add a little ribbon, and you’ve got a perfect homemade gift for family, friends, or coworkers.
Storing Christmas Ooey Gooey Butter Cookies
You’ll want to enjoy these cookies as fresh as possible, but they do keep well for a few days—if they last that long! Here’s how to store them to maintain their gooey goodness:
1. Room Temperature Storage
Once your cookies have fully cooled, store them in an airtight container at room temperature for up to 5 days. You can layer parchment paper between the cookies to prevent them from sticking to each other. They’ll stay soft and chewy for several days!
2. Freezing Cookies
If you want to save some cookies for later, you can freeze them! Here’s how:
- Freezing Baked Cookies: Let your cookies cool completely before placing them in a freezer-safe bag or container. They will stay fresh in the freezer for up to 3 months. When you’re ready to enjoy, simply let them thaw at room temperature or heat them up in the microwave for a few seconds for that freshly baked taste.
- Freezing Cookie Dough: You can also freeze the dough! Scoop the dough into balls, place them on a baking sheet, and freeze them until solid. Then, transfer them to a freezer-safe bag and freeze for up to 3 months. When you’re ready to bake, simply pop the dough balls onto a baking sheet (no need to thaw) and bake for 1-2 extra minutes.
3. Storing in Cookie Jars
If you’re planning to gift these cookies, a cute holiday-themed cookie jar can be the perfect packaging. Just make sure the jar is airtight to preserve the cookies’ freshness. Add a personalized tag, and you’ve got a great gift for friends or neighbors!
Nutritional Information for Christmas Ooey Gooey Butter Cookies
As much as we love the ooey gooey goodness, it’s always nice to know what you’re eating. Here’s a basic nutritional breakdown for each cookie based on standard ingredients:
| Nutrient | Per Cookie (1 cookie) |
|---|---|
| Calories | ~200-250 kcal |
| Protein | ~2 g |
| Total Fat | ~11 g |
| Saturated Fat | ~6 g |
| Carbohydrates | ~28 g |
| Fiber | ~0.5 g |
| Sugars | ~20 g |
| Sodium | ~110 mg |
Note:
- Calories: These cookies are a rich treat, so make sure to enjoy them in moderation.
- Fat: The combination of butter and cream cheese makes these cookies indulgent, with a good amount of fat contributing to their signature texture.
- Sugar: These cookies are on the sweeter side, thanks to the combination of granulated and powdered sugar, plus any sprinkles you add.
- Sodium: If you’re using salted butter, the sodium content will be on the higher end, but the slight saltiness complements the sweetness well.

Christmas Ooey Gooey Butter Cookies
Course: Uncategorized24
cookies15
minutes10
minutes~200-250 kcal
kcalIngredients
Salted Butter, softened: 1/2 cup
Cream Cheese, softened: 8 oz
Granulated Sugar: 1 cup
Egg, room temperature: 1 large
Vanilla Extract: 1 tsp
Confectioners’ Sugar (divided): 1 1/2 cups
Baking Powder: 1 tsp
Christmas Sprinkles (optional): for decoration
Directions
- Preheat oven to 350°F (177°C) and line a baking sheet with parchment paper.
- Mix wet ingredients: In a large bowl, beat together the softened butter, cream cheese, and granulated sugar until creamy. Add the egg and vanilla extract, mixing until fully incorporated.
- Add dry ingredients: Gradually add the baking powder and confectioners’ sugar, mixing until the dough comes together.
- Form cookies: Using a cookie scoop or tablespoon, scoop the dough into balls and roll them in the remaining powdered sugar. Place them on the baking sheet, spacing them about 2 inches apart.
- Bake: Bake for 10-12 minutes or until the edges are golden but the center is still soft.
- Cool: Let the cookies cool on the baking sheet for 5 minutes, then transfer them to a wire rack to cool completely. If desired, top with Christmas sprinkles for extra festive flair.
Final Thoughts on Christmas Ooey Gooey Butter Cookies
Whether you’re baking them for a family gathering, a holiday cookie swap, or just as a special treat for yourself, these Christmas Ooey Gooey Butter Cookies are sure to make everyone’s taste buds dance. The perfect balance of buttery richness and sweetness, paired with a soft and gooey center, creates the ultimate melt-in-your-mouth experience. Plus, with just a handful of ingredients, you can have these cookies ready in under an hour!
The best part? They’re highly customizable. From sprinkles to citrus or even chocolate variations, you can make these cookies your own and impress your guests with minimal effort. The recipe is simple enough for baking newbies but yields results that will make you look like a seasoned pro.