Chicken Parmesan Recipe

Okay, this Chicken Parmesan? It’s crispy, cheesy, and full of flavor. Like, I could eat it every week.
The first time I made it, I didn’t expect it to be that good. But oh wow, it was better than takeout. The sauce, the cheese, the crunch—so good.
You just need a few basic things. Chicken, sauce, cheese, boom. It’s super simple, and it feels fancy.
Let’s get started. I’ll show you exactly how I make it. You’re gonna love this one.
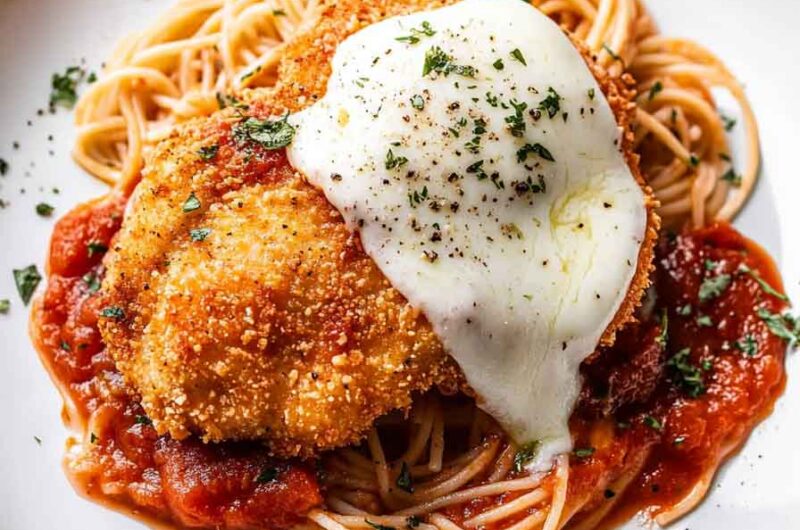
Why You’ll Love This Recipe:
- Reader Favorite: It’s a classic for a reason! Thousands of readers have tried and loved this recipe, and many say it’s their favorite Chicken Parmesan ever.
- Crispy, Crunchy Coating: The combination of panko breadcrumbs and Parmesan gives a satisfying crunch that contrasts perfectly with the tender chicken inside.
- Made From Scratch: We’re making this from scratch, and trust me, it’s worth it! The homemade tomato sauce adds an extra layer of depth and flavor.
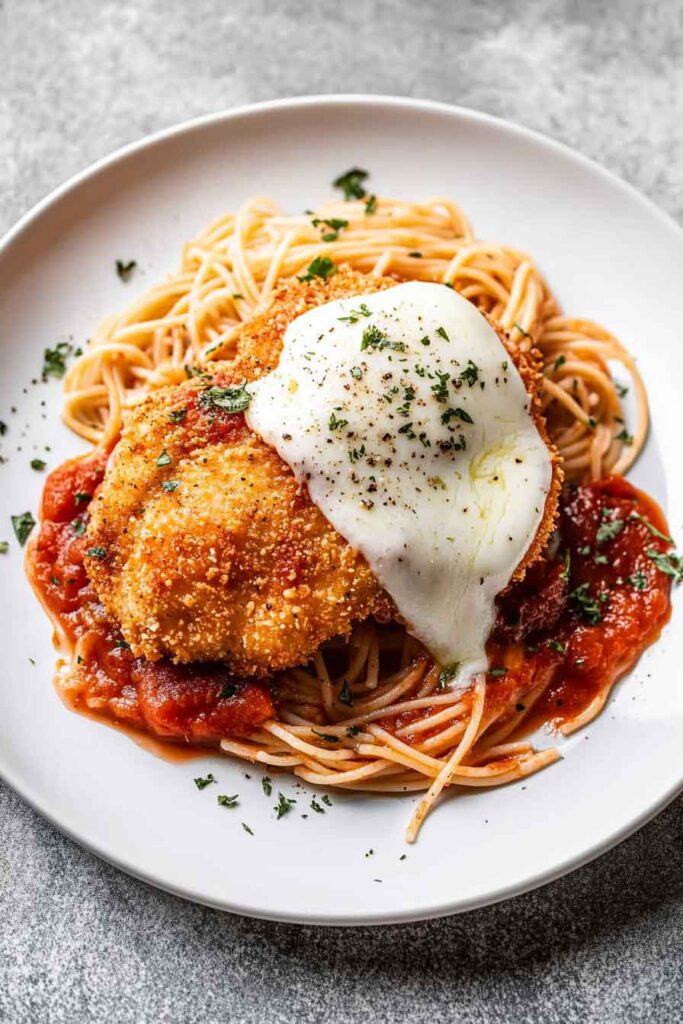
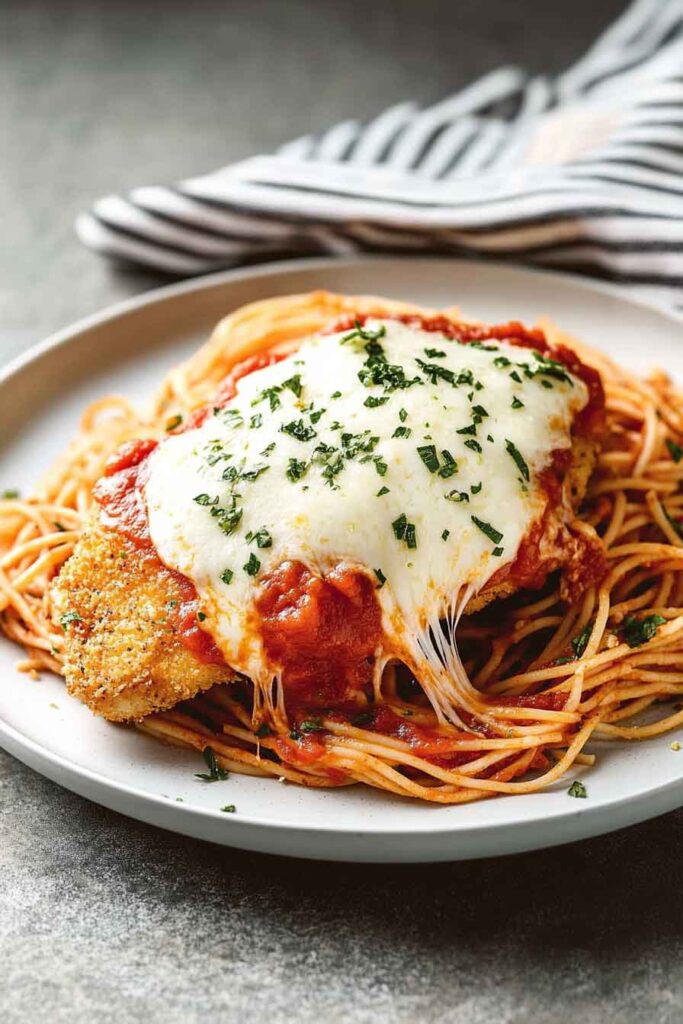
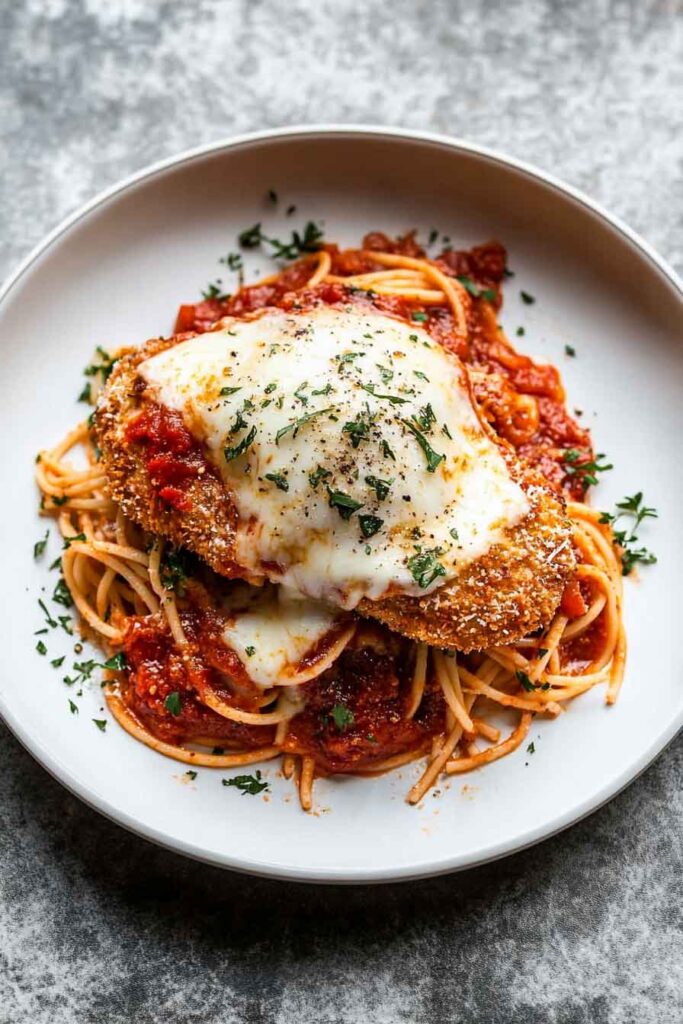
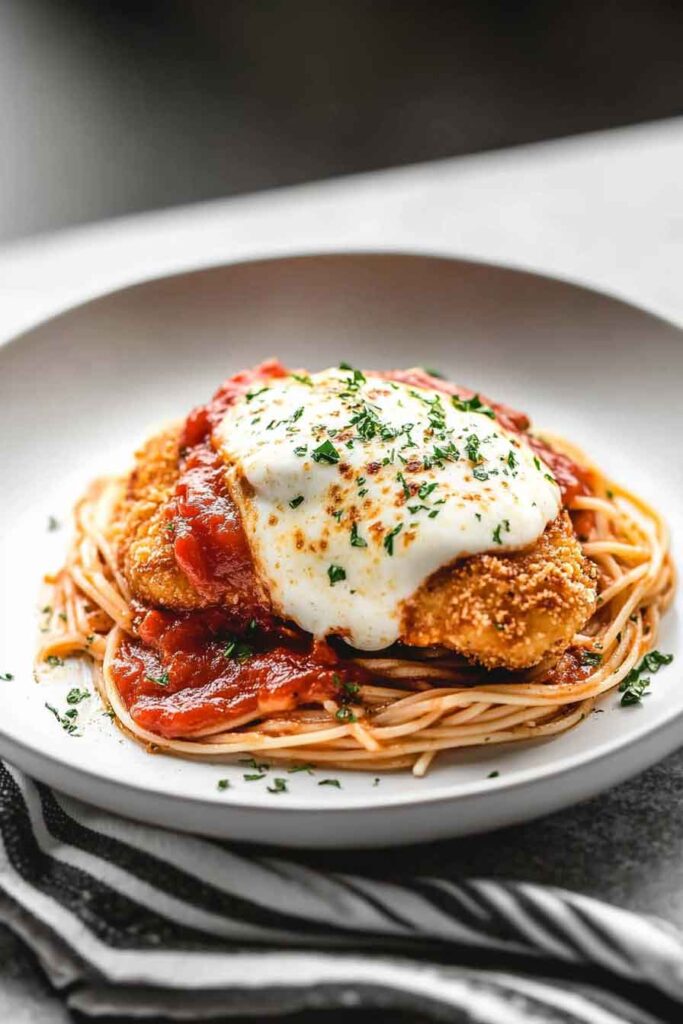
- Cheese Galore: Fresh mozzarella and provolone melt beautifully over the chicken, creating that cheesy, gooey perfection you can’t resist.
- Perfect for Meal Prep: Make a big batch and store it for lunches or quick dinners throughout the week. It’s just as delicious reheated!
Ingredients
Here’s what you’ll need for the most delicious Chicken Parmesan:
- Skinless, Boneless Chicken Breast Halves: These are the foundation of the dish. Boneless chicken breast ensures even cooking and a tender, juicy bite.
- Salt and Freshly Ground Black Pepper: Essential for seasoning the chicken and bringing out its natural flavors.
- Large Eggs: Used for dipping the chicken in before coating it with breadcrumbs, which helps the breadcrumbs adhere and gives that crispy texture.
- Panko Breadcrumbs: These breadcrumbs give the chicken that perfect crispy coating. They’re lighter and crunchier than regular breadcrumbs, making them ideal for this recipe.
- Grated Parmesan Cheese: Added to the breadcrumb mixture to give the chicken a cheesy, golden crust.
- All-Purpose Flour: For dredging the chicken before egg and breadcrumbs, creating the perfect coating.
- Olive Oil for Frying: Olive oil adds flavor and ensures that golden, crispy finish on the chicken.
Required Kitchen Tools:
- Meat Mallet: To pound the chicken breasts to an even thickness for uniform cooking.
- Shallow Bowls: For dredging the chicken in flour, eggs, and breadcrumbs.
- Large Skillet or Frying Pan: A heavy skillet is ideal for frying the chicken evenly and to the perfect crispiness.
- Oven-Safe Baking Dish: To bake the chicken after frying, ensuring everything gets bubbly and perfectly cooked.
- Meat Thermometer: For checking the internal temperature of the chicken to ensure it’s cooked through (165°F).
Step-by-Step Instructions:
1. Prepare the Chicken
Start by tenderizing your chicken breasts. Place them between two sheets of parchment paper or plastic wrap and use a meat mallet to pound them to an even thickness (about 1/2 inch thick). This ensures that the chicken cooks evenly and stays juicy on the inside while becoming crispy on the outside.
2. Season the Chicken
Season both sides of the chicken with salt and freshly ground black pepper. This simple seasoning is all you need to enhance the natural flavors of the chicken before adding the breadcrumbs and sauce.
3. Set Up Your Dredging Station
Set up a dredging station with three shallow bowls:
- First Bowl: Fill with flour.
- Second Bowl: Beat the eggs in the second bowl.
- Third Bowl: Combine panko breadcrumbs and grated Parmesan cheese in the third bowl.
Dip each chicken breast into the flour, making sure it’s well-coated on both sides. Then, dip it into the egg wash, ensuring the chicken is fully covered. Finally, coat the chicken in the breadcrumb mixture, pressing down slightly to make sure the crumbs stick. Repeat for all pieces of chicken.
4. Fry the Chicken
Heat a few tablespoons of olive oil in a large skillet over medium-high heat. Once the oil is hot, add the chicken breasts to the pan. Be sure not to overcrowd the pan to ensure the chicken gets crispy. Fry each piece for 3-4 minutes per side, or until golden brown and crispy. You may need to do this in batches depending on the size of your skillet.
Once the chicken is fried, transfer it to a plate lined with paper towels to drain any excess oil.
5. Prepare the Tomato Sauce
While your chicken is frying, it’s time to prepare the homemade tomato sauce that will complement the crispy chicken perfectly. You can use store-bought sauce, but homemade gives an extra boost of flavor that takes the dish to the next level. Here’s how to make the simple, yet delicious tomato sauce:
Ingredients for Tomato Sauce:
- Olive Oil: For sautéing the garlic and onions.
- Garlic: Freshly minced garlic adds amazing flavor to the sauce.
- Onion: Diced onion will form the base of the sauce and add sweetness.
- Canned Crushed Tomatoes: For the bulk of the sauce, use high-quality crushed tomatoes.
- Dried Italian Herbs (Basil, Oregano): These spices bring that Italian flavor we all love.
- Salt and Pepper: For seasoning and balancing the flavors.
- Sugar (optional): A pinch of sugar can help cut through the acidity of the tomatoes, balancing the flavors.
Instructions for the Sauce:
- Heat a tablespoon of olive oil in a large saucepan over medium heat.
- Add the diced onions and sauté for 2-3 minutes until soft and translucent.
- Add the minced garlic and cook for another 30 seconds, just until fragrant.
- Stir in the crushed tomatoes, dried basil, oregano, salt, pepper, and sugar (if using).
- Bring the sauce to a simmer, then lower the heat and cook for 15-20 minutes, stirring occasionally. The sauce should thicken slightly. Taste and adjust seasoning as necessary.
Once your sauce is ready, set it aside while you move on to the next step.
6. Assemble the Chicken Parmesan
Now that your chicken and tomato sauce are ready, it’s time to assemble your Chicken Parmesan. This is where the magic happens. Here’s how to do it:
- Preheat your oven to 375°F (190°C).
- In a large, oven-safe baking dish, spread a thin layer of tomato sauce to prevent the chicken from sticking.
- Place your crispy fried chicken breasts in the baking dish.
- Spoon more of the tomato sauce over each piece of chicken, making sure each breast is generously covered with sauce.
- Top each chicken breast with cubes of fresh mozzarella cheese and a sprinkle of grated provolone cheese for that extra cheesiness.
- Finish with a final sprinkle of Parmesan cheese for that crispy, golden layer of cheese.
7. Bake the Chicken Parmesan
Now it’s time to bake your Chicken Parmesan to melt the cheeses and bring all the flavors together.
- Place the baking dish in the preheated oven and bake for 20-25 minutes, or until the cheese is bubbling and golden brown.
- If you want an extra crispy top, broil for the last 2-3 minutes, but keep a close eye on it to avoid burning.
8. Serving Suggestions for Chicken Parmesan
Chicken Parmesan is one of those dishes that’s perfect on its own, but it’s even better when paired with the right sides. Here are some ideas on how to serve this delicious meal:
- Classic Spaghetti: The traditional pairing! Serve the Chicken Parmesan over a bed of spaghetti or your favorite pasta. The marinara sauce from the chicken seeps into the noodles, making every bite a dream.
- Garlic Bread: You can’t go wrong with a side of crispy garlic bread. It’s perfect for soaking up the extra tomato sauce.
- Steamed Vegetables: For a healthier option, serve the Chicken Parmesan with some steamed broccoli or sautéed spinach.
- Caesar Salad: A light salad with crispy romaine lettuce, Parmesan cheese, croutons, and a tangy Caesar dressing pairs beautifully with this rich dish.
- Risotto: If you want to elevate the meal, serve it with a creamy Parmesan risotto. The richness of the risotto complements the crispy chicken perfectly.
9. Storing Chicken Parmesan
If you’ve made a large batch of Chicken Parmesan or have leftovers, don’t worry! This dish stores well and can be easily reheated.
- Refrigerating Leftovers: Allow the Chicken Parmesan to cool to room temperature, then store it in an airtight container in the refrigerator for 3-4 days. To reheat, simply cover with foil and warm in the oven at 350°F (175°C) until heated through, about 15-20 minutes.
- Freezing Chicken Parmesan: You can also freeze Chicken Parmesan for later! After baking, allow the dish to cool completely, then cover it tightly with plastic wrap and foil. It will stay good in the freezer for up to 3 months. To reheat, thaw in the refrigerator overnight and bake at 375°F (190°C) until heated through and the cheese is bubbly.
10. Nutrition Information (Optional)
For those keeping an eye on nutrition, here’s an estimate of what you can expect per serving of Chicken Parmesan:
| Nutrient | Amount per Serving |
|---|---|
| Calories | 500-600 kcal |
| Protein | 45g |
| Fat | 30g |
| Carbohydrates | 30g |
| Fiber | 4g |
| Sugar | 5g |
| Sodium | 900mg |
Note: Nutrition values are approximate and can vary based on specific ingredients used.
11. Tips and Tricks for Success
- Pounding the Chicken: Don’t skip the step of pounding the chicken to an even thickness. It ensures even cooking and helps the breading stay intact.
- Use Fresh Mozzarella: Fresh mozzarella melts better than pre-shredded cheese, giving you that gooey, stringy texture we all love.
- Double-Dip for Extra Crunch: For an even crunchier coating, dip the chicken back in the egg and breadcrumbs after the first coating. This gives you a thicker, crispier crust.
- Don’t Overcrowd the Pan: Fry the chicken in batches to ensure each piece gets crispy. If the pan is too crowded, the chicken will steam instead of crisping up.
12. Conclusion (Encouragement + Call-to-Action)
Chicken Parmesan is the ultimate comfort food. With its crispy breading, savory marinara, and gooey melted cheese, it’s a meal that everyone will love. Whether you’re cooking for a family dinner or a special occasion, this dish will never disappoint. I hope you give this recipe a try and see how easy it is to make at home! Don’t forget to share your results with me—I’d love to see how your Chicken Parmesan turns out. And if you enjoyed this recipe, make sure to check out more mouthwatering meals right here!
Chicken Parmesan Recipe – The Ultimate Comfort Food
Course: Uncategorized4
servings20
minutes35
minutes500-600
kcalIngredients
- For the Chicken:
4 skinless, boneless chicken breast halves
Salt and freshly ground black pepper, to taste
2 large eggs
1 cup panko breadcrumbs
1/2 cup grated Parmesan cheese
1 cup all-purpose flour
Olive oil for frying
- For the Tomato Sauce:
1 tablespoon olive oil
1 medium onion, diced
3 cloves garlic, minced
1 (28 oz) can crushed tomatoes
1 teaspoon dried basil
1 teaspoon dried oregano
Salt and pepper to taste
1/2 teaspoon sugar (optional)
- For Assembling:
8 oz fresh mozzarella, cut into small cubes
1/2 cup grated provolone cheese
1/4 cup grated Parmesan cheese
Directions
- Prepare and season chicken breasts. Dredge in flour, dip in beaten eggs, and coat with panko-Parmesan mixture.
- Fry chicken in hot olive oil until golden brown and crispy on both sides, then set aside.
- For the sauce, sauté onion and garlic, add crushed tomatoes, herbs, salt, and pepper, and simmer for 15-20 minutes.
- Preheat oven to 375°F. In a baking dish, layer the fried chicken, top with sauce, mozzarella, provolone, and Parmesan.
- Bake for 20-25 minutes until cheese is bubbly. Serve with your favorite side!
Chicken Parmesan FAQs
Can I use chicken thighs instead of chicken breasts? Yes, chicken thighs work great for this recipe. They are a bit juicier than chicken breasts and will add extra flavor.
Can I make Chicken Parmesan ahead of time? Yes! You can prepare everything up until the baking step, refrigerate overnight, and bake the next day.
Can I use a store-bought tomato sauce? Absolutely! While homemade sauce is best, store-bought sauce can save time without sacrificing too much flavor.
Conclusion (Encouragement + Call-to-Action)
Chicken Parmesan is the ultimate comfort food, combining crispy breaded chicken, savory marinara sauce, and gooey melted cheese in every bite. It’s the kind of dish that’s perfect for any occasion, whether you’re feeding your family, entertaining guests, or simply craving something delicious and hearty. I hope this recipe brings a little slice of Italy to your kitchen and that you enjoy every mouthful.