Candy Cane Cheesecake Ice Cream Cones

Okay, wait. You have to try these Candy Cane Cheesecake Ice Cream Cones. They taste like Christmas and dessert had a baby.
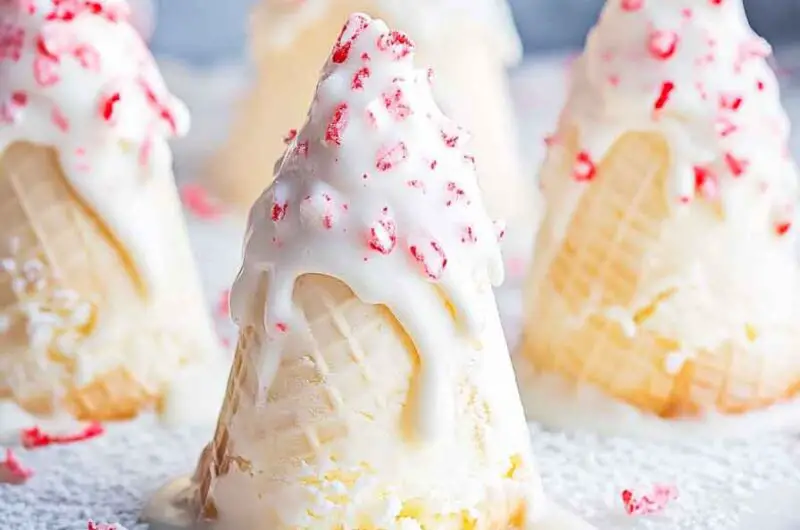
We made them last weekend—and wow. Crunchy cones, creamy cheesecake filling, and that cool minty candy cane on top? Pure joy.
They’re super easy too. No oven, no stress, just mix, swirl, and boom—holiday magic. I couldn’t stop at one.
So yeah, let’s make these together. You’re gonna love how simple and fun they are. Grab your cones and let’s get started!

Why You’ll Love This Recipe
- Reader Favorite: Candy Cane Cheesecake Ice Cream Cones are a hit every time! As one reader put it, “It’s the best winter dessert I’ve made in years – everyone loves them!”
- Festive & Fun: A delicious and fun way to celebrate the holidays with minty candy cane goodness and cheesecake indulgence.
- No Baking Required: This recipe is perfect for those who don’t want to turn on the oven but still crave a decadent dessert.
- Easy to Make: With simple ingredients and straightforward steps, these ice cream cones come together quickly.
- Perfect for Parties: Serve them at your next holiday get-together or festive dinner and watch as guests rave about them.
Required Kitchen Tools
Before diving into the recipe, make sure you have the following kitchen tools on hand to ensure a smooth process:
- Electric Mixer or Hand Whisk: To beat the cream cheese and whipping cream to a smooth consistency.
- Large Mixing Bowls: You’ll need a large bowl to mix the filling and a smaller one to crush the candy canes.
- Ice Cream Cones: Choose a sturdy cone that will hold the cheesecake filling without crumbling.
- Spatula: For spreading the cheesecake mixture into the cones.
- Piping Bag (optional): If you want to make the filling look extra pretty, you can pipe it into the cones.
- Chilled Serving Tray: To keep your ice cream cones chilled before serving.

Ingredients
To make these delicious treats, you’ll need the following ingredients (exact measurements can be found in the recipe card below):
- Candy Canes (plus extra for garnish): Crushed candy canes provide that perfect minty flavor and a bit of crunch.
- Thickened Cream: The base of the cheesecake filling, which adds richness and creaminess.
- Icing Sugar Mixture: A sweetener that adds smoothness and sweetness to the cheesecake filling.
- Cream Cheese (at room temperature): Softened cream cheese ensures that your cheesecake mixture is velvety and smooth.
- Peppermint Essence: Adds the refreshing minty flavor that pairs perfectly with the candy canes.
- Desiccated Coconut: Optional, but it adds a nice texture and a hint of coconut flavor that complements the mint.
- Melted White Chocolate: Drizzle it over the top for a luxurious finishing touch.
Variations for Candy Cane Cheesecake Ice Cream Cones
This recipe is super customizable, so feel free to make adjustments based on your preferences or dietary needs:
- Use Dark Chocolate: If you’re not a fan of white chocolate, feel free to drizzle dark chocolate over the cones instead.
- Add More Candy Canes: For a stronger peppermint flavor and more crunch, increase the amount of crushed candy canes.
- Make It Gluten-Free: Swap out the regular ice cream cones for gluten-free cones, so everyone can enjoy this holiday treat.
- Try Different Nuts: Swap out the desiccated coconut for chopped nuts like almonds, pistachios, or hazelnuts for added texture.
- Use Vegan Cream Cheese: For a dairy-free option, try using vegan cream cheese and coconut cream to make this treat plant-based.

Step-by-Step Instructions
1. Crush the Candy Canes
The first step in making these decadent Candy Cane Cheesecake Ice Cream Cones is to crush the candy canes. To do this, simply place the candy canes in a Ziploc bag and use a rolling pin to break them up into small, manageable pieces. You can crush them as finely or as coarsely as you like, but a combination of big and small pieces works best for texture. Reserve some crushed candy canes for garnish later on.
2. Prepare the Cheesecake Filling
In a large mixing bowl, combine the softened cream cheese and icing sugar mixture. Using an electric mixer (or a whisk if you’re feeling strong!), beat them together until smooth. Next, add in the thickened cream and peppermint essence. Beat the mixture again until it thickens and forms a rich, creamy consistency. If the mixture is too runny, you can add a little more cream cheese or icing sugar to thicken it up.
Now, gently fold in the crushed candy canes, saving some for sprinkling on top of the cones later.
3. Fill the Ice Cream Cones
Grab your ice cream cones and begin filling them with the cheesecake mixture. If you want a clean, professional look, use a piping bag to pipe the filling neatly into each cone. Otherwise, you can simply spoon the mixture into the cones and spread it with a spatula. Fill each cone generously, but leave a little space at the top for the chocolate drizzle and extra candy cane garnish.
4. Drizzle with White Chocolate
Take the melted white chocolate and drizzle it over the top of the filled cones. For an added touch, you can even dip the edges of the cones in the melted white chocolate for an extra layer of indulgence. Allow the white chocolate to set before serving. You can pop the cones into the fridge for a few minutes to speed up the process.
5. Garnish and Serve
Finally, sprinkle the remaining crushed candy canes on top of each cone for a festive look and added flavor. If you like, you can also sprinkle a bit of desiccated coconut on top for extra texture and a tropical twist.
How to Serve Candy Cane Cheesecake Ice Cream Cones
Candy Cane Cheesecake Ice Cream Cones are great for any holiday celebration, so here’s how to serve them:
- Holiday Parties: Serve them as a fun and festive dessert at your next Christmas or New Year’s gathering.
- Gift Idea: Wrap each cone in festive cellophane and give them as sweet homemade gifts.
- After-Dinner Treat: Enjoy these cones as a delightful way to end a holiday meal.
- Kids’ Parties: Kids will love these ice cream cones, especially with the fun candy cane crunch and chocolate drizzle.
These cones are best enjoyed within a few hours of making them, but you can also store them in the fridge for up to 2 days if needed.

Storing Candy Cane Cheesecake Ice Cream Cones
- Unfilled Cones: If you want to make the cones ahead of time, you can prepare the cheesecake filling in advance and store it separately in the fridge. Then, fill the cones just before serving.
- Filled Cones: If you have any leftovers, store the filled cones in an airtight container in the fridge for up to 2 days. Be sure to cover them with plastic wrap or foil to prevent the cones from becoming soggy.
Nutrition (Approximate per serving)
| Nutrient | Amount |
|---|---|
| Calories | 350 kcal |
| Fat | 22g |
| Carbohydrates | 35g |
| Protein | 3g |
| Sugar | 28g |
| Fiber | 1g |
(Note: Nutritional values are based on approximate averages and may vary depending on exact ingredient brands and portion sizes.)
Candy Cane Cheesecake Ice Cream Cone FAQs
Can I make these ahead of time?
Yes! You can prepare the cheesecake filling and fill the cones up to 24 hours in advance. Just be sure to store them in an airtight container in the fridge.
Can I use regular chocolate instead of white chocolate?
Of course! Dark chocolate or milk chocolate would be delicious as well.
How long do these cones last?
They last about 2 days when stored in the fridge. Make sure the cones are well-covered to avoid them getting soggy.
Can I make these without candy canes?
Absolutely! If you can’t find candy canes, you can use peppermint candies or even mint chocolate chips.
Fun Flavor Variations for Candy Cane Cheesecake Ice Cream Cones
The holidays are a perfect time to get creative in the kitchen. While candy canes are the star of this recipe, there are plenty of other ways to infuse exciting flavors into your Candy Cane Cheesecake Ice Cream Cones. Here are some fun ideas to mix things up:
1. Add Chocolate Chips for Extra Crunch
If you love a bit of chocolate in your dessert, try mixing in some mini chocolate chips into the cheesecake filling. Dark or milk chocolate will complement the peppermint perfectly. If you’re feeling extra indulgent, you can also dip the top of the cones in chocolate before drizzling with white chocolate.
2. Make It a Cookie-Crumb Cone
For a little added texture and flavor, you can crush some graham crackers or cookies (like gingerbread cookies, chocolate cookies, or even Oreos) and sprinkle them around the edges of the ice cream cone before filling it with the cheesecake mixture. This will add a crunchy, cookie-like layer to your cones.
3. Swap Candy Canes for Other Holiday Candies
While candy canes are a classic holiday treat, you can try using other holiday-inspired candies to mix things up! Some options include:
- Peppermint Bark: Chopped up pieces of peppermint bark could make a delicious topping or filling alternative.
- Chocolates or Truffles: Use crushed truffles or chocolate-covered mints for a rich twist on the original idea.
- Sugar Sprinkles: If you’re looking for a less minty flavor but still want a festive touch, opt for colorful holiday sugar sprinkles.
4. Add Fresh Fruit or Berries
For a refreshing contrast to the rich cheesecake filling, you can add fresh fruits or berries on top or even incorporate them into the filling itself. Try adding finely chopped strawberries, raspberries, or blueberries. These berries pair beautifully with the minty, creamy flavor of the cones, making for a light, refreshing twist.
5. Switch Up the Drizzle
Instead of white chocolate, you can drizzle with milk chocolate, dark chocolate, or even a strawberry glaze! The type of chocolate you choose will affect the overall flavor of the cones, so pick your favorite or what fits best with the other flavor additions.
6. Incorporate Spices
Add some holiday spice to your cheesecake filling for a deeper, warming flavor. You could mix in ground cinnamon, nutmeg, or even a dash of ginger powder to make these cones feel more like a holiday dessert. A sprinkle of cinnamon on top before serving is also a wonderful finishing touch!
Alternative Ingredients for Dietary Restrictions
The beauty of this recipe lies in its versatility, and it can be adapted to meet various dietary needs. Here are some alternatives you can try to make Candy Cane Cheesecake Ice Cream Cones work for your specific dietary preferences:
Dairy-Free Version
If you or someone you know is avoiding dairy, you can make this dessert dairy-free without sacrificing taste! Here’s what to do:
- Vegan Cream Cheese: Substitute regular cream cheese with a vegan cream cheese alternative, such as Daiya or Tofutti.
- Coconut Whipped Cream: Replace the thickened cream with full-fat coconut milk or coconut whipped cream for a non-dairy alternative that’s rich and creamy.
- Dairy-Free Cones: Choose a dairy-free ice cream cone brand to make sure the entire dessert is dairy-free.
- Vegan White Chocolate: If you want to keep the white chocolate drizzle, be sure to use a vegan white chocolate option, such as those made with coconut or almond milk.
Gluten-Free Version
To make this treat gluten-free, swap the regular ice cream cones for gluten-free cones, which are widely available at most grocery stores. Just ensure that the cones are made in a gluten-free facility to avoid cross-contamination.
Sugar-Free Version
If you’re watching your sugar intake, you can still enjoy these delicious cones by making a few substitutions:
- Sugar-Free Cream Cheese: Look for sugar-free cream cheese or opt for a reduced-fat version.
- Sweeteners: Use a natural sweetener like Stevia, monk fruit, or erythritol to replace the icing sugar mixture in the cheesecake filling. You can also use a sugar-free powdered sugar substitute.
- Sugar-Free Chocolate: For the drizzle, you can use sugar-free chocolate, which is available in most stores.
Nut-Free Version
If you have a nut allergy or need to make these cones nut-free, simply skip the desiccated coconut or any additional nut-based toppings. These cones will still be full of minty and creamy flavor without the need for nuts.
Presentation Tips for Gorgeous Ice Cream Cones
Presentation is key when it comes to making your Candy Cane Cheesecake Ice Cream Cones stand out at your holiday table! Here are some tips to make them even more festive and eye-catching:
1. Serve on a Festive Platter
Place your filled cones on a pretty holiday-themed serving platter or cake stand. This will add to the festive atmosphere and make your cones look like they’re straight out of a food magazine.
2. Add a Holiday Garnish
Top off your cones with a holiday-inspired garnish to elevate the look. A small sprig of fresh mint, a mini candy cane stuck into the top, or a few extra crushed candy canes sprinkled on the cones will give them that extra festive flair.
3. Use Colorful Cones
Not all cones are the same! Try using chocolate-dipped cones or cones with a fun design to give your treats an extra layer of color and excitement. These visually stunning cones will be as delightful to the eyes as they are to the taste buds.
4. Serve in a Mini Ice Cream Cone Stand
For a fun and unique presentation, serve the cones in a mini ice cream cone stand. This will allow each cone to stand tall and showcase its festive topping. You can find these stands in many kitchenware stores, or you can use a simple DIY stand made from foam or cardboard.
How to Make Candy Cane Cheesecake Ice Cream Cones the Star of Your Holiday Spread
Candy Cane Cheesecake Ice Cream Cones are not only a delicious dessert, but they also make for a stunning centerpiece. Whether you’re serving them at a holiday dinner, a cookie exchange, or a party, these cones will steal the show! To make them the star of your spread, consider pairing them with other festive desserts like:
- Sugar Cookies: Bake a batch of classic sugar cookies and decorate them with colorful icing or sprinkles for a simple yet festive treat.
- Eggnog or Hot Chocolate: These cones pair perfectly with a cold glass of eggnog or a warm cup of hot chocolate.
- Peppermint Bark: Another minty holiday treat, peppermint bark is the perfect accompaniment to these cones and adds another layer of flavor.
- Gingerbread Cake: If you’re looking to serve a few desserts, a slice of gingerbread cake with cinnamon frosting will complement the minty, creamy flavor of the cones.
How to Store Your Candy Cane Cheesecake Ice Cream Cones
Proper storage is important to preserve the freshness and quality of your Candy Cane Cheesecake Ice Cream Cones, especially since they include cream cheese and whipped cream. Here’s how to store them:
In the Refrigerator:
If you have any leftover cones or need to prepare them in advance, the best way to store them is in the fridge. Simply:
- Wrap Cones in Plastic Wrap or Foil: Cover the cones loosely with plastic wrap or aluminum foil to avoid the cheesecake filling from drying out.
- Use an Airtight Container: Alternatively, you can place the cones in an airtight container, ensuring the lid is secure to prevent the cones from absorbing odors from the fridge.
- Chill for 1-2 Days: These cones are best enjoyed within 1-2 days of making them to ensure the freshness of the cheesecake filling. After this time, the cones may start to become soggy.
In the Freezer:
You can freeze the Candy Cane Cheesecake Ice Cream Cones if you want to store them for a longer period. Here’s how to do it:
- Freeze the Filling First: If you plan to freeze the cones, it’s best to freeze the cheesecake filling on its own first. Scoop the filling into the cones and place them on a baking sheet. Freeze them until they are firm (about 2-3 hours).
- Wrap and Store: Once frozen, wrap each cone individually in plastic wrap or aluminum foil and then place them in a large freezer bag or airtight container. This will prevent freezer burn and preserve the texture of the cones.
- Thaw Before Serving: To enjoy frozen cones, let them thaw in the refrigerator for a few hours before serving. The cones may soften a little once thawed, but the filling will remain delicious.
For the Best Texture:
If you plan to store the cones for more than a day, consider storing the cones and filling separately, and assemble them just before serving. This ensures the cones remain crisp, and the filling stays fresh and creamy.
How Long Do Candy Cane Cheesecake Ice Cream Cones Last?
The freshness of your Candy Cane Cheesecake Ice Cream Cones largely depends on how they’re stored:
- Refrigerated: When stored properly in the fridge, the cones will last for 1-2 days. After that, the cheesecake filling may begin to soften the cone.
- Frozen: If you freeze the cones, they’ll last for up to 2-3 weeks. The texture of the cones may change slightly when thawed, but they will still taste great!
How to Serve Your Candy Cane Cheesecake Ice Cream Cones
These festive cones are meant to be a fun and beautiful treat, so presenting them properly will elevate your holiday experience. Here are some ways to serve them:
Serve Them Right Away:
These cones are best enjoyed fresh! Once you’ve assembled them with the cheesecake filling and toppings, serve them immediately for the best texture and flavor. They’re perfect for a family gathering, a holiday dinner, or a fun dessert after a Christmas movie marathon.
Perfect for Dessert Buffets:
If you’re hosting a holiday party or gathering, these cones are a showstopper! Serve them as part of a dessert buffet alongside other holiday treats. They’re easy to grab and eat, and their festive presentation will make them the star of the spread.
Add a Warm Beverage:
Pair your Candy Cane Cheesecake Ice Cream Cones with a warm beverage like hot chocolate, spiced cider, or even a festive peppermint latte. The contrast between the cold ice cream and the warm drink creates a cozy and comforting vibe that’s perfect for wintertime.
Mini Cones for a Fun Twist:
If you want to make the cones even more fun, you can use mini ice cream cones. These smaller cones are perfect for serving as bite-sized treats and will allow guests to sample more than one flavor or topping.
Serve as Party Favors or Gifts:
Want to make these cones even more special? Wrap each one up in clear cellophane bags and tie them with a festive ribbon for a delightful party favor or holiday gift. You can also create a batch of these cones and present them in a holiday-themed gift box for a thoughtful homemade treat.
Troubleshooting Tips for Perfect Candy Cane Cheesecake Ice Cream Cones
Making these cones should be an enjoyable experience, but there are a few things that could go wrong. Don’t worry—here are some tips to help you troubleshoot:
1. The Cheesecake Filling is Too Runny
If your cheesecake filling is too runny, it could be because the whipped cream wasn’t whipped enough, or the cream cheese wasn’t thick enough. To fix this:
- Ensure the cream cheese is at room temperature before mixing, as cold cream cheese doesn’t blend as smoothly.
- Make sure the heavy cream is whipped to stiff peaks before folding it into the cheesecake mixture.
- You can also add a little more icing sugar mixture or some cornstarch to thicken it up.
2. The Cones Are Getting Soggy
If you assemble your cones and leave them sitting for too long before serving, the filling can cause the cones to soften. Here’s what you can do:
- Serve Immediately: The best way to keep the cones crisp is to serve them right after assembling.
- Use a Thick Filling: Make sure your cheesecake filling is thick enough to hold its shape and not melt quickly, especially if you’re serving them in a warm environment.
3. The White Chocolate Drizzle Won’t Set
If the white chocolate drizzle doesn’t harden properly, it could be because the chocolate was too warm when drizzled. To fix this:
- Let the white chocolate cool slightly before drizzling over the cones, but don’t let it set completely. Drizzle while the chocolate is still pourable but not too hot.
- Once drizzled, place the cones in the fridge for a few minutes to allow the drizzle to firm up.
Candy Cane Cheesecake Ice Cream Cones
Course: Uncategorized12
cones20
minutes350
kcal3-4
hoursIngredients
Candy canes, plus extra to serve
1 cup thickened cream (for whipping)
1/4 cup icing sugar mixture
8 oz cream cheese, at room temperature, chopped
1 tsp peppermint essence
1/4 cup desiccated coconut (optional)
1/2 cup melted white chocolate, cooled slightly, to drizzle
12 ice cream cones
Directions
- Crush the Candy Canes: Place candy canes in a ziplock bag and crush them with a rolling pin until you have fine crumbs. Set aside some larger pieces for decoration.
- Make the Cheesecake Filling: In a bowl, whip the thickened cream with the icing sugar mixture until stiff peaks form. In another bowl, beat the cream cheese and peppermint essence until smooth and creamy. Gently fold the whipped cream into the cream cheese mixture until combined.
- Assemble the Cones: Fill each ice cream cone with the cheesecake filling. Sprinkle crushed candy cane pieces on top of the filling and add desiccated coconut (if using).
- Drizzle with White Chocolate: Drizzle the cones with the cooled white chocolate and top with extra crushed candy cane pieces.
- Chill the Cones: Refrigerate for at least 3-4 hours, or overnight, to set the filling and chocolate.
- Serve and Enjoy: Serve chilled and enjoy the creamy, minty, and crunchy goodness of your Candy Cane Cheesecake Ice Cream Cones!
Conclusion
Candy Cane Cheesecake Ice Cream Cones are the ultimate holiday treat that blends creamy, indulgent cheesecake with the festive crunch of ice cream cones. They’re perfect for all ages and occasions—whether you’re hosting a holiday party, enjoying a cozy evening with loved ones, or giving them away as sweet gifts. The bright peppermint flavor paired with the smooth cheesecake filling and topped with crushed candy canes and white chocolate drizzle will surely be a hit.
With this recipe, you can easily customize the cones to suit your preferences and dietary needs, making them versatile for everyone to enjoy. Whether you’re preparing them in advance or serving them fresh, these cones will add a magical touch to your holiday celebrations.
The best part is that making these cones is both simple and fun! They don’t require any complicated techniques, just a few ingredients, and a little creativity. Plus, they store well in the fridge or freezer, so you can make a batch ahead of time and enjoy them at your convenience.