Black Velvet Cake: A Decadent Twist on a Classic Treat
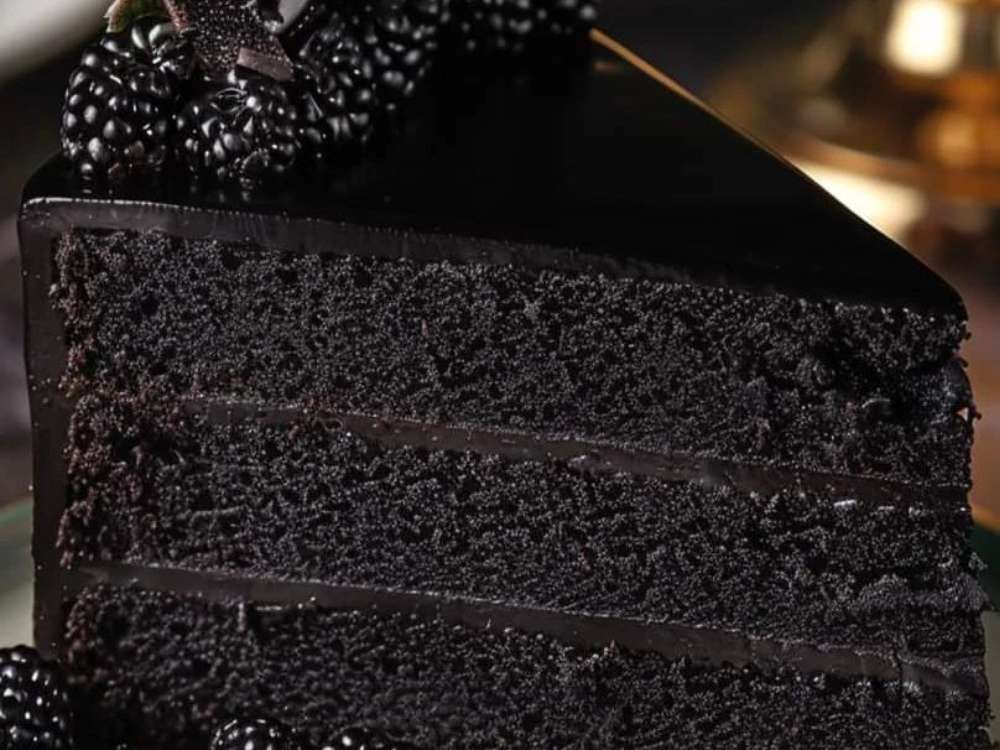
Who can resist the allure of a rich, decadent Black Velvet Cake? This dark, chocolatey dessert is the ultimate indulgence for anyone with a sweet tooth. Its velvety texture and bold flavor make it perfect for special occasions or when you’re simply craving something truly indulgent.
Ready to bring some elegance to your baking? Whether you’re an experienced baker or a beginner, this recipe is simple to follow and will leave you feeling like a pastry pro. Let’s dive into the irresistible world of Black Velvet Cake.
Prepare to be amazed as this cake takes your chocolate game to a whole new level. From birthdays to dinner parties, you’ll want to make this your go-to dessert!
What Is Black Velvet Cake?
At its core, Black Velvet Cake is a dark, rich version of the beloved Red Velvet Cake. Instead of the vibrant red hue, black cocoa powder is used to achieve the deep, dark color that gives this cake its mysterious appeal. The cake still retains the signature velvety texture that red velvet is known for, thanks to the use of buttermilk and vinegar, but the flavor profile is slightly different. With a more intense chocolate taste, this cake is perfect for chocolate lovers who want something just a little bit different.

The Role of Black Cocoa Powder
Black cocoa powder is the magic ingredient that sets this cake apart. It has a higher pH level than traditional cocoa powders, which reduces its acidity and gives it a smoother, less bitter flavor. If you’ve ever had an Oreo cookie, you know the taste of black cocoa. It provides that rich, bittersweet flavor and deep black color without the need for artificial food coloring.
Why Choose Black Cocoa Powder?
- Rich Flavor: It adds a more complex, bittersweet taste compared to regular cocoa.
- Natural Color: The black hue comes naturally, eliminating the need for large amounts of food coloring.
- Versatility: Black cocoa can be used in other recipes, from cookies to brownies, adding a visually stunning element to any dessert.
Pro Tip: If you can’t find black cocoa powder in your local store, you can substitute it with Dutch-processed cocoa. However, to achieve the same dark color, you may need to add a bit of black food gel.
Ingredients You’ll Need
To create this beautiful Black Velvet Cake, you’ll need a combination of simple pantry staples and a few special ingredients. Here’s a breakdown:
- All-purpose flour: 2 cups (260g)
- Granulated sugar: 2 cups (400g)
- Black cocoa powder: ¾ cup (75g)
- Baking powder: 2 tsp (8g)
- Baking soda: 1 ½ tsp (9g)
- Salt: 1 tsp (6g)
- Hot water: 1 cup (240g)
- Instant espresso powder: 2 tsp (5g)
- Buttermilk: 1 cup (240g)
- Vegetable oil: ½ cup (110g)
- Large eggs: 2, room temperature (112g)
- Vanilla extract: 2 tsp (8g)
For the Frosting:
- Unsalted butter: 2 cups (452g)
- Powdered sugar: 5 cups (625g)
- Black cocoa powder: 1 cup (100g)
- Vanilla extract: 1 tsp (4g)
- Heavy cream: ⅔ cup (180g)
- Dark chocolate chips: 1 ⅓ cups (230g), melted and cooled
Step-by-Step Guide to Making Black Velvet Cake
1. Preheat Your Oven and Prepare the Pans
Preheat your oven to 350°F (175°C). Line and grease three 8-inch cake pans (or four 7-inch pans) to ensure your cake layers don’t stick.
2. Mix the Dry Ingredients
In a large mixing bowl, combine the flour, granulated sugar, black cocoa powder, baking powder, baking soda, and salt. Use a whisk to fully combine the dry ingredients.
3. Prepare the Espresso Mixture
In a separate bowl, dissolve the instant espresso in hot water. This enhances the chocolate flavor without adding a noticeable coffee taste.
4. Add the Wet Ingredients
To the espresso mixture, add buttermilk, vegetable oil, eggs, and vanilla extract. Whisk until everything is well combined.
5. Combine the Wet and Dry Ingredients
Pour the wet ingredients into the dry ingredients and stir by hand until fully incorporated. The batter will be thin, but don’t worry—that’s what gives the cake its moist texture.
6. Bake the Cake Layers
Divide the batter evenly among the prepared pans and bake for 24-27 minutes. Use a toothpick to check if the cake is done—it should come out with just a few moist crumbs attached. Let the cakes cool in the pans for 10 minutes before transferring them to a wire rack.
7. Make the Black Buttercream Frosting
While the cakes cool, beat the butter on medium speed for 30 seconds until smooth. Add sifted black cocoa powder, vanilla extract, and salt. Gradually mix in the powdered sugar, adding the heavy cream halfway through to make it easier to blend. Finally, mix in the melted dark chocolate until smooth and creamy.
Assembling Your Black Velvet Cake
1. Level the Cake Layers
Once your cake layers are completely cool, use a serrated knife to level the tops of each layer for a smooth stack. This step ensures even layers and a more polished final look.
2. Frost Between the Layers
Place the first cake layer on a cake board or plate. Spread an even layer of black buttercream frosting on top. Add the second layer, repeat, and finish with the final layer.
3. Crumb Coat and Chill
Apply a thin coat of frosting around the cake to seal in any crumbs (this is called the crumb coat). Chill the cake in the fridge for 30 minutes to set the frosting.
4. Final Frosting Layer
After chilling, apply a thicker layer of frosting around the entire cake. Use a bench scraper to smooth the sides and top.
5. Decoration Ideas
- For a more dramatic look, consider adding a black drip using melted dark chocolate or a black gel.
- Finish with simple black or silver sprinkles for a sleek, elegant appearance.
- Add edible flowers or fruit for a pop of color against the dark cake.
Tips for Perfecting Your Black Velvet Cake
- Room Temperature Ingredients: Cold ingredients don’t blend as smoothly. Set out your butter, eggs, and buttermilk before starting.
- Measure Your Flour Correctly: Spoon the flour into your measuring cup, then level it off with a knife. This prevents adding too much flour, which can lead to a dense cake.
- Weigh Your Cake Pans: For even cake layers, use a kitchen scale to make sure each pan has the same amount of batter.
- Chill Before Assembling: Always chill your cake layers before frosting. This makes them easier to stack and prevents the frosting from melting or sliding off.
Why Black Velvet Cake is Perfect for Any Occasion
What makes Black Velvet Cake so versatile is its ability to be dressed up or down for any occasion. The deep black color gives it a sophisticated and elegant appearance, making it perfect for events like Halloween parties, gothic-themed weddings, or even a classy black-tie dinner party. At the same time, its rich chocolate flavor is universally appealing, meaning it’s just as suited for a family birthday or a weekend treat.
Storing and Freezing Your Cake
Making Ahead
You can make the cake layers ahead of time and freeze them for up to 3 months. Once they’ve cooled, wrap each layer tightly in plastic wrap and place them in the freezer.
Storing Frosted Cake
If you’ve already frosted your cake, it can be stored in the fridge for up to a week. Keep it in an airtight container to prevent it from drying out.
Variations to Try
- Chocolate Ganache Filling: For an extra indulgent treat, add a layer of chocolate ganache between the cake layers.
- Cream Cheese Frosting: Swap the black buttercream for tangy cream cheese frosting for a more traditional pairing.
- Black Velvet Cupcakes: Make this recipe into cupcakes by dividing the batter into lined muffin tins. Bake for 15-18 minutes at 350°F.
Final Thoughts
Black Velvet Cake is the perfect blend of flavor, texture, and visual appeal. Its rich, bittersweet chocolate taste combined with the velvety soft crumb makes it irresistible to chocolate lovers and cake enthusiasts alike. Whether you’re making it for a holiday celebration, a themed event, or just because, this cake is sure to impress. Happy baking!

