Berry Delight Ice Cream Sandwiches

Oh my goodness, have you ever tried making ice cream sandwiches? I made these berry ones last week, and they were so good! They’re cold, sweet, and fun to eat.
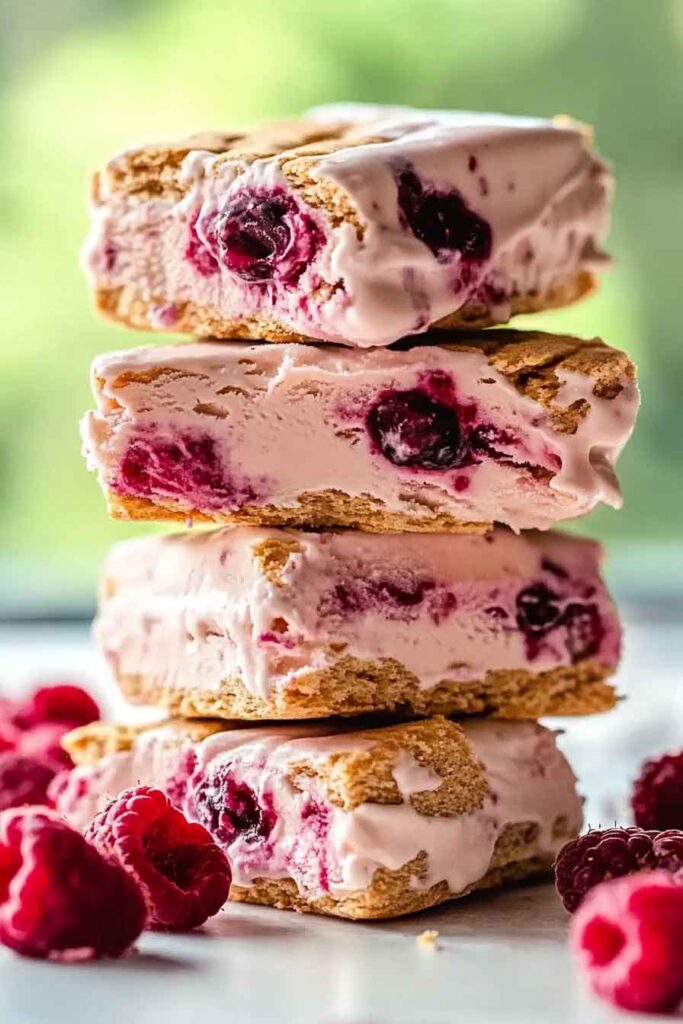
What I love most is the soft cookie outside and the creamy, berry-filled ice cream inside. It’s a little messy, but it’s worth it. You just wanna take another bite right away!
If you like berries and ice cream, you’ll love these. Trust me, they’re super easy to make. You’ll want to make them again and again!
Wanna make some with me? Let’s grab some cookies and ice cream and put them together. It’ll be so fun!

Why You’ll Love This Recipe
- Refreshing and Fruity: The juicy mixed berries add a burst of natural sweetness that pairs perfectly with the creamy, indulgent ice cream.
- Customizable: You can use any berry combination you prefer, or even experiment with different ice cream flavors.
- Perfect for Summer or Any Time: These ice cream sandwiches are ideal for hot summer days but are delicious enough to enjoy year-round.
- Fun to Make: With a few simple ingredients, you can create this show-stopping dessert for parties, family gatherings, or just as a treat for yourself.
- Kid-Friendly: These are easy enough for little hands to help with. Let the kids scoop and assemble, and enjoy making them a family project!
Required Kitchen Tools
Before diving into the recipe, you’ll need a few basic kitchen tools:
- Mixing Bowls: For combining your dry and wet ingredients.
- Electric Hand Mixer or Stand Mixer: To make sure your cookie dough comes together with ease.
- Baking Sheets: To bake your cookies to perfection.
- Parchment Paper or Silicone Baking Mats: To prevent the cookies from sticking.
- Ice Cream Scoop: To portion your ice cream evenly and make the sandwich assembly easier.
- Cookie Cutter or Round Glass: To cut out perfect rounds of cookies for the sandwich.
- Spatula: To help with sandwich assembly and transferring the ice cream between cookies.

Ingredients
Let’s break down the ingredients you’ll need for these Berry Delight Ice Cream Sandwiches:
- All-purpose flour: This is the base of the cookie dough. It gives the cookies structure and chew.
- Baking soda: Helps the cookies rise slightly and become soft and chewy.
- Salt: A pinch of salt enhances all the flavors in the cookie dough and balances the sweetness.
- Unsalted butter (softened): Butter gives the cookies richness and flavor.
- Brown sugar: Adds a touch of caramel sweetness and contributes to the chewy texture.
- Granulated sugar: Sweetens the cookie dough and helps the cookies spread evenly during baking.
- Large egg: Provides structure and helps bind the ingredients together.
- Pure vanilla extract: Adds a deep, aromatic sweetness that complements the other flavors.
- Fresh mixed berries (strawberries, blueberries, raspberries), chopped: Fresh berries bring a juicy, tangy flavor to the sandwich. You can mix and match your favorite berries!
- Berry-flavored ice cream: The star of the show. You’ll want a creamy, berry-flavored ice cream to complement the fruitiness of the cookies. You can use raspberry, strawberry, or mixed berry ice cream.
Variations for Berry Delight Ice Cream Sandwiches
- Use Chocolate Chips: Add a handful of mini chocolate chips to the cookie dough for a chocolate-berry twist.
- Swap the Ice Cream Flavor: While berry-flavored ice cream works beautifully, vanilla, chocolate, or even a fruity sorbet could also be delicious options.
- Experiment with Different Fruits: If you want a more tropical vibe, try adding mango or pineapple chunks to the cookie filling. Or, for a fall twist, use apples or pears.
- Gluten-Free Option: If you need to make these cookies gluten-free, simply swap the all-purpose flour for a gluten-free flour blend.
- Vegan Version: For a dairy-free and vegan option, you can swap the butter for coconut oil and choose a plant-based ice cream.

Step-by-Step Instructions
Now that you know what you need, let’s dive into the step-by-step process to make these Berry Delight Ice Cream Sandwiches.
1. Prepare the Cookie Dough
Start by preheating your oven to 350°F (177°C) and line two baking sheets with parchment paper or silicone baking mats.
In a medium bowl, whisk together the flour, baking soda, and salt. Set this aside.
In another large bowl, cream the softened unsalted butter, brown sugar, and granulated sugar using a hand or stand mixer. Beat on medium speed for about 2-3 minutes until the mixture becomes light and fluffy. This step is important as it ensures your cookies are soft and chewy.
Add in the egg and vanilla extract and continue mixing until the dough comes together.
2. Mix in the Dry Ingredients
Slowly add the dry flour mixture into the wet ingredients. Beat on low speed to combine. Don’t overmix, or your cookies could become tough.
3. Incorporate the Berries
Gently fold in the chopped mixed berries with a spatula. You want the berries to be evenly distributed in the dough without smashing them too much. This will create pockets of fresh fruit flavor in your cookies.
4. Scoop and Shape the Dough
Use an ice cream scoop or tablespoon to portion out the dough onto the prepared baking sheets. Roll the dough into balls and then flatten them slightly with the back of a spoon or your fingers. Make sure they’re about 2-3 inches in diameter to ensure they’re the right size for sandwiching later.
5. Bake the Cookies
Bake the cookies for about 8-10 minutes, or until the edges are lightly golden. The centers may look a bit soft, but they’ll firm up as they cool.
Once they’re done, remove them from the oven and let them cool on the baking sheets for 5 minutes. Then, transfer the cookies to a wire rack to cool completely.
6. Assemble the Ice Cream Sandwiches
Once your cookies have cooled, it’s time to assemble your ice cream sandwiches. Use an ice cream scoop to place a generous scoop of berry-flavored ice cream on the bottom of one cookie. Top it with another cookie, pressing down gently to sandwich the ice cream in between.
7. Freeze the Sandwiches
Place the assembled ice cream sandwiches on a baking sheet lined with parchment paper and freeze for at least 2 hours, or until the ice cream is firm. This will help the cookies set and prevent the ice cream from melting too quickly when you serve them.

How to Serve Berry Delight Ice Cream Sandwiches
These Berry Delight Ice Cream Sandwiches are perfect for all sorts of occasions and can be served in different ways to impress your guests or make your treat even more special. Here are a few fun and delicious ideas:
1. As a Dessert for Parties
These ice cream sandwiches are a great addition to any dessert table. Their vibrant colors and fresh flavors make them a showstopper. Place them on a platter, and garnish with extra berries or mint leaves for a visually stunning display.
2. For Summer Gatherings
Serve them at your next barbecue, picnic, or pool party. Their refreshing, fruity taste is a perfect complement to a sunny day, and they’re easy to eat with no need for utensils—just grab, bite, and enjoy!
3. As a Fun Family Activity
Since these sandwiches are so easy to assemble, they’re a perfect project for kids. Let them scoop out the ice cream and stack the sandwiches. They’ll love being part of the process, and it’s a great way to spend quality time together.
4. For Special Occasions
Make birthdays or other celebrations extra special by serving these unique ice cream sandwiches. You can customize them to match the party theme by adding different colored sprinkles, edible glitter, or themed toppings.
5. A Sweet Treat for Movie Night
Skip the usual popcorn and serve these ice cream sandwiches as a fun twist on your movie night snacks. Grab your favorite movie, settle in, and enjoy these chilly, fruity treats while you relax.
Storing Berry Delight Ice Cream Sandwiches
If you’re lucky enough to have leftovers, here’s how to store them so they stay fresh and delicious:
1. Freezing Leftovers
Once your ice cream sandwiches are assembled and frozen, you can store them in an airtight container or wrap them individually in plastic wrap for an easy grab-and-go snack. Keep them in the freezer for up to 2 weeks for optimal freshness. When you’re ready to enjoy, simply pull one out and let it sit for a few minutes to soften slightly before eating.
2. Preventing Ice Cream from Melting
If you’re making these ahead of time, be sure to store them in the freezer until you’re ready to serve. During warm weather, they might soften a bit when taken out, so it’s best to eat them right away or put them back in the freezer if you’re not eating them immediately.
3. Keep Cookies Fresh
If you have extra cookies (without the ice cream), you can store them in an airtight container at room temperature for up to 5 days. Then, just add ice cream before serving to make them into sandwiches whenever you’re ready!
Nutritional Information
These Berry Delight Ice Cream Sandwiches are a decadent dessert, but they are definitely worth indulging in from time to time. Here’s an estimated nutritional breakdown per sandwich (based on a standard serving size):
| Nutrient | Amount per Serving (1 sandwich) |
|---|---|
| Calories | 350 kcal |
| Total Fat | 16g |
| Saturated Fat | 8g |
| Cholesterol | 35mg |
| Sodium | 150mg |
| Total Carbohydrates | 50g |
| Dietary Fiber | 2g |
| Sugars | 32g |
| Protein | 3g |
| Vitamin A | 6% |
| Vitamin C | 15% |
| Calcium | 6% |
| Iron | 8% |
(Note: Nutritional values can vary depending on the type of ice cream and berries used, as well as the portion size of the cookies and ice cream).

Berry Delight Ice Cream Sandwiches
Course: Uncategorized12
sandwiches20
minutes8
minutes350 kcal
kcal2
hoursIngredients
All-purpose flour: 2 cups
Baking soda: 1/2 teaspoon
Salt: 1/4 teaspoon
Unsalted butter (softened): 1/2 cup (1 stick)
Brown sugar: 1/2 cup
Granulated sugar: 1/2 cup
Large egg: 1
Pure vanilla extract: 1 teaspoon
Fresh mixed berries (strawberries, blueberries, raspberries), chopped: 1 cup
Berry-flavored ice cream: 1 pint (about 2 cups)
Directions
- Preheat Oven: Preheat your oven to 350°F (177°C) and line two baking sheets with parchment paper.
- Mix Dry Ingredients: In a medium bowl, whisk together the flour, baking soda, and salt. Set aside.
- Cream Butter and Sugars: In a separate large bowl, cream together the softened butter, brown sugar, and granulated sugar using a hand or stand mixer until light and fluffy.
- Add Egg and Vanilla: Mix in the egg and vanilla extract until well combined.
- Combine with Dry Ingredients: Gradually add the dry ingredients to the wet mixture, mixing until just combined.
- Add Berries: Fold in the chopped mixed berries gently.
- Scoop and Shape: Scoop dough into 1-1.5 tablespoon portions, roll into balls, and flatten slightly with the back of a spoon.
- Bake: Bake for 8-10 minutes, or until the edges are golden and the centers are soft.
- Cool: Allow the cookies to cool on the baking sheets for 5 minutes before transferring them to a wire rack to cool completely.
- Assemble: Once the cookies have cooled, scoop berry-flavored ice cream onto the bottom of one cookie, then sandwich with another cookie.
- Freeze: Place the sandwiches on a baking sheet lined with parchment paper and freeze for at least 2 hours, until firm.
- Serve: Serve immediately or store in the freezer for later.
Tips and Tricks for Perfect Berry Delight Ice Cream Sandwiches
Making the perfect Berry Delight Ice Cream Sandwiches is not as difficult as it seems, but there are a few tips and tricks that will ensure your cookies come out perfectly soft, your ice cream doesn’t melt too quickly, and everything stays delicious. Whether you’re a baking pro or a beginner, these suggestions will help you get the best possible results:
1. Use Room Temperature Butter
For the best texture in your cookies, make sure the butter is softened to room temperature. Cold butter won’t mix properly with the sugars and will lead to dense, crumbly cookies. On the other hand, melted butter can cause the cookies to spread too much during baking. Aim for a soft, slightly squishy butter that will easily cream with the sugar.
2. Don’t Overmix the Dough
When adding the dry ingredients to the wet mixture, mix just until combined. Overmixing the dough will result in tough cookies. Stop mixing as soon as the flour is incorporated, and your cookies will turn out soft and chewy.
3. Chill the Dough (Optional)
Although it’s not mandatory, chilling the cookie dough for 15-20 minutes before baking can help prevent the cookies from spreading too much. This is especially helpful if you live in a warm climate or if your butter is a bit softer than usual.
4. Perfectly Sized Cookies
To ensure your ice cream sandwiches are easy to assemble, try to make your cookies all the same size. Use an ice cream scoop or tablespoon to portion out the dough, and gently roll it into balls. If you want uniform cookies, use a cookie cutter or the bottom of a glass to gently flatten the dough into even circles before baking.
5. Don’t Skip the Freezing Step
Once you assemble the ice cream sandwiches, it’s crucial to freeze them for at least 2 hours. This allows the ice cream to firm up and prevents it from oozing out when you eat it. You can even freeze them overnight if you’re making them ahead of time.
6. Handle the Ice Cream Carefully
Scoop the ice cream just before assembling the sandwiches. Ice cream that sits out for too long will melt, and you’ll have a mess on your hands. If it starts to soften while you work, pop it back in the freezer for a few minutes to firm it up again. You can also use a large spoon to scoop the ice cream and quickly transfer it onto the cookie.
7. Customize Your Ice Cream Flavors
While berry-flavored ice cream is the star of this recipe, don’t be afraid to experiment. Strawberry, raspberry, blueberry, and even chocolate ice cream would work wonderfully with the cookies. Or, you could opt for a swirl of different berry flavors to make the sandwiches even more dynamic.
8. Add Toppings or Garnishes
To make your ice cream sandwiches even more fun, add toppings like sprinkles, crushed nuts, or mini chocolate chips to the edges of the ice cream after assembling the sandwiches. You can also drizzle some fruit syrup or melted chocolate over the top for an extra indulgent touch.
9. Make Extra Cookies
If you have extra cookie dough, feel free to bake some cookies on their own for a simple treat! They can be enjoyed on their own with a glass of milk or paired with another scoop of ice cream if you’re craving more. Store extra cookies in an airtight container for up to a week.
10. Plan for Variations
One of the best parts about this recipe is how flexible it is. You can make it your own in several ways. Try swapping the fresh berries for berry preserves or compote for a more intense berry flavor. You could even layer two different flavors of ice cream for a colorful, multi-flavor sandwich!
Frequently Asked Questions (FAQs)
1. Can I make these sandwiches ahead of time?
Yes! These ice cream sandwiches can be made up to 2 days in advance. Just make sure to keep them frozen until you’re ready to serve them. If you’re planning for a party, making them ahead will save you time when you’re ready to serve.
2. Can I use store-bought cookies instead of homemade ones?
Of course! If you’re short on time or prefer to skip the cookie-making process, you can substitute the homemade cookies for store-bought ones. Look for soft, chewy cookies like sugar cookies or chocolate chip cookies for the best results. Just be sure the size of the cookies matches the size of the ice cream scoop.
3. Can I use frozen berries instead of fresh ones?
While fresh berries give a nice burst of flavor, frozen berries will work in a pinch. Be sure to thaw and drain them thoroughly before adding them to the cookie dough, or they could make the dough too wet. Also, keep in mind that frozen berries may not hold their shape as well as fresh ones, but the flavor will still be there!
4. How do I prevent the ice cream from melting too fast when serving?
To keep the ice cream firm for longer, make sure to freeze the sandwiches thoroughly before serving. If you’re serving them outdoors on a hot day, consider chilling the sandwiches again just before serving to keep everything firm for longer. You can also serve them in a cooler with ice packs if you’re bringing them to a picnic or barbecue.
5. Can I make these sandwiches with other flavors of ice cream?
Absolutely! While berry-flavored ice cream pairs beautifully with the berry-filled cookies, feel free to swap in your favorite flavors. Vanilla, chocolate, or even a swirl of caramel and nuts would be delicious alternatives. You can mix and match flavors to suit your personal taste.
6. Can I make these sandwiches without the berries?
Yes, you can omit the fresh berries from the cookies if you prefer a simpler flavor. The cookies will still be soft, sweet, and delicious on their own. Pair them with ice cream of your choice, or you can add other mix-ins like chocolate chips, nuts, or even a swirl of caramel in the dough.
Conclusion
Berry Delight Ice Cream Sandwiches are an absolute treat and the perfect dessert for any occasion. Whether you’re serving them at a summer party, making them for a family night, or just indulging in a sweet snack, these ice cream sandwiches are sure to please everyone who tastes them. The combination of chewy cookies, fresh berries, and creamy ice cream is unbeatable, and the best part is you can customize them to your liking.
With just a few simple ingredients and a little bit of time, you can create a dessert that’s not only visually stunning but also incredibly delicious. From baking the cookies to assembling the ice cream sandwiches and freezing them to perfection, this dessert is both fun to make and even more fun to eat.
So, next time you’re in the mood for a refreshing, indulgent treat, whip up a batch of these Berry Delight Ice Cream Sandwiches. I promise they’ll be a hit, and you’ll love every bite!