Pumpkin Chocolate Chip Cookies Recipe
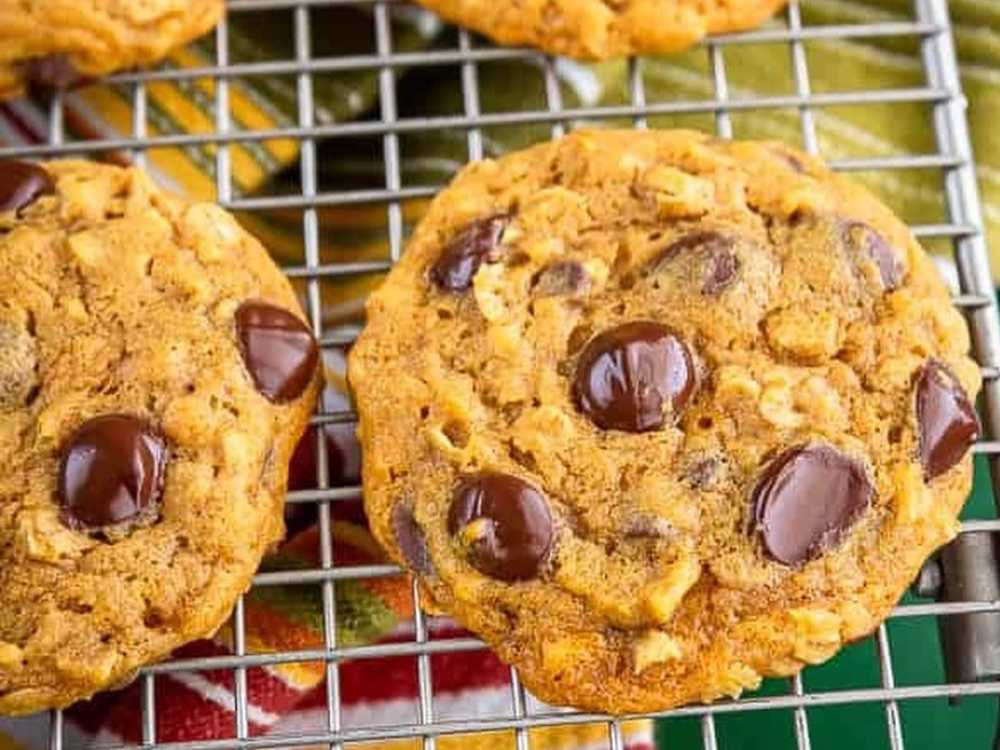
Pumpkin chocolate chip cookies bring together the best of fall flavors with the warm spices of pumpkin and the sweetness of chocolate chips. These cookies are not just a delicious fall treat but also a great baking project for both beginners and seasoned bakers. Whether you’re enjoying these with a warm cup of tea or sharing them at a holiday gathering, they never fail to impress.
This recipe takes a twist on the classic chocolate chip cookie, adding the subtle sweetness and richness of pumpkin, making the cookies soft, chewy, and perfectly spiced. Many recipes out there, including those from our competitors, promise the perfect cookie but leave gaps in their instructions or fail to address common challenges. We’ll dive deep into every step to ensure you bake the ultimate pumpkin chocolate chip cookies.
Let’s explore how you can make the perfect batch by focusing on trustworthiness, precision, and eliminating the common mistakes found in other recipes.
Why These Pumpkin Chocolate Chip Cookies Stand Out
Unlike some recipes that can result in cakey cookies, this version ensures you’ll have a chewy texture, full of pumpkin spice flavor. Our recipe addresses the common pitfalls of excessive moisture from pumpkin puree by using practical methods to ensure a dense, chewy cookie, not one that resembles a muffin.
Key Tips for Chewy Pumpkin Chocolate Chip Cookies
- Blot the Pumpkin Puree: Excess moisture in the pumpkin can make your cookies cakey. We’ll show you how to blot the pumpkin effectively.
- Melted Butter for Chewiness: Instead of using room temperature butter, we use melted butter, which helps create a chewier cookie.
- No Eggs Needed: Pumpkin itself is a great substitute for eggs, providing both moisture and binding, while keeping the texture chewy.
- Chill the Dough: For better control of spreading and to help develop flavors, we recommend chilling the dough for at least 30 minutes.
Ingredients
| Ingredient | Amount |
|---|---|
| Unsalted Butter, melted & cooled | 1/2 cup (113g) |
| Light or Dark Brown Sugar | 1/4 cup (50g) |
| Granulated Sugar | 1/2 cup (100g) |
| Vanilla Extract | 1 tsp |
| Pumpkin Puree (blotted) | 6 Tbsp (86g) |
| All-Purpose Flour | 1 1/2 cups (188g) |
| Salt | 1/4 tsp |
| Baking Powder | 1/4 tsp |
| Baking Soda | 1/4 tsp |
| Ground Cinnamon | 1 1/2 tsp |
| Pumpkin Pie Spice | 1 tsp |
| Semi-Sweet Chocolate Chips | 1/2 cup (90g) |
Method
1. Blotting the Pumpkin Puree
One of the key steps to ensuring your cookies aren’t cakey is to remove excess moisture from the pumpkin puree. Here’s how you do it:
- Scoop 6 tablespoons of pumpkin puree onto a layer of paper towels.
- Place another layer of paper towels on top and press gently to blot away the moisture.
- Repeat this step if necessary until the puree feels drier but still moist to the touch.
This step is crucial because pumpkin puree contains up to 90% water, which can lead to cakey cookies. Most recipes miss this step, but it makes a world of difference!
2. Preparing the Wet Ingredients
- In a medium bowl, whisk the melted butter, brown sugar, and granulated sugar until smooth. Be sure to whisk thoroughly so that no lumps of brown sugar remain.
- Add in the vanilla extract and the blotted pumpkin puree, mixing until fully incorporated.
Tip: Many recipes miss the importance of making sure the sugars are fully dissolved into the butter, which helps create that smooth, chewy texture.
3. Mixing the Dry Ingredients
- In a separate large bowl, whisk together the flour, salt, baking powder, baking soda, cinnamon, and pumpkin pie spice.
- Gradually pour the wet ingredients into the dry mixture. Use a spatula to fold the ingredients together gently. The dough will be soft and slightly sticky.
Why It’s Important: Some competitors might skip mentioning the importance of folding rather than over-mixing, which can lead to dense cookies.
4. Adding Chocolate Chips
- Gently fold in the semi-sweet chocolate chips.
- Ensure that the chocolate chips are evenly distributed throughout the dough. You can also reserve a few extra chocolate chips to place on top of the cookie dough balls before baking for presentation.
5. Chilling the Dough
- Cover the dough with plastic wrap and chill it in the refrigerator for at least 30 minutes, but no longer than 3 days.
Pro Tip: Chilling the dough helps control the spreading of the cookies during baking. It also allows the flavors to meld together, resulting in a more flavorful cookie.
6. Shaping the Cookies
- Preheat the oven to 350°F (177°C).
- Line two large baking sheets with parchment paper or silicone baking mats.
- Using a medium cookie scoop (about 1.5 tablespoons of dough per cookie), scoop and roll the dough into balls.
- Place the cookie dough balls 3 inches apart on the baking sheets, and slightly flatten the tops with the back of a spoon or the bottom of a measuring cup.
7. Baking the Cookies
- Bake for 11-12 minutes, or until the edges are set but the centers still look slightly underbaked. They will continue to firm up as they cool.
- Remove the cookies from the oven and allow them to cool on the baking sheet for at least 10 minutes before transferring them to a wire rack to cool completely.
Tip: This is another area where competitors might falter—removing cookies too early or too late can drastically affect texture.
8. Serving and Storing
Once the cookies have cooled, they are ready to enjoy! The flavors of the pumpkin and chocolate chip meld together beautifully, creating a cookie that’s both chewy and perfectly spiced.
- Storage: These cookies will stay fresh in an airtight container at room temperature for up to a week.
- Freezing: You can freeze the unbaked cookie dough balls for up to 3 months. Simply bake frozen dough balls for an extra minute without thawing.
Variations and Additions
- Nutty Crunch: Add chopped pecans or walnuts to the cookie dough for a nutty twist.
- Cinnamon Sugar Topping: Roll the dough balls in cinnamon sugar before baking for a pumpkin snickerdoodle effect.
- White Chocolate Chips: Swap out half the chocolate chips for white chocolate chips for a sweeter variation.
Why Blotting and Chilling are Essential
Many recipes online skip over the importance of blotting the pumpkin puree and chilling the dough. These steps ensure your cookies don’t turn out cakey but rather maintain that desirable chewy texture. Omitting these steps can result in excess moisture, leading to less-than-ideal cookies.
Our competitor’s recipe failed to stress these steps adequately, leading to potential frustration for bakers who didn’t get the chewy cookie they were promised. Here, we emphasize these processes because they make all the difference in the final product.
Troubleshooting: Common Issues and How to Fix Them
- Cookies Spreading Too Much: If your cookies spread too much, it could be due to insufficient chilling of the dough. Ensure that the dough is well chilled before baking. You can also add a little more flour to the dough if needed.
- Cookies Not Spreading Enough: If your cookies are staying in a ball shape and not spreading, you might need to flatten them a bit more before baking or use less flour.
- Cakey Texture: If the cookies come out too cakey, you likely didn’t blot enough moisture from the pumpkin puree. Be thorough with this step to achieve the perfect chewiness.
Final Thoughts
These pumpkin chocolate chip cookies strike the perfect balance between fall spices and chocolatey sweetness. By focusing on small but important details like blotting the pumpkin and chilling the dough, you can avoid common pitfalls and ensure your cookies turn out chewy and flavorful.
Whether you’re an experienced baker or just starting, this recipe is approachable and guarantees delicious results every time. Enjoy baking these cookies, and remember to share them with friends and family—they’re too good to keep to yourself!
Nutritional Information
| Serving Size | 1 cookie |
|---|---|
| Calories | 150 |
| Total Fat | 8g |
| Saturated Fat | 5g |
| Carbohydrates | 19g |
| Protein | 1g |
| Sugar | 12g |
This comprehensive guide ensures you have everything you need to make the best pumpkin chocolate chip cookies. Happy baking!

