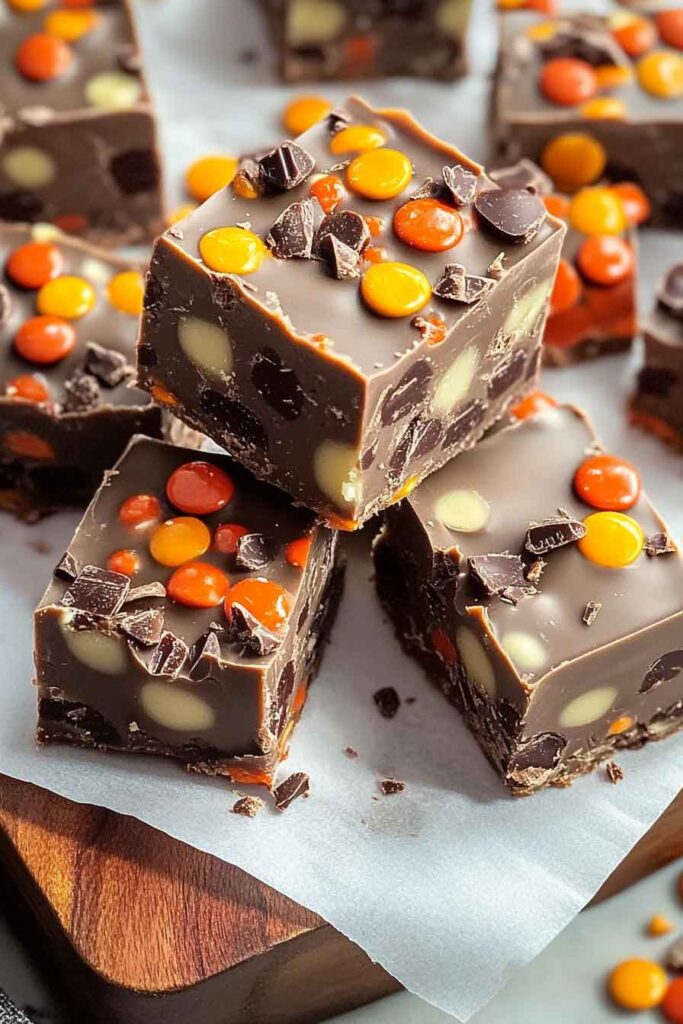
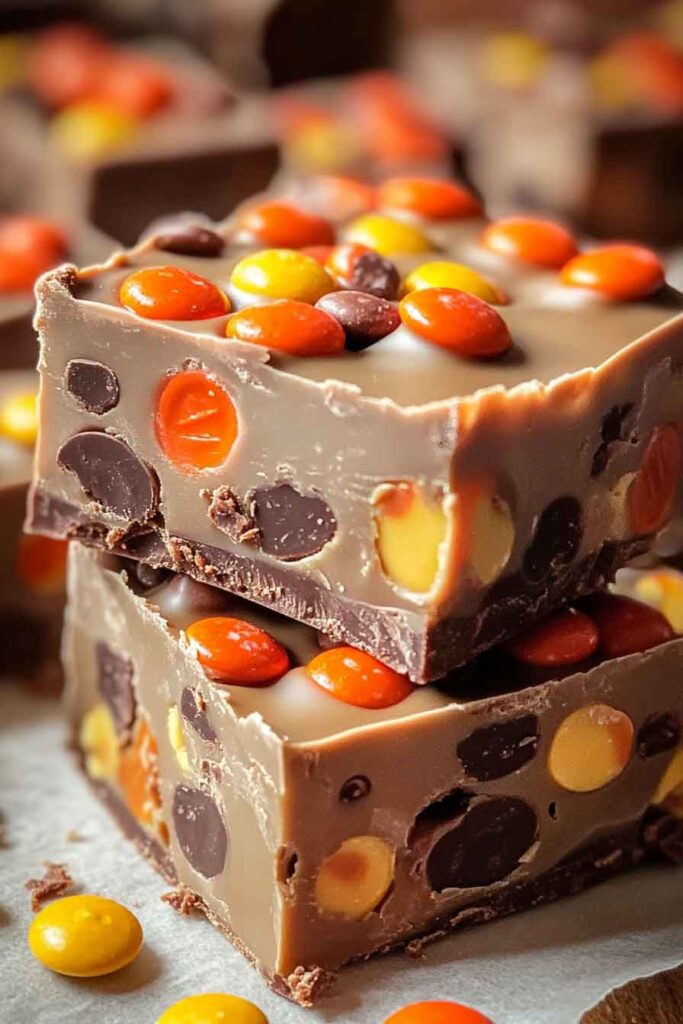
A Decadent Chocolate Fudge With Butterfinger And Reese’s Pieces
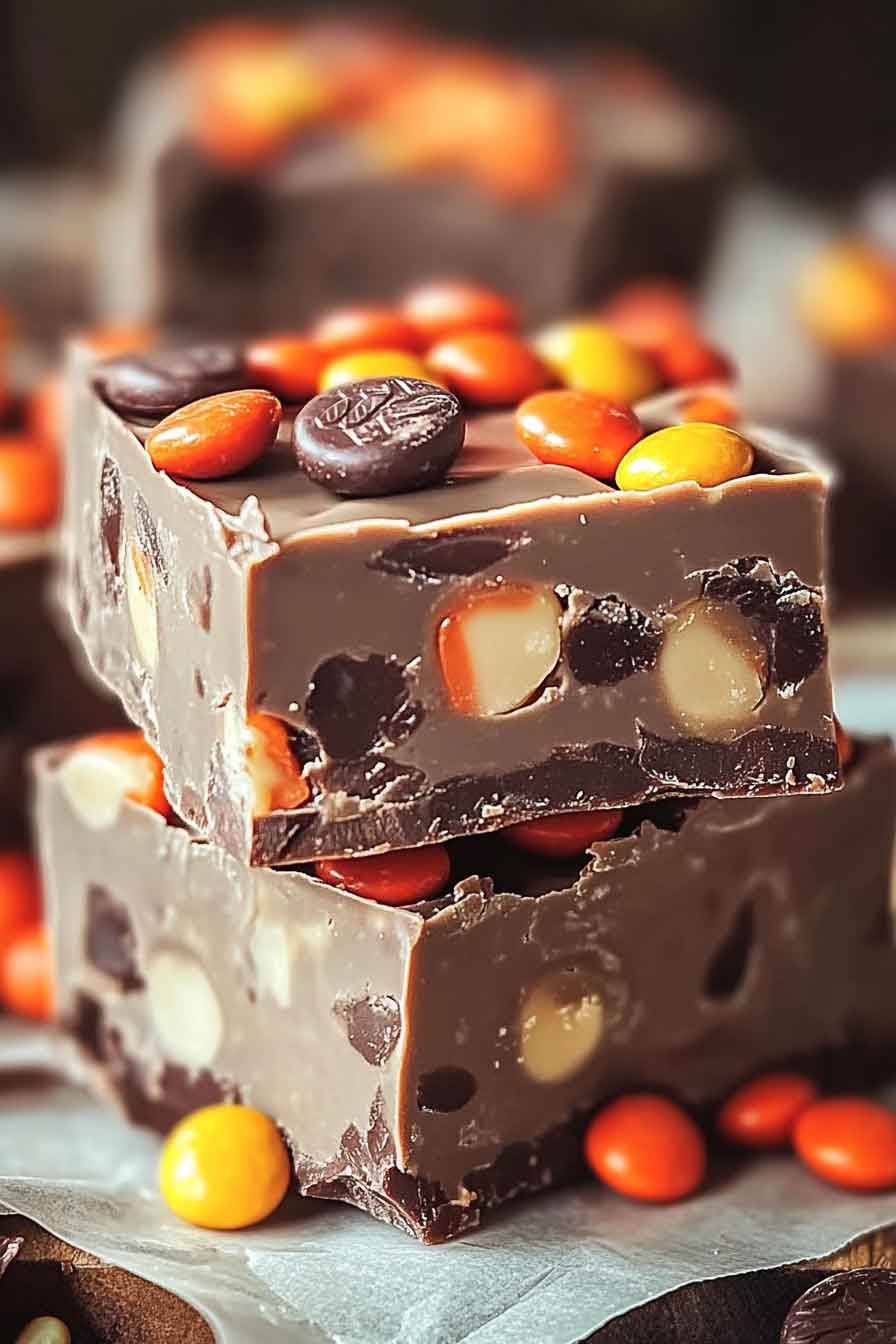
Omg, this fudge is so good. Like, melt-in-your-mouth kind of good. It’s chocolatey, crunchy, and full of candy surprises.
I made it last weekend, and whoa—it was gone in minutes. The Butterfinger adds crunch, and the Reese’s? Pure peanut buttery joy. Everyone kept sneaking extra pieces.
You don’t need fancy stuff. Just a few ingredients and a sweet tooth. It’s super easy and crazy delicious.
Let’s whip up a batch together. You’ll love every bite—I promise. Ready? Let’s do it!

Why You’ll Love This Recipe
- Incredibly Easy to Make: Only a few simple ingredients and no baking required.
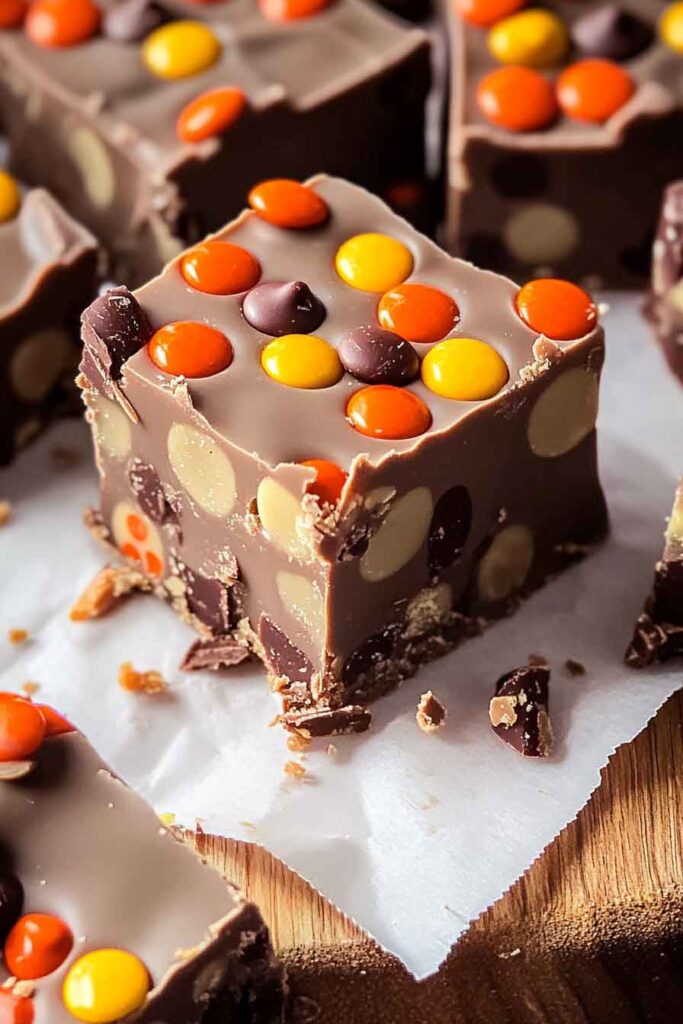
- Perfectly Balanced: The smooth chocolate fudge contrasts beautifully with the crunch of Butterfinger and the peanut butter goodness of Reese’s Pieces.
- Great for Gifting: These fudge squares make a fantastic homemade gift for friends, family, or holiday treat boxes.
- Make-Ahead Friendly: Prepare it in advance and store it in the fridge for when you need a sweet pick-me-up.
- Crowd-Pleaser: Chocolate and peanut butter fans will go wild for this combination!
Required Kitchen Tools
Before you start, make sure you have these kitchen essentials:
✔️ 8×8 or 9×9 Baking Pan – for setting the fudge.
✔️ Parchment Paper – prevents sticking and makes it easy to lift the fudge out.
✔️ Microwave-Safe Bowl or Double Boiler – for melting the chocolate and sweetened condensed milk.
✔️ Spatula – to stir and spread the fudge evenly.
✔️ Knife – for chopping Butterfinger bars and cutting the fudge into squares.
Ingredients
Here’s what you’ll need to create this irresistible chocolate fudge:
- Semi-Sweet Chocolate Chips (2 cups): The base of the fudge, providing a deep, rich chocolate flavor.
- Sweetened Condensed Milk (14 oz can): Gives the fudge a smooth, creamy texture and natural sweetness.
- Vanilla Extract (1 tsp): Enhances the overall chocolate flavor.
- Butterfinger Candy Bars (4 bars, crushed): Adds a delicious peanut-buttery crunch.
- Reese’s Pieces (¾ cup): Provides extra peanut butter flavor and a pop of color.
- Peanut Butter (¼ cup, optional): Drizzle on top for an added layer of richness.
Variations and Customization Options
Love experimenting? Here are some fun ways to switch up this recipe:
- Swap the Chocolate: Try using dark chocolate, milk chocolate, or even white chocolate for a different flavor.
- Add a Nutty Crunch: Stir in chopped peanuts, almonds, or pecans for even more texture.
- Salted Fudge Twist: Sprinkle a pinch of flaky sea salt on top for a sweet-and-salty contrast.
- Extra Caramel Drizzle: Drizzle some melted caramel over the top for an added gooey touch.
- Marshmallow Swirls: Add mini marshmallows into the mix for a fun, rocky-road-style fudge.
Step-by-Step Instructions
Making this delicious chocolate fudge is super simple! Follow these easy steps for a foolproof result:
1. Prepare the Baking Pan
- Line an 8×8-inch or 9×9-inch baking pan with parchment paper, leaving a slight overhang on the sides.
- Lightly grease the parchment paper with nonstick spray or butter to prevent sticking.
2. Melt the Chocolate and Sweetened Condensed Milk
- In a microwave-safe bowl, combine semi-sweet chocolate chips and sweetened condensed milk.
- Microwave in 30-second intervals, stirring after each, until the mixture is smooth and fully melted. (This usually takes about 1 to 1½ minutes.)
- Alternative Stovetop Method: Use a double boiler by placing a heatproof bowl over a pot of simmering water. Stir until melted.
3. Add the Vanilla Extract
- Once the chocolate is melted, stir in vanilla extract for enhanced flavor.
4. Fold in the Butterfinger and Reese’s Pieces
- Gently fold in ¾ of the crushed Butterfinger bars and ½ cup of Reese’s Pieces (reserve some for topping).
- Stir until the candy pieces are evenly distributed throughout the fudge.
5. Transfer to the Baking Pan
- Pour the fudge mixture into the prepared pan and spread it out evenly using a spatula.
- Sprinkle the remaining Butterfinger pieces and Reese’s Pieces over the top.
- Optional: Drizzle with melted peanut butter for an extra layer of flavor.
6. Chill Until Set
- Place the pan in the refrigerator for at least 2-3 hours (or until the fudge is firm).
- If you’re in a hurry, pop it in the freezer for 1 hour to speed up the process.
7. Cut Into Squares and Serve
- Once fully set, use the parchment paper overhang to lift the fudge out of the pan.
- Place it on a cutting board and use a sharp knife to slice into small squares.
- Serve immediately or store for later!
Tips and Tricks for the Perfect Fudge
- Use Good-Quality Chocolate: Since chocolate is the star ingredient, high-quality chocolate chips or a chopped chocolate bar will give the best results.
- Don’t Overheat the Chocolate: Melt it slowly in the microwave or over low heat to prevent burning.
- Make Clean Cuts: To get neat, sharp edges, run your knife under hot water, wipe it dry, and slice. Repeat between cuts.
- For a Softer Texture: If you prefer a softer fudge, increase the sweetened condensed milk slightly.
- To Make It Dairy-Free: Use dairy-free chocolate chips and coconut sweetened condensed milk as a substitute.
How to Serve Chocolate Fudge With Butterfinger and Reese’s Pieces
This indulgent fudge is rich, creamy, and packed with crunchy goodness, making it perfect for any occasion. Here are some fun ways to serve it:
1. As a Dessert Platter Favorite
- Arrange the fudge pieces on a decorative serving tray for a festive touch.
- Pair with fresh berries or salted nuts for a balanced flavor profile.
- Add it to a holiday dessert board with cookies, truffles, and caramel candies.
2. Topped with Extras
- Whipped Cream and Caramel Drizzle: Take it over the top with a dollop of whipped cream and a drizzle of caramel or chocolate sauce.
- Ice Cream Pairing: Serve fudge squares alongside vanilla or peanut butter ice cream for a dreamy dessert combo.
3. Turn It into a Fudge Sundae
- Crumble a few pieces over a scoop of ice cream and top with hot fudge sauce and chopped nuts.
4. As a Holiday Gift Idea
- Cut the fudge into bite-sized squares and wrap them in decorative boxes or cellophane bags.
- Perfect for Christmas, birthdays, or Valentine’s Day gifts!
How to Store Chocolate Fudge
To keep your fudge fresh and delicious, follow these storage tips:
Room Temperature Storage (Up to 5 Days)
- Store in an airtight container at cool room temperature (below 70°F).
- Keep parchment paper between layers to prevent sticking.
Refrigerator Storage (Up to 2 Weeks)
- Place the fudge in an airtight container and refrigerate.
- Allow it to sit at room temperature for 10-15 minutes before serving for the best texture.
Freezer Storage (Up to 3 Months)
- Wrap the fudge tightly in plastic wrap, then place it in a freezer-safe bag or container.
- To thaw, let it sit at room temperature for about 30 minutes before enjoying.
Nutrition Information
| Serving Size | Calories | Fat | Carbs | Sugar | Protein |
|---|---|---|---|---|---|
| 1 Square (approx.) | 180 | 9g | 22g | 18g | 2g |
- This is an estimated nutritional value and may vary depending on portion sizes.
Conclusion
This Chocolate Fudge with Butterfinger and Reese’s Pieces is the perfect balance of creamy, chocolatey, and crunchy. It’s easy to make, requires no baking, and is a guaranteed crowd-pleaser for any occasion. Whether you’re making it for the holidays, gifting it to friends, or simply treating yourself, this indulgent fudge is sure to become a favorite.

A Decadent Chocolate Fudge With Butterfinger And Reese’s Pieces
Course: Uncategorized16-20
squares10
minutes180
kcal2–3
hoursIngredients
2 cups semi-sweet chocolate chips
1 (14 oz) can sweetened condensed milk
1 tsp vanilla extract
4 Butterfinger candy bars, crushed (reserve some for topping)
¾ cup Reese’s Pieces (reserve some for topping)
¼ cup peanut butter, melted (optional, for drizzling)
Directions
- Prepare the Baking Pan
Line an 8×8-inch or 9×9-inch pan with parchment paper and lightly grease it. - Melt the Chocolate and Sweetened Condensed Milk
In a microwave-safe bowl, combine chocolate chips and sweetened condensed milk.
Microwave in 30-second intervals, stirring in between, until smooth. - Add Vanilla and Mix the Candy Pieces
Stir in vanilla extract.
Fold in ¾ of the crushed Butterfinger bars and ½ cup of Reese’s Pieces. - Transfer to the Pan and Chill
Spread the fudge evenly in the prepared pan.
Sprinkle the remaining Butterfinger pieces and Reese’s Pieces on top.
Optional: Drizzle with melted peanut butter for extra flavor.
Chill in the refrigerator for 2-3 hours or until firm. - Slice and Serve
Once set, lift the fudge out of the pan and cut it into small squares.
Serve immediately or store for later.
Chocolate Fudge FAQs
1. Can I use milk chocolate instead of semi-sweet chocolate?
Yes! Milk chocolate will make the fudge sweeter and creamier, while dark chocolate will add a richer, less sweet flavor. Choose based on your preference!
2. Can I make this fudge without condensed milk?
Sweetened condensed milk is essential for smoothness and structure, but you can try using coconut condensed milk for a dairy-free option.
3. How do I make this fudge softer or firmer?
- For softer fudge, add a little more condensed milk.
- For firmer fudge, use less condensed milk or refrigerate it longer.
4. Can I freeze this fudge?
Yes! Wrap the fudge in plastic wrap, place it in a freezer-safe container, and store it for up to 3 months. Let it thaw at room temperature before serving.
5. What can I use instead of Butterfinger and Reese’s Pieces?
You can substitute with:
- Snickers, Twix, or Crunch Bars for a different candy mix.
- Chopped peanuts or almonds for extra crunch.
- M&Ms or chocolate-covered pretzels for a unique twist.