Pink Lemonade Ice Cream Cake

Oh my gosh—you have to try this! This Pink Lemonade Ice Cream Cake is like summer in every single bite. It’s sweet, tangy, and soooo creamy.
I made this for a backyard party and, wow, it disappeared in minutes. The colors are super cute too—pretty pink and just fun to look at. And honestly, it’s way easier than it looks.
If you love lemonade and ice cream (I mean, who doesn’t?), then this cake is calling your name. Trust me, once you try it, you’ll wanna make it again and again. Let’s dive in!

Why You’ll Love This Recipe
- The Ultimate Cool Treat: A refreshing dessert perfect for hot days or summer gatherings. Pink lemonade fans will love the tangy flavor.
- Easy to Make: No baking required! It’s a simple layered cake made with store-bought ice cream and cake ingredients.
- Showstopper Dessert: The layers of color and texture make it a showstopper at birthday parties, BBQs, and holidays.
- Make-Ahead Friendly: You can prepare this cake the night before, giving you more time to enjoy the occasion.
- Flavor Explosion: The combination of tangy lemonade, rich strawberry ice cream, and a creamy frosting is unbeatable.
Required Kitchen Tools
Before we get started, make sure you have the following tools and equipment:
- Cake Pans: You will need two 8-inch round cake pans to create the base of the cake.
- Hand Mixer or Stand Mixer: To easily whip the cream cheese and frosting ingredients.
- Spatula: For spreading the ice cream layers and frosting evenly.
- Plastic Wrap: This is essential for wrapping the ice cream layers so they set up perfectly.
- Measuring Cups and Spoons: For accurate measurements.
- Piping Bag (optional): If you want to create a decorative effect with the frosting.
- Serving Platter or Cake Stand: To display your gorgeous Pink Lemonade Ice Cream Cake.
Ingredients
Now that you’re equipped with the right tools, let’s get into the ingredients. Here’s what you’ll need to create this refreshing, layered cake (exact measurements are in the recipe card at the end):
Lemon Cake Ingredients:
- All-purpose flour: This is the base of your cake, giving it the structure it needs.
- Granulated sugar: For sweetness and to balance the tangy lemon flavor.
- Baking powder: To help the cake rise and achieve a fluffy texture.
- Salt: Just a pinch to enhance the other flavors.
- Unsalted butter, room temperature: Adds richness and moisture to the cake.
- Pasteurized egg whites from a carton: These will help achieve a light and airy texture.
- Buttermilk, room temperature: Adds tenderness and a slight tang to the cake.
- Vegetable oil: Keeps the cake moist without being too heavy.
- Vanilla extract: Enhances the overall flavor of the cake.
- Fresh lemon zest: For a zesty lemon kick that packs in that fresh citrusy flavor.
- Fresh lemon juice: The bright acidity balances the richness of the cake.
- Yellow gel food coloring: To give the cake that classic yellow tint we associate with lemon desserts.
Strawberry Ice Cream Layers:
- Containers (48 oz. each) of strawberry ice cream: Choose high-quality strawberry ice cream to ensure a creamy, smooth texture when frozen. You’ll need two full containers to create the ice cream layers.
Whipped Cream Frosting:
- (8 ounce block) full fat cream cheese, cold: The cream cheese adds structure and a slight tang to balance the sweetness of the whipped cream.
- Powdered sugar: To sweeten and thicken the frosting, creating a velvety texture.
- Vanilla extract: Adds depth and rounds out the flavors in the frosting.
- Heavy cream or heavy whipping cream, cold: This is essential for whipping the frosting to its light, airy consistency.
- Fresh lemon zest: Adds another punch of lemony goodness that ties into the cake and ice cream.
- Yellow and pink gel food coloring: For those beautiful swirls of color that make this cake a visual masterpiece.
Variations for Pink Lemonade Ice Cream Cake
While the classic Pink Lemonade Ice Cream Cake is fantastic on its own, there are a few variations you can try to customize it for your preferences or for different occasions.
Try Different Ice Cream Flavors:
- Lemon Sorbet: If you want to make the cake extra refreshing and citrus-forward, substitute the strawberry ice cream with lemon sorbet or lemon ice cream for an even stronger lemonade flavor.
- Berry Blend: Combine strawberry, blueberry, and raspberry ice cream for a burst of mixed berry flavors. This will make the cake even more visually stunning and give it a unique taste profile.
- Vanilla Ice Cream: If you want the lemon and strawberry flavors to shine more, go with a simple vanilla ice cream instead of strawberry. It’s classic and allows the other elements to stand out more.
Add Fresh Fruit:
- Sliced Strawberries: Layer fresh strawberry slices between the cake and ice cream layers for added freshness and texture.
- Lemon Zest Garnish: For a stronger lemon flavor and a bit of decoration, top the cake with extra lemon zest or thin lemon slices before serving.
Decorate with Toppings:
- Whipped Cream Clouds: Create decorative dollops of whipped cream around the edges or center of the cake for a cloud-like effect.
- Candied Lemon Peel: For a decorative and edible touch, add candied lemon peel on top of the frosting or around the edges of the cake.
Make It Dairy-Free:
- Dairy-Free Ice Cream: Substitute with dairy-free ice cream (strawberry or lemon) and use a dairy-free cream cheese alternative to make this cake suitable for those with dietary restrictions.

Step-by-Step Instructions
Now, let’s dive into the detailed steps to make your Pink Lemonade Ice Cream Cake!
1. Make the Lemon Cake Layers
Preheat the Oven:
Preheat your oven to 350°F (177°C). Grease and line two 8-inch round cake pans with parchment paper. This will ensure your cake layers come out easily.
Mix the Dry Ingredients:
In a medium bowl, whisk together the all-purpose flour, baking powder, and salt. Set aside.
Cream the Wet Ingredients:
In a large mixing bowl, beat the unsalted butter and granulated sugar using an electric mixer until light and fluffy, about 2-3 minutes. Add the pasteurized egg whites and continue to mix until combined. Beat in the vegetable oil, vanilla extract, fresh lemon zest, and fresh lemon juice. Mix until smooth.
Add Dry Ingredients:
Gradually add the dry ingredients to the wet mixture in batches, alternating with the buttermilk, until everything is just combined. If you want that bright yellow hue, add a few drops of yellow gel food coloring and mix until evenly distributed.
Bake the Cake:
Pour the batter evenly into the two prepared cake pans. Bake in the preheated oven for 20-25 minutes, or until a toothpick inserted into the center of the cakes comes out clean. Allow the cakes to cool in the pans for 10 minutes before transferring them to wire racks to cool completely.
2. Prepare the Strawberry Ice Cream Layers
Soften the Ice Cream:
While the cakes cool, remove the strawberry ice cream from the freezer and let it sit for about 10 minutes to soften. You want it to be spreadable but not too runny.
Line Pans with Plastic Wrap:
Line an 8-inch cake pan with plastic wrap, making sure the plastic hangs over the edges to make it easier to remove the ice cream layer later.
Spread the Ice Cream:
Once the ice cream has softened, spread one layer of the strawberry ice cream into the bottom of the lined cake pan. Smooth it out evenly with a spatula. Freeze the ice cream layer for at least 1 hour or until firm.
Add Another Layer of Ice Cream:
Once the first ice cream layer is firm, add a second layer of strawberry ice cream and smooth it out. Freeze again for at least 1 hour or until completely frozen.
3. Whip the Cream Cheese Frosting
Mix the Frosting Ingredients:
In a large mixing bowl, beat the cream cheese and powdered sugar together until smooth. Add the vanilla extract, fresh lemon zest, and cold heavy cream. Beat the mixture on high speed until stiff peaks form, about 3-5 minutes.
Color the Frosting:
Divide the frosting into two portions. Add yellow gel food coloring to one half of the frosting and pink gel food coloring to the other half. Gently swirl the colors together to create a marbled effect.
4. Assemble the Cake
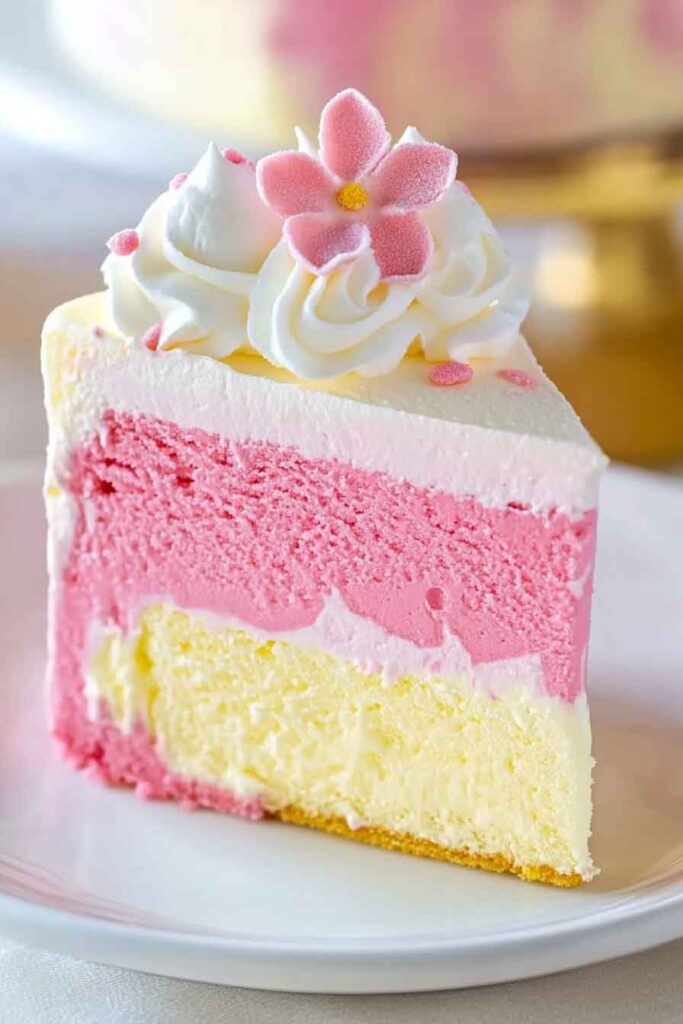
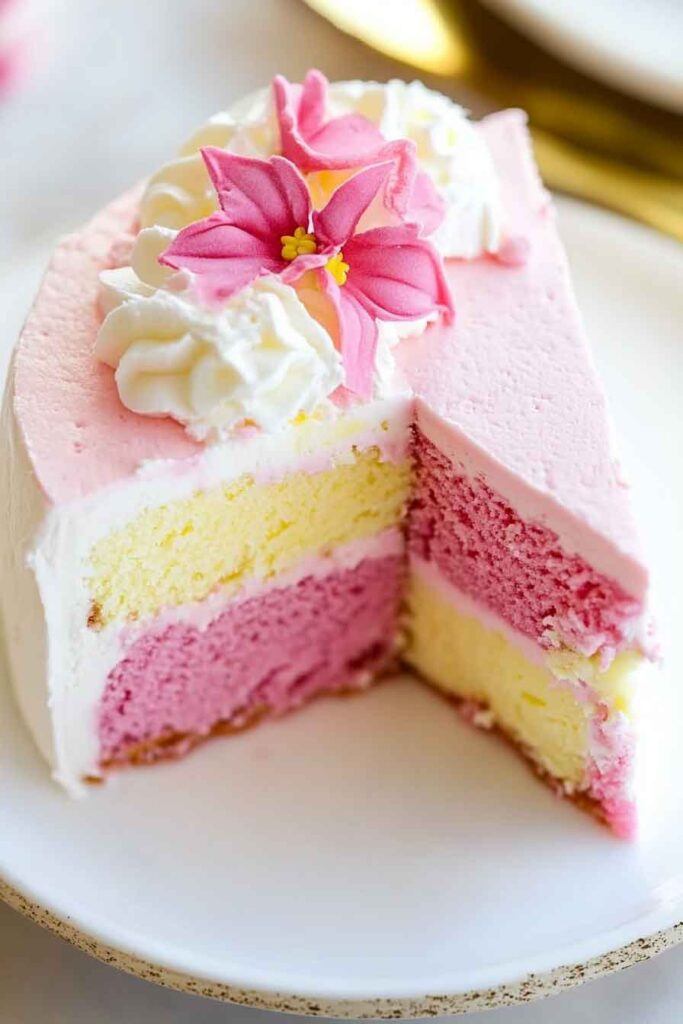
Layer the Cake and Ice Cream:
Place the first lemon cake layer onto your serving platter or cake stand. Top with one of the frozen strawberry ice cream layers. Next, place the second lemon cake layer on top of the ice cream. Gently press down to secure.
Frost the Cake:
Spread the whipped cream frosting generously over the entire cake, smoothing it out with a spatula. If you like, you can pipe extra frosting around the edges for a more decorative look.
5. Freeze the Cake
Once the cake is fully assembled and frosted, cover it with plastic wrap and freeze for at least 3 hours, or overnight if possible. This will help the layers set properly and make the cake easier to slice.
6. Serve and Enjoy!
Garnish:
Before serving, garnish with extra lemon zest or sliced strawberries for an extra touch of freshness.
Slice:
Remove the cake from the freezer about 10 minutes before serving to make slicing easier. Cut into slices and serve!
How to Serve Pink Lemonade Ice Cream Cake
This ice cream cake can be served on its own as a show-stopping dessert, or paired with some light summer dishes. Here are a few ideas:
- As a Refreshing Summer Dessert: Serve it after a barbecue or family gathering. Its light, citrusy flavors are a great way to end a hot day.
- With Lemonade: Naturally, this cake pairs wonderfully with a glass of pink lemonade or iced tea. The flavors complement each other perfectly.
- With Fruit Salads: Pair with a fresh fruit salad on the side for a complete summer dessert.
Storing Pink Lemonade Ice Cream Cake
This Pink Lemonade Ice Cream Cake is ideal for making ahead, but knowing how to store it properly will ensure it stays fresh and delicious for as long as possible.
Storing Leftovers:
- In the Freezer: Since this is an ice cream cake, it should be stored in the freezer. Make sure to wrap the cake tightly in plastic wrap or foil, then place it in an airtight container or a resealable freezer bag. This will help prevent freezer burn and maintain its texture. The cake will stay fresh in the freezer for up to 1-2 weeks.
- Serve from the Freezer: To keep the texture perfect, serve the cake directly from the freezer. Let it sit for about 10 minutes at room temperature to soften slightly before slicing.
Storing Whipped Cream Frosting:
If you happen to have leftover frosting (though it’s unlikely!), you can store it in an airtight container in the refrigerator for up to 3 days. However, note that whipped cream frosting may lose its fluffiness after a day or two, so it’s best used immediately or within the first 24 hours.
Nutrition for Pink Lemonade Ice Cream Cake
If you’re curious about the nutritional breakdown of this decadent treat, here’s an estimated guide to keep in mind. (Please note, these values can vary depending on your specific ingredients and portion sizes.)
Serving Size: 1 slice (1/12 of the cake)
| Nutrient | Amount per Serving |
|---|---|
| Calories | 320 |
| Total Fat | 18g |
| Saturated Fat | 9g |
| Cholesterol | 40mg |
| Sodium | 150mg |
| Total Carbohydrates | 39g |
| Dietary Fiber | 1g |
| Sugars | 30g |
| Protein | 3g |
This cake is indulgent but perfect for a special treat or celebration. With its layers of ice cream, cake, and creamy frosting, it’s definitely a dessert to savor!

Pink Lemonade Ice Cream Cake
Course: Uncategorized12
slices20
minutes320
kcal4
hoursIngredients
- Lemon Cake Ingredients:
All-purpose flour: 1 ½ cups
Granulated sugar: 1 cup
Baking powder: 1 ½ tsp
Salt: ¼ tsp
Unsalted butter (room temperature): ½ cup
Pasteurized egg whites (carton): ½ cup
Buttermilk (room temperature): ½ cup
Vegetable oil: 2 tbsp
Vanilla extract: 1 tsp
Fresh lemon zest: 2 tsp
Fresh lemon juice: 2 tbsp
Yellow gel food coloring: a few drops (optional)
- Strawberry Ice Cream Layers:
Strawberry ice cream (2 containers, 48 oz. each)
- Whipped Cream Frosting:
Full-fat cream cheese (cold): 8 oz
Powdered sugar: 1 ½ cups
Vanilla extract: 1 tsp
Heavy cream (cold): 1 cup
Fresh lemon zest: 1 tsp
Yellow and pink gel food coloring: a few drops
Directions
- Make the Lemon Cake: Preheat the oven to 350°F. Prepare two 8-inch cake pans with parchment paper. Mix the dry ingredients, cream the butter and sugar, and add wet ingredients. Alternate adding dry and wet ingredients. Bake for 20-25 minutes, cool the cakes.
- Prepare Ice Cream Layers: Soften the strawberry ice cream. Line an 8-inch pan with plastic wrap, spread the ice cream, freeze for 1 hour, add another layer, and freeze again.
- Whip Frosting: Beat the cream cheese and powdered sugar, then add vanilla, heavy cream, and lemon zest. Whip until stiff peaks form. Add gel food coloring to make the frosting pink and yellow.
- Assemble the Cake: Layer the cake, ice cream, and frosting. Freeze the cake for at least 4 hours or overnight.
- Serve: Garnish with fresh lemon zest or sliced strawberries, slice, and enjoy!
Conclusion
If you’ve made it this far, I’m sure you’re excited to try this Pink Lemonade Ice Cream Cake! It’s a dessert that brings together all the flavors of summer in a beautifully layered, easy-to-make treat. Whether you’re making it for a birthday, a summer BBQ, or just a fun family gathering, this cake will be the star of the show.
The balance of tart lemon cake, creamy strawberry ice cream, and zesty lemon frosting will have everyone coming back for seconds. Best of all, you can easily customize it to suit your taste—whether that means trying a different ice cream flavor, adding fresh fruit, or making it dairy-free. Whatever way you make it, this Pink Lemonade Ice Cream Cake will be a hit!