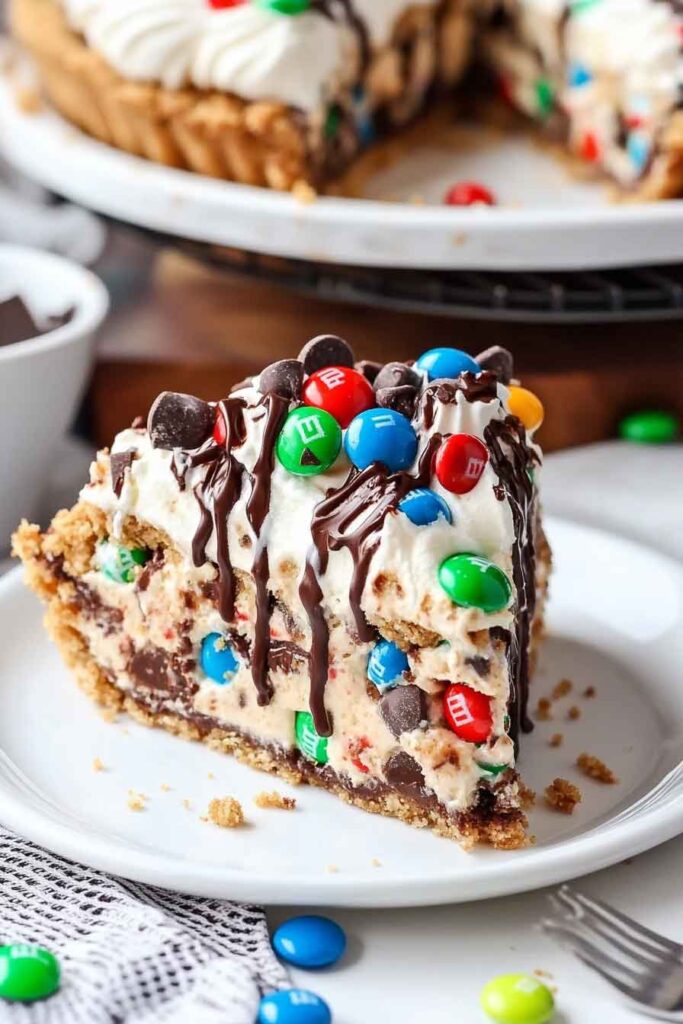
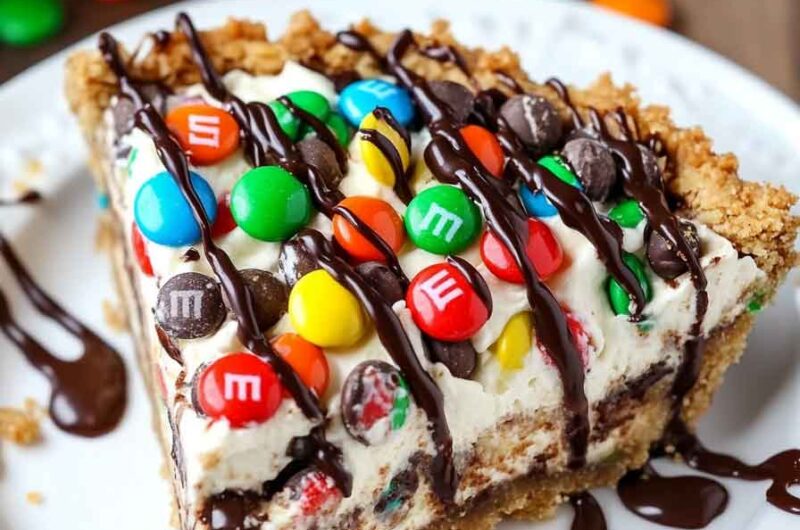
Monster Cookie Cheesecake Pie
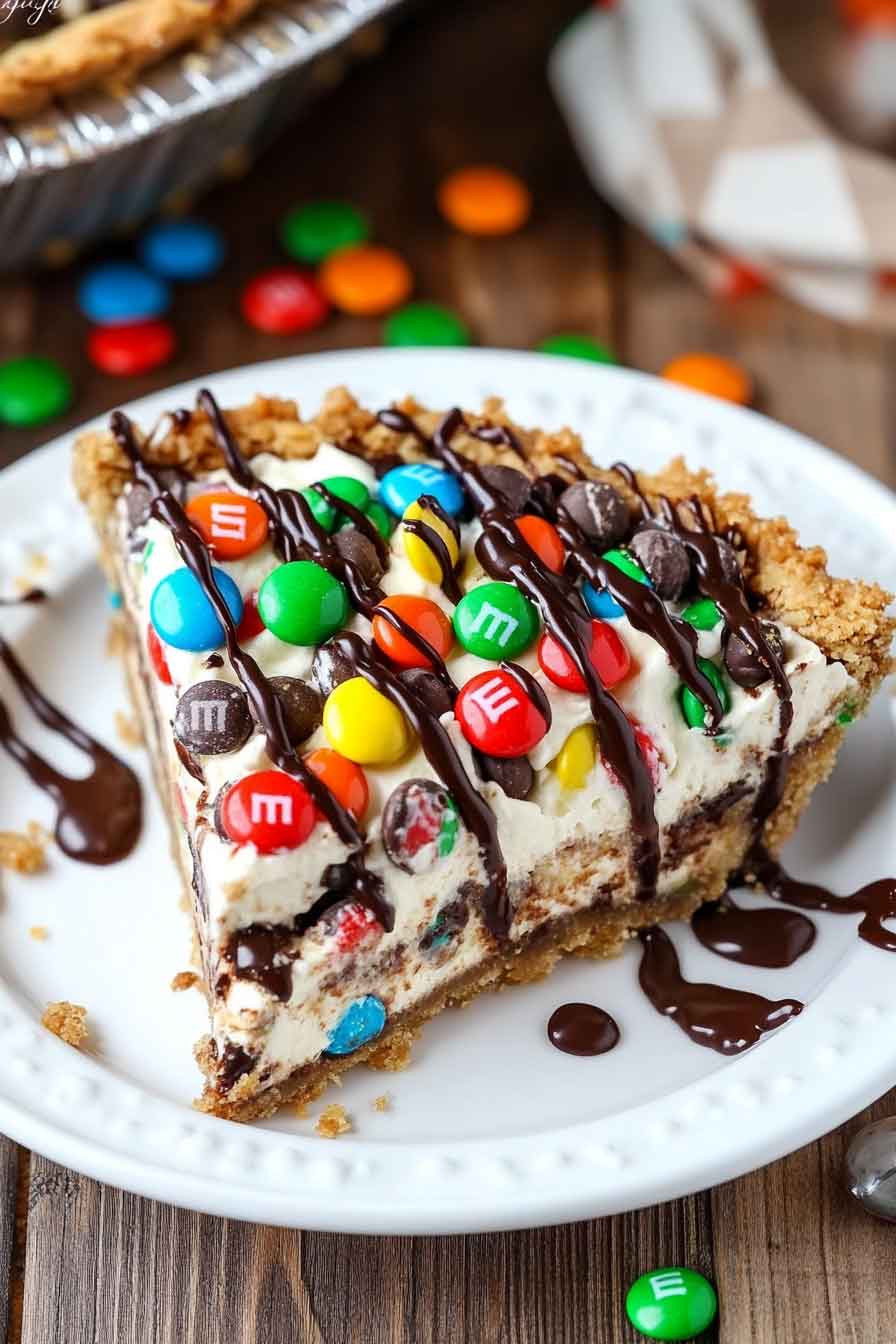
Okay, so this Monster Cookie Cheesecake Pie? Total game-changer. It’s like cookies, candy, and cheesecake had the best baby ever.
I made it for fun once—and wow, everyone lost it. It’s sweet, crunchy, creamy… and kinda addicting. Like, I had to stop myself from eating the whole thing.
You don’t need fancy stuff. Just mix, pour, chill, and boom—pure happiness. If you love monster cookies and cheesecake, this is it.
So, let’s make it together! You’re gonna love every bite. Promise.

Why You’ll Love This Recipe
- Reader Favorite: Whether you’re making it for a family gathering or a special occasion, this pie is a crowd-pleaser. “Delicious!” “Incredible!” and “Amazing” are just a few of the words readers use to describe it.
- Cheesecake and Cookie Bliss Combined: A perfect marriage of two desserts into one unbeatable pie.
- Customizable: You can easily adjust the ingredients based on what you have in your pantry or what you like best.
- Perfect for Any Occasion: Whether it’s a holiday dinner or just a weekend treat, this pie is bound to impress.
- Make-Ahead Friendly: Bake it ahead of time and let it chill in the fridge until you’re ready to serve. It’s the perfect make-ahead dessert for busy hosts.
Required Kitchen Tools
Here’s a quick list of the tools you’ll need to make this decadent Monster Cookie Cheesecake Pie:
- Mixing Bowls: For combining the cookie dough and cheesecake batter.
- Hand Mixer or Stand Mixer: To beat the cream cheese and the peanut butter until smooth.
- Pie Pan: You’ll need a 9-inch pie pan for this recipe.
- Measuring Cups and Spoons: To ensure your ingredients are spot on!
- Spatula: For spreading the cheesecake batter evenly and scraping down the sides of your mixing bowls.
- Baking Sheet: For baking the monster cookie base.

Ingredients
Monster Cookie Layer:
You’ll need the following ingredients to make the delicious, chewy monster cookie base:
- Butter: 1 cup (softened). This adds richness and ensures the cookies are soft and chewy.
- Brown Sugar: 1 cup (packed). The brown sugar gives a hint of caramel flavor that balances out the sweetness.
- Granulated Sugar: 1/2 cup. This sugar will help your cookies to spread and crisp up nicely around the edges.
- Peanut Butter: 1/2 cup (smooth or chunky). The peanut butter adds flavor and richness to the cookies and ties everything together.
- Eggs: 2 large eggs. They help bind everything and give the cookies their chewy texture.
- Vanilla Extract: 1 tsp. Adds a lovely depth of flavor to the cookie dough.
- Quick Oats: 2 cups. These give the cookies their signature chewy texture.
- All-Purpose Flour: 1 cup. This provides structure to the cookie base.
- Baking Soda: 1 tsp. For leavening and giving the cookies a light rise.
- Baking Powder: 1/2 tsp. Helps create a soft and tender texture.
- M&Ms: 1/2 cup. These colorful candy-coated chocolates make the cookies even more fun and irresistible.
- Chocolate Chips: 1/2 cup. These add the perfect amount of melty chocolate in every bite.
Cheesecake Filling:
For the cheesecake layer, you will need the following ingredients to create the creamy, peanut buttery center:
- Cream Cheese: 8 oz (softened). This is the base for the cheesecake layer and gives it that creamy, tangy flavor.
- Brown Sugar: 1/2 cup. Adds a subtle sweetness and balances the tanginess of the cream cheese.
- Peanut Butter: 1/4 cup. The creamy peanut butter adds richness and complements the monster cookie flavor.
- Egg: 1 large egg. This helps set the cheesecake layer while keeping it light and smooth.
- Milk: 1/4 cup. This adds moisture and ensures the cheesecake filling is smooth and creamy.
Peanut Butter Icing (Optional, but highly recommended!):
- Butter: 1/2 cup (softened). The butter provides a creamy consistency for the icing.
- Peanut Butter: 1/2 cup. It adds more peanut butter flavor to complement the cookie base.
- Powdered Sugar: 2 cups. This sweetens the icing and gives it the perfect consistency.
- Water or Milk: 2-4 tbsp (adjust for consistency). You’ll need a bit of liquid to make the icing smooth and spreadable.
- Chocolate Sauce (Optional): Drizzle on top for an extra layer of decadence!
Variations for Monster Cookie Cheesecake Pie
While this recipe is already a winning combo, you can easily make a few tweaks to personalize it to your taste:
- Switch Up the Mix-ins: If you’re not a fan of M&Ms, you can replace them with any of your favorite candy or nuts. Try adding mini Reese’s cups, butterscotch chips, or even chopped pretzels for a sweet and salty combo.
- Use Crunchy Peanut Butter: If you love a bit of crunch in your cookies, try swapping out the smooth peanut butter for chunky peanut butter for added texture.
- Cheesecake Flavor Twist: Add a bit of vanilla extract or even a teaspoon of cinnamon to the cheesecake filling for a warm, comforting flavor.
- No-Bake Cheesecake Layer: If you want to skip baking the cheesecake layer, you can use a no-bake cheesecake filling (like the one used in traditional no-bake cheesecakes) instead.
Step-by-Step Instructions
Now, let’s dive into the steps to make this delectable Monster Cookie Cheesecake Pie. Trust me, this will become a new favorite dessert!
1. Make the Monster Cookie Dough
In a large mixing bowl, combine the softened butter, brown sugar, and granulated sugar. Beat them together using a hand mixer or stand mixer until the mixture is light and fluffy. This should take about 3-5 minutes.
Next, add the peanut butter, eggs, and vanilla extract to the bowl and continue mixing until everything is well incorporated.
In a separate bowl, whisk together the quick oats, flour, baking soda, and baking powder. Slowly add this dry mixture to the wet ingredients, mixing on low speed until just combined. Be sure not to overmix!
Finally, fold in the M&Ms and chocolate chips. The dough should be thick and chunky, just like you want your monster cookies to be!
2. Press the Cookie Dough Into the Pie Pan
Take the cookie dough and press it into the bottom of a greased 9-inch pie pan. You want the dough to be evenly spread across the bottom and slightly up the sides of the pan. Don’t worry if it’s not perfectly smooth; a rustic look works great here!
Once the dough is spread out, place the pie pan in the refrigerator to chill while you prepare the cheesecake filling. This helps the dough firm up and prevents it from spreading too much while baking.
3. Make the Cheesecake Filling
In a separate mixing bowl, beat together the softened cream cheese and brown sugar until smooth and creamy. You can use a hand mixer or stand mixer for this step. Add in the peanut butter and beat until fully incorporated. Add the egg and milk, and continue to beat until everything is well combined. The cheesecake filling should be smooth and creamy.
4. Layer the Cheesecake Filling Over the Cookie Dough
Once the cookie dough is chilled, take it out of the fridge and pour the cheesecake filling over the top. Use a spatula to spread the filling evenly across the top of the cookie dough. Don’t worry if some of the cookie dough peeks through—this is a pie after all, and a little imperfection adds to the charm!
5. Bake the Pie
Preheat your oven to 350°F (177°C). Place the pie in the oven and bake for 30-35 minutes or until the cheesecake is set and the cookie dough is golden brown. The center of the pie may still have a slight jiggle, but it will firm up as it cools.
6. Cool and Chill
Let the pie cool on a wire rack for about 30 minutes, then transfer it to the refrigerator. Allow it to chill for at least 2 hours before serving. The chilling time helps the pie set and ensures the cheesecake layer is smooth and firm.
7. Prepare the Peanut Butter Icing (Optional)
If you’re feeling extra indulgent (and let’s face it, who isn’t?), adding a peanut butter icing on top of this Monster Cookie Cheesecake Pie is a game-changer. The creamy peanut butter icing adds the perfect finishing touch and a little extra sweetness to complement the rich flavors of the cookie and cheesecake layers.
Make the Icing
In a mixing bowl, beat together the softened butter and peanut butter until smooth and creamy. Once combined, slowly add in the powdered sugar, 1/4 cup at a time, mixing well after each addition. The icing should thicken as you go.
Add in the milk or water a tablespoon at a time until you reach your desired consistency. If you want a thicker, more spreadable icing, use less liquid. For a thinner drizzle, add more milk or water.
Once the icing is the right consistency, you’re ready to decorate your pie.
Drizzle the Icing
Once your pie has chilled and is firm, drizzle the peanut butter icing over the top of the pie. You can either spread it evenly with a spatula or drizzle it in a fun, decorative pattern. If you like, add a drizzle of chocolate sauce for an extra touch of decadence!

How to Serve Monster Cookie Cheesecake Pie
This pie is perfect for any celebration, family gathering, or even a casual weekend dessert. The combination of flavors is irresistible, and the visual appeal of the colorful M&Ms and chocolate drizzle on top will make it the star of any table. Here’s how to serve it:
Slice It Up:
Once the pie is fully chilled, slice it into generous wedges. Serve each slice as is, or with a scoop of vanilla ice cream for an extra indulgent treat. You could also serve it with a dollop of whipped cream and a drizzle of chocolate sauce if you’re feeling extra fancy.
Pairing Suggestions:
- Vanilla Ice Cream: The creamy, cool texture of vanilla ice cream contrasts perfectly with the warm, rich flavors of the pie.
- Whipped Cream: A light topping like whipped cream adds a soft, airy contrast to the dense pie.
- Coffee or Milk: Pair the pie with a hot cup of coffee or a cold glass of milk for the ultimate indulgence.
Storing Monster Cookie Cheesecake Pie
Once you’ve made this pie, you’ll want to enjoy it again and again, so here’s how to store leftovers (if there are any!):
- Refrigeration: Store leftover pie in an airtight container in the fridge for up to 5 days. The cheesecake layer will stay nice and creamy, and the cookie crust will remain soft.
- Freezing: If you want to freeze the pie, slice it into individual pieces, wrap each slice in plastic wrap or foil, and place them in an airtight container. The pie will last in the freezer for up to 3 months. To reheat, let the slices thaw in the fridge overnight and serve chilled or at room temperature.
Monster Cookie Cheesecake Pie FAQs
Can I make this pie ahead of time?
Yes, absolutely! This pie is perfect for making ahead. You can bake it, chill it, and even add the icing a day or two before you plan to serve it. Just store it in the refrigerator until you’re ready to serve, and it’ll taste just as delicious!
Can I use store-bought cookie dough?
While homemade monster cookie dough is ideal for the best flavor and texture, you can use store-bought cookie dough as a shortcut. Simply bake the dough in the pie pan and proceed with the cheesecake filling and icing as instructed.
Can I make this a gluten-free dessert?
Yes! To make this pie gluten-free, you can swap out the all-purpose flour for a gluten-free flour blend. Just be sure that all of the other ingredients (like oats, baking powder, and baking soda) are gluten-free as well.
What can I substitute for peanut butter if I have allergies?
If you or your guests have peanut allergies, you can substitute the peanut butter with sun butter (made from sunflower seeds), almond butter, or even cashew butter. Just make sure to choose a nut butter that has a similar texture to peanut butter for the best results.
Nutrition Information (Per Slice)
Here’s an approximate breakdown of the nutrition for each slice of this indulgent Monster Cookie Cheesecake Pie:
| Nutrient | Amount per Slice |
|---|---|
| Calories | 450 |
| Total Fat | 27g |
| Saturated Fat | 11g |
| Cholesterol | 55mg |
| Sodium | 180mg |
| Total Carbohydrates | 48g |
| Dietary Fiber | 2g |
| Sugars | 34g |
| Protein | 7g |
Please note that these values are estimates and may vary based on the exact ingredients and portion sizes used.
Monster Cookie Cheesecake Pie: The Ultimate Sweet Treat for Any Occasion
Tips for Perfecting Your Monster Cookie Cheesecake Pie
While this pie is pretty straightforward to make, here are a few tips to ensure your pie turns out perfectly every single time:
1. Use Room Temperature Ingredients:
For the best texture in both the cookie and cheesecake layers, make sure your butter, eggs, and cream cheese are at room temperature. This will allow them to mix together more easily and create a smooth batter. Cold ingredients can cause the batter to be lumpy and uneven, so give yourself a little time to warm them up before starting.
2. Don’t Overmix the Cookie Dough:
When making the cookie dough, be sure to mix the dry ingredients in gradually and stop mixing once everything is incorporated. Overmixing the dough can lead to a tough crust, and we want a chewy, tender cookie base. It’s okay if there are a few lumps—those will bake out in the oven!
3. Let the Pie Cool Completely Before Chilling:
Allow the pie to cool to room temperature before placing it in the fridge to chill. If you place it in the fridge while it’s still hot, it can cause condensation, which could make the crust soggy. Cooling first ensures the pie sets properly and maintains that perfectly firm cheesecake layer.
4. Adjust the Sweetness:
While this pie is already quite sweet (thanks to the M&Ms, chocolate chips, and peanut butter icing), you can always adjust the sweetness levels to suit your taste. If you want a slightly less sweet dessert, you can reduce the amount of sugar in the cheesecake filling or skip the icing altogether. You can also use a sugar substitute if you prefer a lower-calorie version.
5. Don’t Rush the Chilling Time:
Chilling the pie is crucial for getting the perfect texture. If you skip or rush this step, the cheesecake layer might not set properly, and the cookie crust might not be as chewy as it should be. Give the pie at least 2 hours in the fridge, or even overnight if you’re prepping it ahead of time. The longer it chills, the better it will taste!
6. Make It a Showstopper with Extra Toppings:
If you want to take this pie to the next level, try adding some extra toppings before serving. Crushed up cookies, additional chocolate drizzle, or even a sprinkle of crushed peanuts on top would make this pie even more irresistible. Get creative and make it your own!
Why This Recipe Will Become a Family Favorite
Monster Cookie Cheesecake Pie combines all the best elements of two classic desserts into one unforgettable treat. Whether you’re baking for a holiday, a family gathering, or just a special treat, this dessert is a sure-fire way to impress your guests. It’s indulgent, flavorful, and just plain fun!
The chewy cookie crust pairs so beautifully with the creamy peanut butter cheesecake filling. And with a peanut butter icing drizzle and chocolate sauce on top, it’s a dessert that satisfies every sweet tooth in the room. Plus, it’s the kind of dessert that’s just as delicious the next day, so you don’t have to worry about leftovers!
Monster Cookie Cheesecake Pie
Course: Uncategorized8-10
slices20
minutes35
minutes450
kcal2
hoursIngredients
- For the Cookie Layer
Butter: 1 cup (softened)
Brown Sugar: 1 cup (packed)
Granulated Sugar: 1/2 cup
Peanut Butter: 1/2 cup
Eggs: 2 large
Vanilla Extract: 1 tsp
Quick Oats: 2 cups
All-Purpose Flour: 1 cup
Baking Soda: 1 tsp
Baking Powder: 1/2 tsp
M&Ms: 1/2 cup
Chocolate Chips: 1/2 cup
- For the Cheesecake Filling
Cream Cheese: 8 oz (softened)
Brown Sugar: 1/2 cup
Peanut Butter: 1/4 cup
Egg: 1 large
Milk: 1/4 cup
- For the Peanut Butter Icing
Butter: 1/2 cup (softened)
Peanut Butter: 1/2 cup
Powdered Sugar: 2 cups
Water or Milk: 2-4 tbsp
Chocolate Sauce (Optional)
Directions
- Prepare the Cookie Dough: Cream together butter, brown sugar, and granulated sugar. Add peanut butter, eggs, and vanilla, and mix until smooth. Stir in oats, flour, baking soda, and baking powder, followed by M&Ms and chocolate chips.
- Press Dough Into Pie Pan: Press the dough into a greased 9-inch pie pan. Chill in the fridge while preparing the cheesecake filling.
- Make the Cheesecake Filling: Beat together cream cheese, brown sugar, and peanut butter. Add the egg and milk and beat until smooth.
- Assemble the Pie: Pour the cheesecake filling over the chilled cookie dough in the pie pan.
- Bake: Bake at 350°F for 30-35 minutes, until the cheesecake is set and the cookie crust is golden brown.
- Cool and Chill: Let the pie cool for 30 minutes before refrigerating for at least 2 hours.
- Prepare the Icing: Beat together butter and peanut butter. Slowly add powdered sugar, and then add water or milk to achieve the desired consistency.
- Decorate the Pie: Drizzle the peanut butter icing over the cooled pie and add optional chocolate sauce if desired. Slice and serve!
Conclusion
Monster Cookie Cheesecake Pie is the perfect dessert for anyone who loves a rich, indulgent treat. Whether you’re serving it for a family dinner, bringing it to a potluck, or just craving something sweet to enjoy with a cup of coffee, this dessert is sure to impress. The combination of chewy cookie crust, creamy cheesecake filling, and peanut butter icing is truly irresistible. Make it once, and it’ll become a staple in your dessert repertoire!
This recipe is easy to make, full of flavor, and just the right amount of decadence. Don’t forget to share it with friends and family—just be ready for requests to make it again and again!