Coconut Celebration Cake
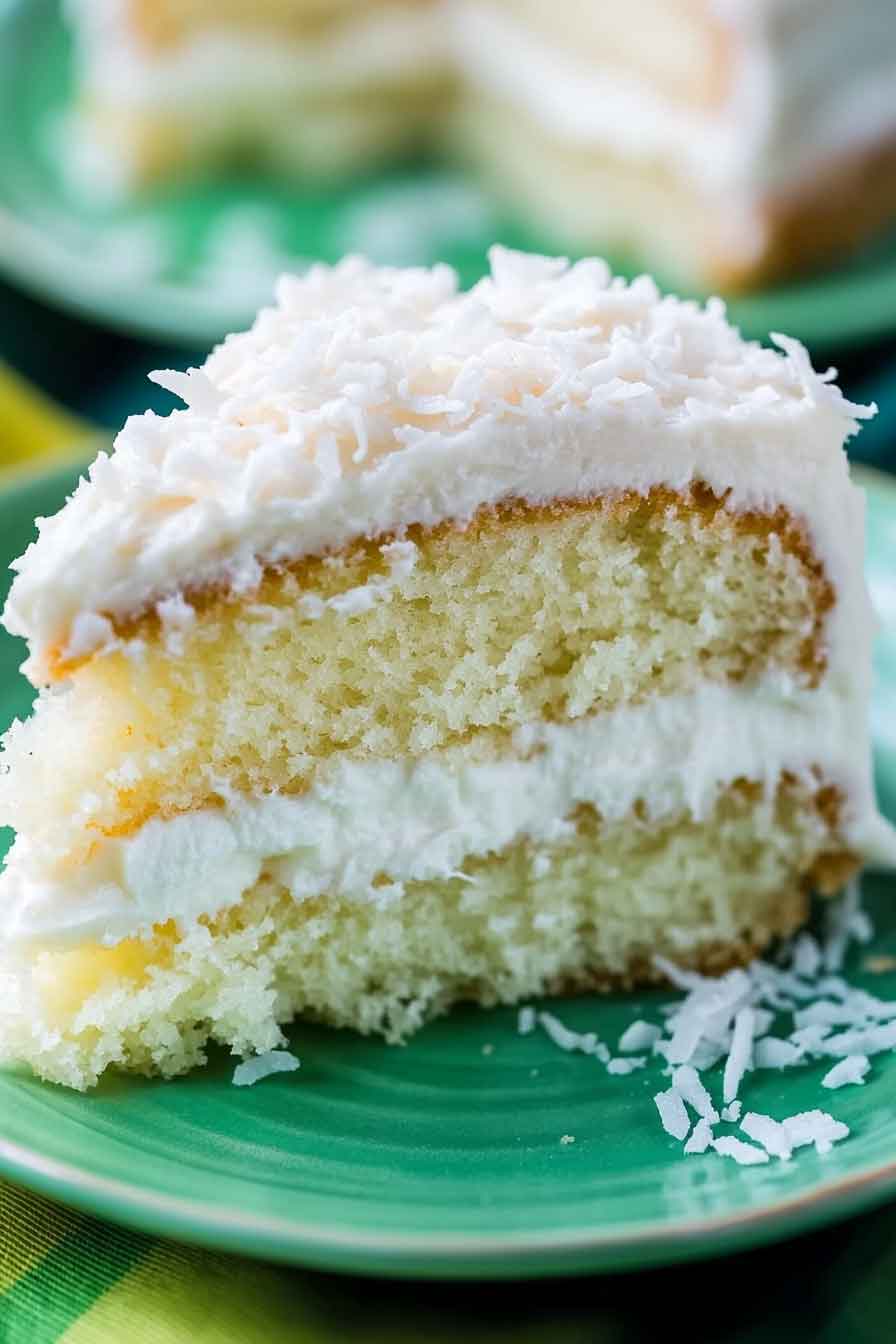
The first time I made this Coconut Celebration Cake, the sweet smell of coconut filled the room. It felt so festive and warm. I couldn’t wait to cut into it.
When I took a bite, it was soft, creamy, and full of coconut flavor. Every slice tasted like a party on its own. I just kept going back for more.
If you want a cake that feels special for birthdays, holidays, or any little win, this one is perfect. Let’s make it together and celebrate with every bite.
Why You’ll Love This Coconut Celebration Cake Recipe
- Reader Favorite: This cake has become a go-to for many readers who are looking for something both festive and mouthwatering. With the perfect balance of sweet, creamy, and tropical coconut flavors, it’s been described as “the best cake I’ve ever made.”
- Moist and Fluffy: The coconut cake base is light and airy, while the filling and frosting add a rich, indulgent touch that complements the cake perfectly.
- Perfect for Special Occasions: Whether you’re celebrating a milestone birthday or a holiday, this cake adds elegance and excitement to any event.
- Make-Ahead Friendly: You can prepare the cake layers and frosting ahead of time, making it easy to assemble when you’re ready to serve.
- Aesthetic Appeal: The coconut cake’s snowy-white exterior and textured coconut topping make it look as beautiful as it tastes. It’s sure to wow your guests and make them reach for seconds.
Required Kitchen Tools for Coconut Celebration Cake
Before we get started, here’s a list of the essential tools you’ll need to make the Coconut Celebration Cake:
- Mixing Bowls: To combine the ingredients for the cake batter and frosting.
- Hand or Stand Mixer: For beating the cake batter and frosting until light and fluffy.
- Measuring Cups & Spoons: To accurately measure all your ingredients.
- Cake Pans: I recommend using two 9-inch round cake pans for this recipe.
- Cooling Rack: To cool the cake layers before frosting.
- Spatula: For spreading frosting and smoothing the top.
- Whisk: For mixing the dry ingredients and for making the whipped cream.
- Parchment Paper: To prevent the cakes from sticking to the pans.
- Electric Mixer or Whisk: To ensure your whipped cream is light and fluffy.

Ingredients
Here’s what you’ll need to create this coconut-filled masterpiece. All ingredients listed below are key to giving you the perfect flavor and texture in the cake and frosting.
For the Cake Base:
- 3 cups White Lily® Enriched Bleached All-Purpose Flour: This flour gives the cake a tender, light texture.
- 2 teaspoons baking powder: Helps the cake rise, giving it a fluffy, airy consistency.
- 1 cup butter, softened: Butter adds richness and flavor to the cake.
- 2 cups sugar: Sweetens the cake and helps create a moist crumb.
- 4 large eggs: Eggs provide structure and moisture to the cake.
- 1 cup whole milk: Moisturizes the batter, making it smooth and easy to work with.
- 1 teaspoon vanilla extract: A classic flavor that complements the coconut perfectly.
For the Filling and Frosting:
- 1 1/2 cups sugar: Sweetens the frosting while balancing the coconut’s natural flavor.
- 1 cup sour cream: Adds creaminess and a slight tang to the frosting, creating a beautiful texture.
- 1 (14-ounce) package sweetened shredded coconut: This gives the cake its signature coconut flavor and a lovely texture.
- 3/4 cup heavy cream, whipped: Whipped cream lightens up the frosting and adds fluffiness.
Variations for Coconut Celebration Cake
This cake is versatile, and you can customize it to suit different tastes and occasions:
- Add Pineapple: Incorporate crushed pineapple into the cake layers or frosting for a tropical twist.
- Swap Sour Cream for Cream Cheese: For a tangier, richer frosting, try replacing sour cream with cream cheese.
- Make it Dairy-Free: Use non-dairy milk and dairy-free butter to make the cake vegan-friendly without sacrificing flavor.
- Add a Rum Flavor: Add a tablespoon of dark rum to the cake batter for an extra kick of tropical flavor.
- Fill with Coconut Custard: For an added layer of decadence, use coconut custard as a filling between the cake layers.
Step-by-Step Instructions for Coconut Celebration Cake
Step 1: Preheat the Oven and Prepare the Cake Pans
First, preheat your oven to 350°F (175°C). Grease two 9-inch round cake pans with butter and line the bottoms with parchment paper. This ensures that the cakes come out easily without sticking.
Step 2: Mix the Dry Ingredients
In a medium bowl, whisk together the flour and baking powder. Set aside.
Step 3: Cream the Butter and Sugar
In a large mixing bowl, use an electric mixer to beat the softened butter and sugar together on medium speed until the mixture is light and fluffy. This should take about 3-4 minutes. The key here is to incorporate air into the mixture to create a tender cake.
Step 4: Add the Eggs and Vanilla
Beat in the eggs, one at a time, ensuring each is fully incorporated before adding the next. Add the vanilla extract and mix to combine.
Step 5: Alternate Adding the Dry Ingredients and Milk
Slowly add the flour mixture in 3 parts, alternating with the whole milk, starting and ending with the flour mixture. Mix on low speed to avoid overworking the batter, which can result in a dense cake. Stop once the ingredients are just combined—be careful not to overmix.
Step 6: Bake the Cake Layers
Divide the batter evenly between the two prepared cake pans. Smooth the tops with a spatula to ensure they bake evenly. Place the pans in the oven and bake for 30-35 minutes, or until a toothpick inserted into the center comes out clean. Once done, remove the cakes from the oven and let them cool in the pans for 10 minutes. Then, transfer them to a wire rack to cool completely.
Step 7: Make the Whipped Cream Frosting
While the cake is cooling, prepare the frosting. In a medium bowl, beat the heavy cream with an electric mixer on high speed until soft peaks form. Be careful not to overwhip, as this will cause the cream to separate. Set aside.
Step 8: Prepare the Coconut Frosting Base
In another bowl, mix the sour cream and sugar until smooth. Gently fold in the shredded coconut. Then, carefully fold in the whipped cream. The result will be a light and fluffy coconut frosting with a creamy texture.
Step 9: Frost the Cake
Once the cake layers have cooled completely, place one layer on your serving platter. Spread a generous amount of frosting over the top. Add the second layer and cover the entire cake with the coconut frosting, smoothing it with a spatula.
Step 10: Add the Final Coconut Touch
To finish, sprinkle the top and sides of the cake with the remaining shredded coconut. Press gently to help it stick, creating a snow-like effect on the outside of the cake.
How to Serve Coconut Celebration Cake
This cake is perfect for any celebration, but here are some ideas for how to serve it:
- For a Special Occasion: Serve it as the centerpiece of a birthday party, holiday gathering, or wedding celebration.
- With Tropical Drinks: Pair it with tropical beverages like piña coladas, coconut water, or fresh fruit juices to complement the coconut flavor.
- On a Dessert Table: Include this cake alongside other tropical-inspired desserts like mango sorbet or lime tarts for a cohesive, exotic-themed spread.
- With Fresh Fruit: Serve slices of this cake with a side of fresh fruit, like mangoes, pineapples, or berries, to add a refreshing contrast to the richness of the cake.
Storing Coconut Celebration Cake
- Unfrosted Cake Layers: You can store the unfrosted cake layers in an airtight container at room temperature for up to 2 days or freeze them for up to 3 months.
- Frosted Cake: Once frosted, store the cake in the refrigerator in an airtight container. It will keep for up to 5 days. Let it come to room temperature before serving for the best flavor and texture.
- Freezing the Whole Cake: If you want to prepare this cake ahead of time, you can freeze the fully frosted cake. Wrap it tightly in plastic wrap and aluminum foil, and freeze for up to 1 month. Thaw it overnight in the fridge before serving.
Nutrition Information (per serving)
| Nutrient | Amount per Serving |
|---|---|
| Calories | 430 |
| Total Fat | 26g |
| Saturated Fat | 18g |
| Cholesterol | 75mg |
| Sodium | 150mg |
| Total Carbohydrates | 50g |
| Dietary Fiber | 2g |
| Sugars | 38g |
| Protein | 4g |
(Note: Nutritional values are approximate and may vary depending on ingredients used.)
Conclusion:
This Coconut Celebration Cake is more than just a dessert—it’s an experience. Whether you’re hosting a big event or simply indulging in a sweet treat, it’s a showstopper that brings joy with every bite. From the tender, fluffy cake layers to the creamy coconut frosting, this cake is a true celebration of tropical flavors. Try it for your next special occasion, and you’ll see why it’s quickly becoming a fan favorite!

Coconut Celebration Cake
Course: Uncategorized12
servings30
minutes30
minutes430
kcalIngredients
- For the Cake Base:
3 cups White Lily® Enriched Bleached All-Purpose Flour
2 teaspoons baking powder
1 cup butter, softened
2 cups sugar
4 large eggs
1 cup whole milk
1 teaspoon vanilla extract
- For the Filling and Frosting:
1 1/2 cups sugar
1 cup sour cream
1 (14-ounce) package sweetened shredded coconut
3/4 cup heavy cream, whipped
Directions
- Preheat the oven to 350°F and prepare two 9-inch cake pans.
- Mix the dry ingredients.
- Cream the butter and sugar until light and fluffy.
- Add the eggs and vanilla extract.
- Alternate adding dry ingredients and milk.
- Bake for 30-35 minutes.
- Whip the heavy cream for frosting.
- Combine sour cream, sugar, and shredded coconut for frosting.
- Frost the cooled cake with the coconut frosting.
- Sprinkle shredded coconut on top and sides of the cake.
- Serve and enjoy!
Coconut Celebration Cake FAQs
Can I make this cake ahead of time?
Yes, this cake can be made ahead of time! You can prepare the cake layers a day or two in advance, and then frost and assemble the cake when you’re ready to serve.
Can I make this cake gluten-free?
Yes, you can substitute the all-purpose flour with a gluten-free flour blend. Just be sure to check the rest of your ingredients for gluten content, particularly in the shredded coconut and sour cream.
How do I make the frosting thicker?
If you find that the frosting is too runny, add more shredded coconut to thicken it up. You can also add a bit more whipped cream to adjust the consistency to your liking.