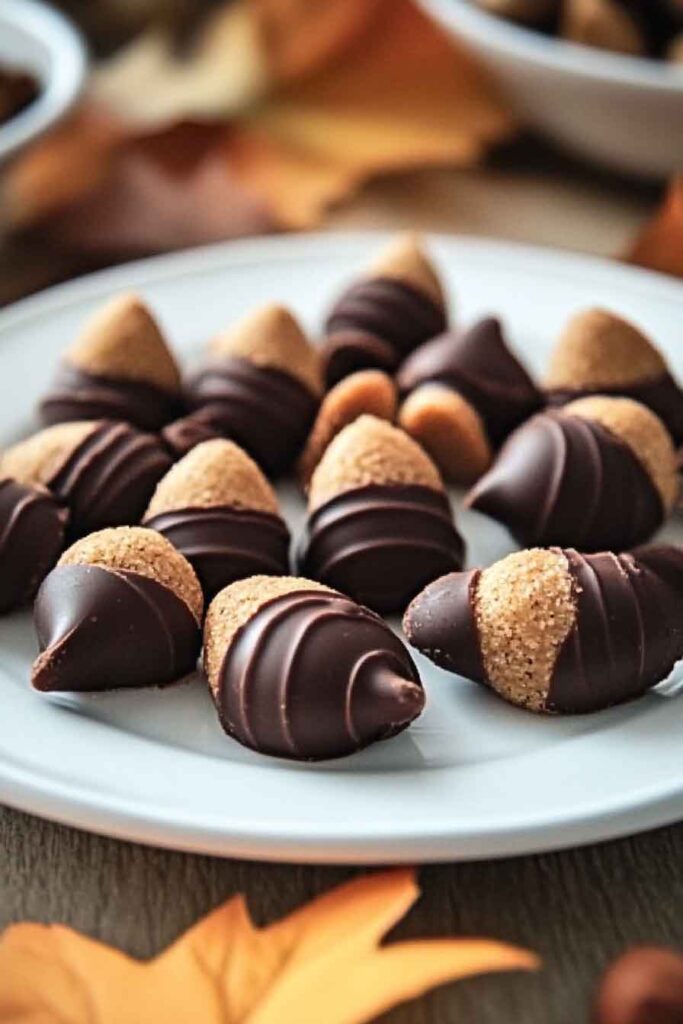
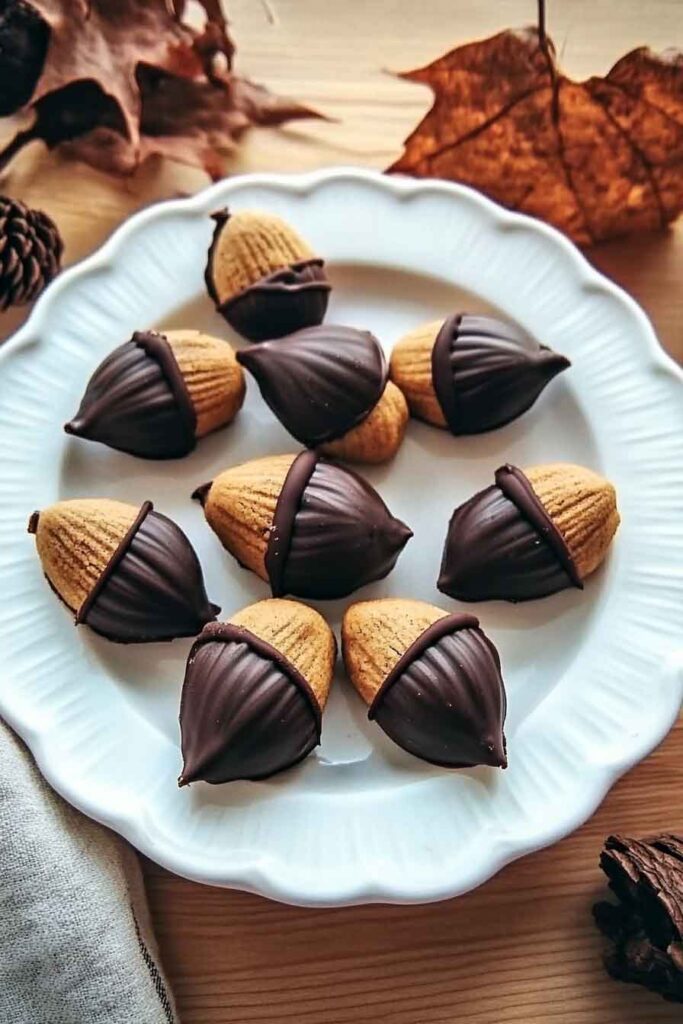
Chocolate Acorn Treats

The first time I made these Chocolate Acorn Treats, I couldn’t stop smiling. They’re tiny, cute, and taste like a mix of chocolate and peanut butter heaven. Just seeing them on the plate makes everyone go “aww.”
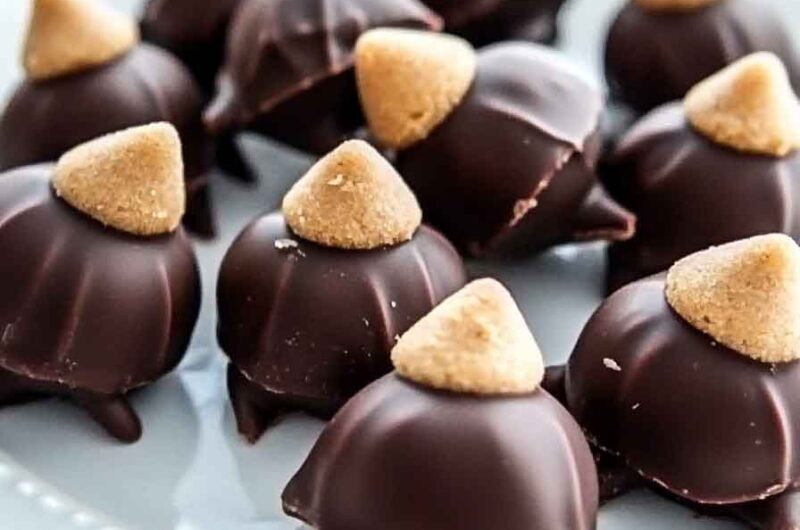
They’ve got a sweet chocolate base, a little crunch, and that smooth kiss of peanut butter on top. Each one looks like a tiny acorn from a storybook. And honestly, they’re as fun to make as they are to eat.
I love making these for fall parties or cozy weekends. They’re simple, no-bake, and always a hit with kids and grown-ups alike. You’ll want to make a big batch because they disappear fast.
So let’s make these adorable treats together. It takes just minutes, but the smiles last all day. Once you try them, they’ll be your new go-to fall snack.

Why You’ll Love This Recipe
- Reader Favorite: Everyone who tries these Chocolate Acorn Treats loves them! The combination of chocolate, peanut butter, and crunchy wafer cookies is unbeatable.
- Fun and Creative: These treats are shaped like acorns, making them a fun and creative project to do with kids or on your own.
- Quick to Make: You can create these in no time with just a few simple steps.
- Perfect for Any Occasion: Whether it’s for a cozy fall evening or a themed party, these chocolate acorns are sure to impress your guests.
- Minimal Ingredients: With just a few pantry staples, you can make a batch of these tasty treats.
Required Kitchen Tools
Before we dive into the recipe, make sure you have the following kitchen tools ready to go:
- Microwave-safe bowls: You’ll need these for melting the chocolate and peanut butter chips.
- Toothpicks or small brushes: For applying the melted chocolate to the mini Nilla wafers.
- Spatula: To help with mixing and moving the wafers and chocolate.
- Plate or tray: For setting the treats as they cool and harden.
Ingredients
Here’s what you need to gather for the acorn treats:
- Hershey’s Kisses (unwrapped): These will be the “top” of your acorn.
- Mini Nilla Wafers: These are the “bottoms” of the acorns, providing the crispy, crunchy base.
- Semi-Sweet Chocolate Chips: These are for dipping and coating the acorns, giving them that rich, melty chocolate layer.
- Peanut Butter Chips (optional): These can be used for a creamy peanut butter flavor and to decorate the acorns.
- Sprinkles (optional): If you want to make them look extra festive, sprinkle some colored sugar or fall-themed sprinkles on top!
Variations for Chocolate Acorn Treats
- Peanut Butter Substitution: If you’re not a fan of peanut butter, you can swap the peanut butter chips with caramel chips or even butterscotch chips for a different flavor twist.
- Add Nuts: For extra texture, add finely chopped nuts to the chocolate coating or sprinkle them over the treats.
- Use White Chocolate: If you love white chocolate, you can replace the semi-sweet chocolate chips with white chocolate chips for a sweeter flavor.
- Make Them More Festive: Use colorful sprinkles or small candy eyes to turn these treats into little characters for Halloween or any festive event!

Step-by-Step Instructions
1. Prepare Your Ingredients
Start by gathering all your ingredients and tools. Unwrap your Hershey’s Kisses and set them aside. If you’re using peanut butter chips, have those ready too. This is a quick treat, so having everything prepped beforehand makes the process smoother.
2. Melt the Chocolate
In a microwave-safe bowl, place your semi-sweet chocolate chips. Microwave them in 20-second intervals, stirring in between, until the chocolate is completely melted and smooth. If you’re adding peanut butter chips, melt them in a separate bowl in the same way. If you prefer, you can also melt the chocolate and peanut butter chips in a double boiler on the stovetop.
3. Assemble the Acorns
Take a mini Nilla wafer and dip the bottom in the melted chocolate. This will serve as the base of the acorn. Place it on a plate or tray to set the base down.
4. Attach the Hershey’s Kiss
Next, take a Hershey’s Kiss and dip the bottom into the melted chocolate. Place it on top of the Nilla wafer so that the Kiss looks like the top of the acorn. Press gently to make sure the two pieces adhere together.
5. Decorate the Acorn
For added decoration, you can drizzle the melted peanut butter chips over the top or dip a small brush into the peanut butter and paint it on. You can also use sprinkles to add a fun touch to the acorn cap or even dust the treats with a little cocoa powder for extra visual flair.
6. Let the Chocolate Hardens
Once you’ve assembled all the acorns, set them on a tray or plate and place them in the refrigerator for about 10-15 minutes to allow the chocolate to set. This step is essential to ensure your treats hold their shape.
7. Serve and Enjoy!
Once the chocolate has hardened, your Chocolate Acorn Treats are ready to be served! You can arrange them on a plate or give them away in little treat bags for a cute homemade gift.
Serving and Decoration
How to Serve Chocolate Acorn Treats
These Chocolate Acorn Treats are perfect for any event, and their cute shape makes them an ideal choice for autumn-themed parties or holiday gatherings. You can serve them as:
- A Fall Snack: Perfect for munching on during cozy evenings, watching movies, or while enjoying your favorite fall drinks.
- Party Favors: Wrap them in clear cellophane bags tied with a ribbon to create personalized party favors for your guests.
- Sweet Dessert Table Addition: Place them on a dessert table at your next celebration. These acorn-shaped treats will be a conversation starter!
- Gifts: These treats make great gifts for neighbors, teachers, or anyone who loves cute and delicious homemade treats.
Storing Chocolate Acorn Treats
- Room Temperature: Store these treats in an airtight container at room temperature for up to 5 days. They will stay fresh and tasty without the need for refrigeration.
- In the Refrigerator: If you prefer your treats to stay firm and last longer, you can store them in the fridge for up to a week.
- Freezing: You can freeze Chocolate Acorn Treats for up to 3 months. Make sure they’re placed in an airtight container or freezer bag to prevent freezer burn.
Nutrition with Table Format
While Chocolate Acorn Treats are certainly indulgent, they are great for sharing and enjoying in moderation. Here’s an estimated nutritional breakdown for one treat:
| Nutrient | Amount per Serving (1 Treat) |
|---|---|
| Calories | 110 kcal |
| Total Fat | 6g |
| Saturated Fat | 3g |
| Carbohydrates | 15g |
| Sugars | 10g |
| Protein | 1g |
| Fiber | 0g |
Please note that the values may vary depending on specific ingredients used.
Conclusion
Chocolate Acorn Treats are an easy-to-make, fun, and delicious snack that everyone will love. With minimal ingredients and a quick preparation process, you can create these adorable treats in no time. Whether you’re making them for a fall-themed gathering, as a homemade gift, or just for yourself, they are sure to be a hit. So, gather your ingredients, have fun decorating, and enjoy every chocolatey, peanut buttery bite!
Chocolate Acorn Treats
Course: Uncategorized12-15
treats15
minutes110
kcalIngredients
1 bag of Hershey’s Kisses, unwrapped
1 bag of mini Nilla wafers
1/2 cup semi-sweet chocolate chips
1/4 cup peanut butter chips (optional)
Sprinkles (optional, for decoration)
Directions
- Prepare Ingredients: Unwrap the Hershey’s Kisses and set them aside. Melt the chocolate and peanut butter chips in separate microwave-safe bowls.
- Assemble Acorns: Dip the bottom of a Nilla wafer in the melted chocolate and place it on a tray. Next, dip the bottom of a Hershey’s Kiss and place it on top of the wafer.
- Decorate: Drizzle melted peanut butter over the top or add sprinkles for decoration.
- Set: Allow the chocolate to harden by placing the tray in the fridge for 10-15 minutes.
- Serve and Enjoy: Once the chocolate has set, serve the treats or store them in an airtight container.